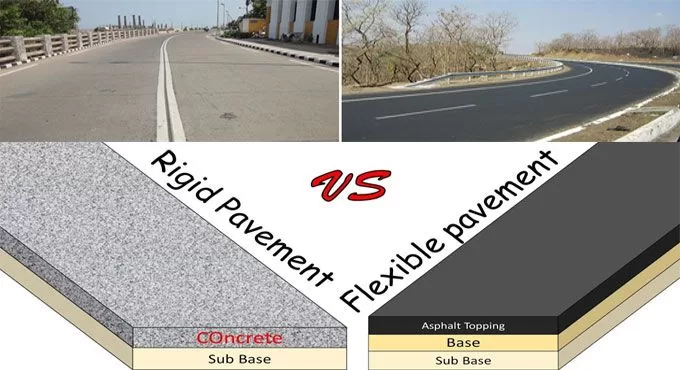
Flexible and rigid pavements are the two most common types of roadways constructed for transportation purposes. Flexible and rigid pavements both of these types of pavements are designed for specific and needful purposes. Each one of them has their own advantages and disadvantages.
In this article, we will explore the major differences that can be found between flexible and rigid pavements
Flexible Pavements
Flexible pavement is the most common type of pavement used for roadways and highways.
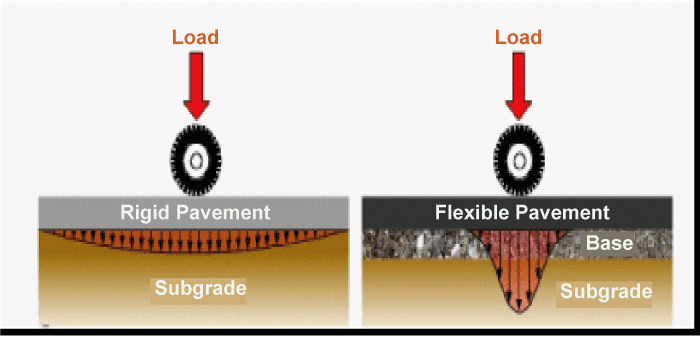
As the name suggests, these pavements are flexible in nature and can bend and deform under the weight of traffic found on a regular basis.
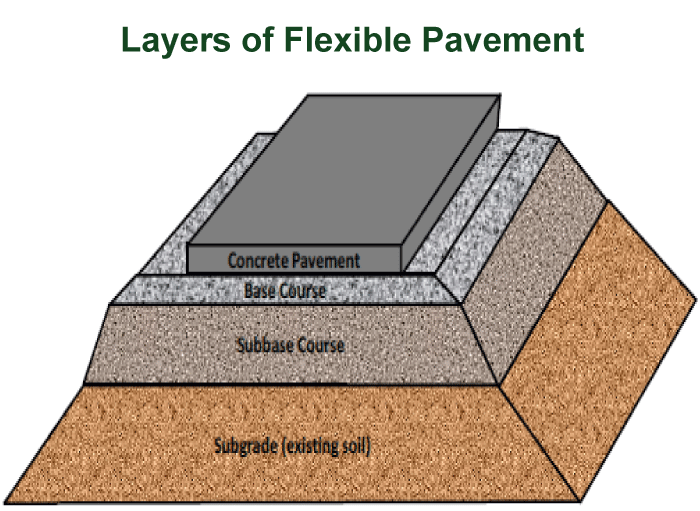
They are made up of several material layers, including the surface layer, base layer, sub-base layer, and sub-grade. Each layer is designed to provide a specific purpose and performs a specific function. And the overall pavement structure is designed to distribute the traffic load evenly across the layers to prevent any deconstruction.
Different Layers Used in The Flexible Pavement
- Number one is the surface layer. The surface layer of a flexible pavement is usually made up of concrete. It is designed to provide a smooth riding surface for every vehicle, whether it is a light or heavy vehicle.
- The second layer is the base layer, typically made up of crushed stone or gravel; this is specifically designed to provide support and stability to the surface layer.
- The third layer is the sub-base layer. This layer is typically made up of compacted soil or gravel and is designed to provide additional support to the base layer.
- The fourth layer is the sub grade layer, which is made up of natural soil or raw, and the pavement is built above this layer.
Advantages of Flexible Pavements
One of the major advantages of flexible pavement is that they are relatively easy and are budget friendly to construct.
- Flexible pavements can be built quickly and do not require a lot of heavy pieces of equipment.
- They also have a higher degree of flexibility, making them stand temperature changes and minor ground movements without breaking.
Disadvantages of Flexible Pavements
Flexible pavements have certain disadvantages as well, and among them are-
Flexible pavement is less durable than rigid pavement and requires more maintenance.
They usually tend to deteriorate more quickly in areas with heavy traffic or harsh weather conditions.
Rigid Pavements
Reject pavement is usually made up of a single layer of concrete that is designed specifically to provide a strong and rigid service for vehicles so that they can have a smooth journey. They support each and every type of vehicle, either it be a light one or a heavy one.
Rigid pavements are usually used for high-traffic areas like airports, industrial parks, and interstates. Rigid pavements are specifically designed to distribute a load of traffic across the entire surface of the pavement, which eventually leads to reducing the stress on individual section of the pavement.
Advantages Of Rigid Pavements
One of the major advantages that we can figure out in rigid pavements is that they are very durable, can last for a long time, and does not require much maintenance.
Rigid pavements can be seen as a very strong construction method, and can easily support heavy loads without deforming or leading to any deconstruction.
In addition to the advantages mentioned above, we can also see one of the major advantages that rigid pavements serve, which is that they are resistant to damage from temperature changes, moisture, and chemicals and stay strong even in the harsh weather conditions.
Disadvantages Of Rigid Pavements
We can see that rigid pavements are more expensive and time-consuming to construct than flexible pavements, requiring specialized equipment and well-knowledgeable labor.
Rigid pavement is less flexible as compared to the flexible pavement and can be prone to cracking in areas that have significant ground movement.
Factors To Consider While Choosing Flexible Pavements or Rigid Pavements
Whenever someone wants to construct a road highway or the airport runways, there are only 2 types of pavements available that are rigid and flexible pavements. Both types of pavements have their own advantages and disadvantages, and the decision to choose one over the other completely depends on the various factors that we will discuss further.
First, let us talk about who should go for flexible pavement.
Flexible pavement comprises multiple layers of aggregate material that can adjust to traffic movement. The soil present below this type of pavement is better-suitable for areas with low to moderate traffic volumes and areas with fluctuating temperatures.
Flexible pavement is also a cost-effective method, and the best solution for short to medium-length roads, driveways, and parking lots.
Here are some factors that will help you determine that whether you should go for flexible pavement or not for your project
1. Low To Moderate Traffic Volume
If your roadway or driveway does not experience high-level of traffic, then you should definitely go for flexible pavement. The primary reason behind this is that the asphalt surface can easily accommodate the weight of the vehicle and adjust to choose changes in the soil and temperature.
Additionally, the construction cost of flexible pavement is quite less as compared to rigid pavement, which makes it more cost-effective for constructors or architectures that have to go for smaller projects
2. Varied Weather Conditions
Flexible pavement is a better option for areas that experience fluctuate fluctuating temperatures and often have different weather conditions. The key reason behind this is the asphalt layer can expand and contract with temperature, which helps to prevent cracks and deconstruction. This is especially important in areas that face harsh winters with temperature swings that can cause significant damage to the rigid pavement
3. The Type of Soil
Flexible pavements are the best option for those areas that have less stable soil. The reason behind this is that the flexible pavement design allows the soil to move and adjust, reducing the risk of any cracks. This can be especially important in areas that have expansive soils, which can cause significant damage to the rigid pavements.
Now let us talk about Rigid Pavements
Rigid pavement is made up of a concrete slab that is reinforced with steel or other materials, that completely depends upon the requirement. Rigid pavement is better suited for areas that experience heavy traffic volumes and have a consistent weather condition. It is more durable and long lasting as compared to flexible pavement, which makes it a good option for high-traffic areas like airports, and highways.
Here are some factors that can help you determine if rigid pavement is the right choice for your project or you should consider another method of pavement
1. Heavy Traffic Volume
If you have a knowledge about the traffic that your area might face, if your road or highway experience heavy traffic volume, rigid pavement option is the best choice for you. The main reason behind this is that the concrete surface can withstand the weight of a heavy vehicle without leading to any breakage or cracks. Secondly, the smooth surface of the concrete provides a comfortable ride for drivers and reduces the risk of vehicle being teared.
2. Consistent Weather Conditions
Rigid pavement is a better option for areas that have consistent weather conditions, like areas with stable climate or those with limited temperature swings. The sole reason behind this is that the concrete that is used to make the rigid pavement is more suspect-able to damage that is caused by temperature changes
3. Longevity
It has been seen that rigid pavement is more durable and long-lasting as compared to flexible pavement. This is because the concrete slab can withstand heavy traffic volumes and does not require much maintenance. Because of this, it is a good option for areas that require long-lasting pavement solutions, such as airports, ports, and highways.
Overall, we can say that the decision to choose flexible or rigid pavement completely depends upon the requirement of the client and also on the factors like traffic volume, weather conditions, soil type, and length of the project. For smaller projects that have low to moderate traffic volumes fluctuating temperatures, and an unsuitable soil for these the flexible pavement is the best option.
Whereas for larger projects with heavy traffic volumes, consistent weather conditions, and the need for durability and longevity, rigid pavement option is the best option. Ultimately, the choice between flexible and rigid pavement will depend on the specific needs of your project. It is important to consider your budget and other conditions as well while going for rigid or flexible pavement
| Criteria | Flexible pavement | Rigid pavement |
|---|---|---|
| Material used | Flexible pavements are made up of asphalt and aggregate materials. | Rigid pavements are made up of concrete that is in forced with steel or other hard material. |
| Traffic volume | Flexible payment are best suited for areas That have low to moderate traffic volume. | Rigid pavement are best suited for areas that have heavy traffic volume. |
| Weather conditions | Flexible pavement are best suited for areas that have varied weather conditions or face fluctuating temperatures. | Rigid pavements are better suited for areas that have consistent weather conditions. |
| Soil type | Flexible pavement can last long on less stable soil. | Rigid pavements can last long on in stables soil. |
| Durability | Flexible pavement are less durable and require more maintenance. | Rigid payment are more durable and required less maintenance. |
| Construction cost | Construction cost Flexible pavement have lower initial construction cost. | Rigid pavement have higher initial construction cost. |
| Longevity | Flexible pavement have shorter life span | Rigid pavement have a good longer life span. |
| Comfort | Flexible pavement is known for providing a comfortable right for the drivers. | Rigid pavement provides a comfortable right for the drivers. |
| Smoothness | Flexible pavement have a lighter suffer surface. | Rigid pavement have a smooth surface. |
| Expansion and contraction | Flexible pavement can adjust to the changes in the temperature and soil movement. | Rigid pavement or less flexible and more suspect-able to damage from temperature changes. |
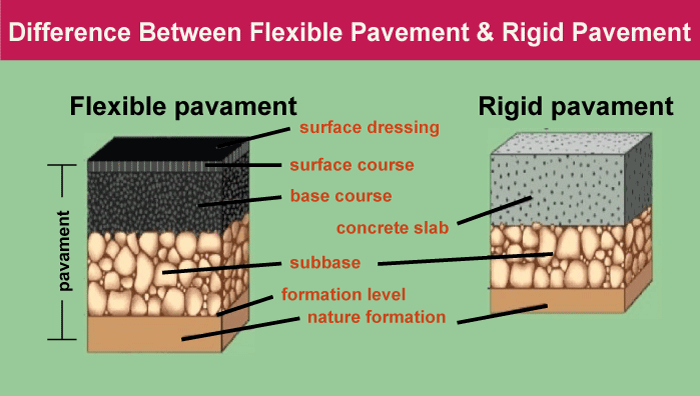
Difference Between Flexible and Rigid Pavements
1. Material Used
In case of flexible pavements, they are composed of layers of asphalt and aggregate materials. This design allows the pavement to adjust to the movement of traffic and changes in the underlying soil full on the other hand, rigid pavement consists of a concrete slab that is reinforced with steel or other strong materials. This design provides a more durable surface that is less suspectable to cracks or any other form of deconstruction.
2. Traffic Volume
One of the vital factor that you have to consider while deciding between flexible pavement and rigid pavement is the traffic volume flexible pavement are well suited for areas that have low to moderate traffic volumes.
The key reason behind this is that the material that is used to make the flexible pavement that is asphalt, this surface can accommodate the weight of vehicles and adjust to changes in the soil and in the temperature as well.
On the other hand, in rigid pavement, the construction is made up of concrete surface, which is eventually better suited for areas that have heavy traffic volume. The main reason behind this is that the concrete surface can withstand the weight of heavy vehicles without leading to any cracks or any other form of deconstruction
3. Weather Conditions
Another major factor that you have to consider while choosing between flexible and rigid pavement is the weather. In case of flexible pavements, they are better suited for areas that face fluctuating temperatures and have vulnerable changing weather conditions.
The reason behind this is that the asphalt layer can expand and contract with the changing weather conditions, which eventually helps to prevent cracks or any other form of deconstruction. This is vital in areas with harsh winters with temperature swings that can cause a sufficient amount of damage.
On the other hand, rigid pavements are better suited for areas with consistent weather conditions, such as areas with stable climate or those with limited temperature swings, for example, Bengaluru. This is because concrete is less flexible than asphalt and is more suspectable to damage from temperature changes
4. Soil Type
Another major factor that you have to consider while choosing between flexible and rigid pavement is the type of soil that is present in the area. Flexible pavements are better suited for areas that have less stable soil.
The reason behind this is that the flexible design of the pavement allows the soil to move and adjust according to the traffic, which eventually reduces the risk of damage or cracking. This can be especially important in areas that have expansive soils, which can cause significant damage to rigid pavements.
5. Durability
Durability is another important consideration that you have to look while you are selecting between flexible and rigid pavements. Rigid pavements are generally more durable and long lasting as comparative to flexible pavements, and the reason behind this is the concrete slab that can withstand heavy traffic volumes and does not require much maintenance.
On the other hand, flexible pavements require maintenance and have a shorter lifespan. This makes them a good option for smaller projects that have low traffic volumes and shorter life spans.
6. Construction Cost
Construction cost is one of the major factors that you have to look at while selecting between flexible and rigid pavements, but you also have to consider the purpose of your project.
Generally, flexible pavements are less expensive to construct than rigid pavements, and the reason behind this is that the material used to make the flexible pavement is less expensive than the material used to make rigid pavement. Secondly, flexible pavements are easier to install, which can also reduce labor costs.
However, it is vital to note that the long-term cost of ownership for rigid pavements is often lower due to their long-lasting life span.
7. Longevity
The life span of a pavement is an important consideration when you are deciding between flexible and rigid pavements. Rigid pavements generally have a longer life span compared to flexible pavements. The reason behind this is the concrete slab that can withstand heavy traffic volumes and does not require as much maintenance as flexible pavements. Secondly, it is important to note that digit pavements can be more easily repaired as compared to flexible pavements, which can extend their life span even further.
8. Comfort
The comfort of drivers and passengers is one of the most vital factors you must consider while selecting between flexible and rigid pavements; as usual, pavements generally provide a smoother, more comfortable ride compared to flexible pavements, the drivers prefer to go for rigid pavements. The sole reason behind the smoothness of rigid pavements is the concrete surface that leads to smoother and less prone to bumps and dips areas.
Conclusion
To summarize the above discussion of differences between flexible and rigid pavements, the decision to choose between the 2 is only sometimes straightforward and requires careful consideration of various factors. The choice of a pavement depends on various factors, including traffic volume, weather conditions, soil type, durability, construction cost, and longevity. Both types of payments offer different types of benefits and have unique characteristics that make them well-suited for specific conditions and projects.
To compose our discussion on flexible pavements, they are made up of asphalt and aggregate materials, making them well-suited for areas with low to moderate traffic volumes. They can adjust to the movement of traffic and changes in the underlining soil, making them an ideal choice for areas with less stable soil. Secondly, they are better suited to fluctuating temperatures and changing weather conditions, making them an overwhelming choice for areas with harsh winters.
On the other hand, rigid payment is made from concrete slabs reinforced with steel or other hard materials, making them a better choice for areas that face heavy traffic volumes and have consistent weather conditions. Rigid pavements have been seen that they are more durable and have a long life span as compared to flexible pavements. Secondly, they can provide passengers and drivers with a smoother and more comfortable ride.
Overall, the choice between flexible and rigid pavement is not a one size fits all solution. Each project must be evaluated individually, considering the unique needs and requirements of the area. It is crucial to thoroughly understand the benefits and drawbacks of both types of payments. The project holder needs to make an informed decision to avoid any circumstances.
If you want to go for construction, it is essential to work with a qualified pavement contractor with extensive experience in both types of pavement. Through a well-educated contractor, you can get health to evaluate the specific needs of a project. They will also recommend the most appropriate type of pavement that will make your project last long.
]]>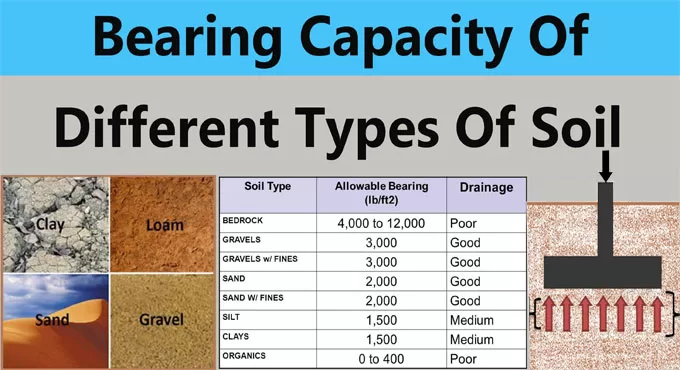
It is extremely important to figure out the safe bearing capacity of the soil at the construction site. If this is not done properly, the structure may settle, and the building may get damaged, or even collapse. For this reason, we perform various tests to find out the safe bearing capacity of the soil. Today, let us see how we can do this.
The safe bearing capacity of soil is defined as the maximum load per unit area that the soil can bear without any displacement or settlement. This is measured in terms of kilograms per square centimeter. If the load exceeds this mark, the soil will start to displace or break. This will lead to structure settlement, which can end up in destructive results.
Formula:
Safe bearing capacity of soil = (ultimate bearing capacity)/(Cross-section area x Factor of safety)
Explanation: The ultimate bearing capacity of the soil is the point at which the soil starts to displace under load.
Any soil can take up to a certain amount of load only, after which it starts to settle or displace.
The cross-section area is the area of soil on site on which the tests are being performed. It can be a square meter in general practice.
The factor of safety indicates how safe the soil capacity results must be before considering a certain type of construction. Naturally, it depends upon the type of building being constructed. It is kept at 2 for general civil constructions and 3 for high-rise or heavy constructions.
Testing Procedures for Soil Bearing Capacity: There are quite a few methods to determine the bearing capacity of the soil at the construction site. Among them, the Drop Weight Method is the easiest and it is a tried and tested true test.
How to perform the Drop Weight Test:
1. Dig up a pit down to the foundation depth.
2. Find a heavy perfectly cube-shaped object. Stone blocks work best. Measure its precise weight.
3. Lift the cube up to a predetermined height directly over the pit. This must be precise as well.
4. Drop the cube in the pit, and then carefully lift it out without disturbing the impression made by the block.
5. Measure the depth of the impression made by the block.
6. Repeat the above process several times and take the average value.
Example:
Weight of the block: 1.2 kg
Height of drop: 120cm
Depth of impression: 1.6cm
Cross section: 20 sq.cm.
Factor of safety: 2
Therefore, ultimate bearing capacity = (1.2 x 120)/1.6 = 90
And, safe bearing capacity of soil = 90/(20 x 2) = 2.25 kg/cm2.
Safe Bearing Capacity (SBC) values for different types soils: These values represent probabilities only. You can use the data below for making a preliminary design and estimation. However, you still have to carry out the actual tests at site to know the real value and adjust the design accordingly.
Soft, wet or muddy clay: 0.5 kg/cm2
Black cotton soil: 1.5 kg/cm2
Loose gravel: 2.5 kg/cm2
Compacted clay: 4.5 kg/cm2
Soft rocks: 4.5 kg/cm2
Compacted gravel: 4.5 kg/cm2
Hard rocks: 33.0 kg/cm2
Coarse sand: 4.4 kg/cm2
Medium sand: 2.45 kg/cm2
Fine sand: 4.45 kg/cm2
A retaining wall is a structure designed and constructed to resist the lateral pressure of soil, when there is a desired change in ground elevation that exceeds the angle of repose of the soil. Retaining walls are used for supporting soil laterally so that it can be retained at different levels on the two sides. Retaining walls are structures designed to restrain soil to a slope that it would not naturally keep to (typically a steep, near-vertical or vertical slope). They are used to bound soils between two different elevations often in areas of terrain possessing undesirable slopes or in areas where the landscape needs to be shaped severely and engineered for more specific purposes like hillside farming or roadway overpasses.
Retaining wall design consideration
Retaining walls are vertical or near-vertical structures designed to retain material on one side, preventing it from collapsing or slipping or preventing erosion. They provide support to terrain where the soil’s angle of repose is exceeded and it would otherwise collapse into a more natural form. The principal characteristic of a retaining wall is being able to withstand the pressure exerted by the retained material, which is usually soil.
The most important consideration in proper design and installation of retaining walls is to recognize and counteract the tendency of the retained material to move downslope due to gravity. This creates lateral earth pressure behind the wall which depends on the angle of internal friction (phi) and the cohesive strength (c) of the retained material, as well as the direction and magnitude of movement the retaining structure undergoes.
Lateral earth pressures are zero at the top of the wall and – in homogenous ground – increase proportionally to a maximum value at the lowest depth. Earth pressures will push the wall forward or overturn it if not properly addressed. Also, any groundwater behind the wall that is not dissipated by a drainage system causes hydrostatic pressure on the wall. The total pressure or thrust may be assumed to act at one-third from the lowest depth for lengthwise stretches of uniform height.
It is important to have proper drainage behind the wall in order to limit the pressure to the wall’s design value. Drainage materials will reduce or eliminate the hydrostatic pressure and improve the stability of the material behind the wall. Drystone retaining walls are normally self-draining. As an example, the International Building Code requires retaining walls to be designed to ensure stability against overturning, sliding, excessive foundation pressure and water uplift; and that they be designed for a safety factor of 1.5 against lateral sliding and overturning.
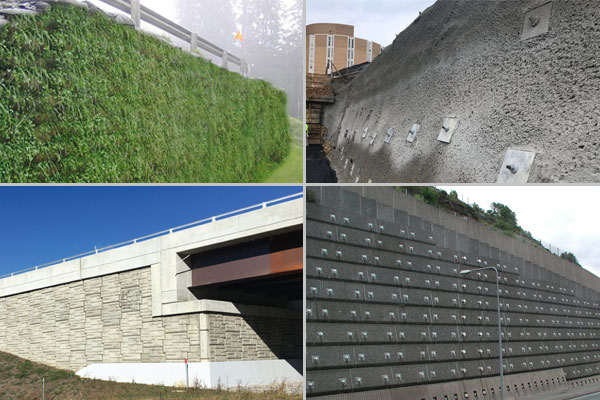
Types of retaining walls
There are several types of retaining walls, some of the popular ones are discussed below.
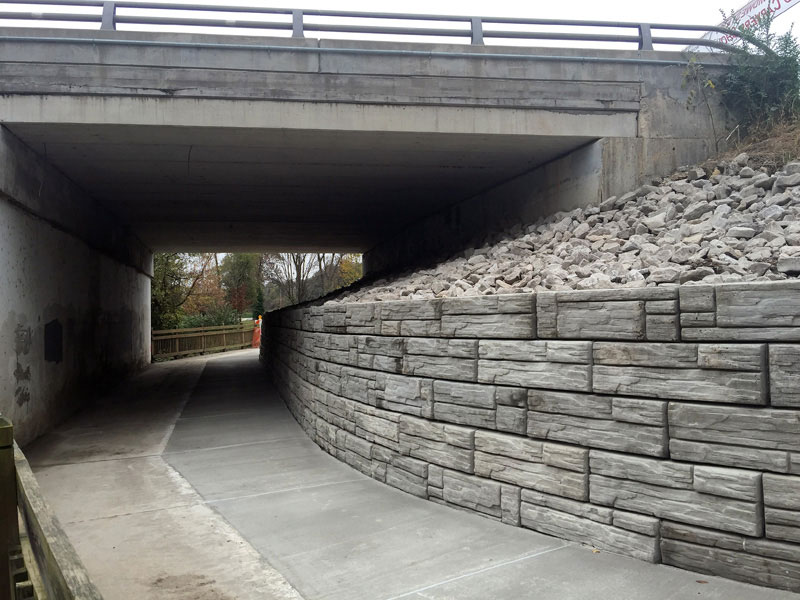
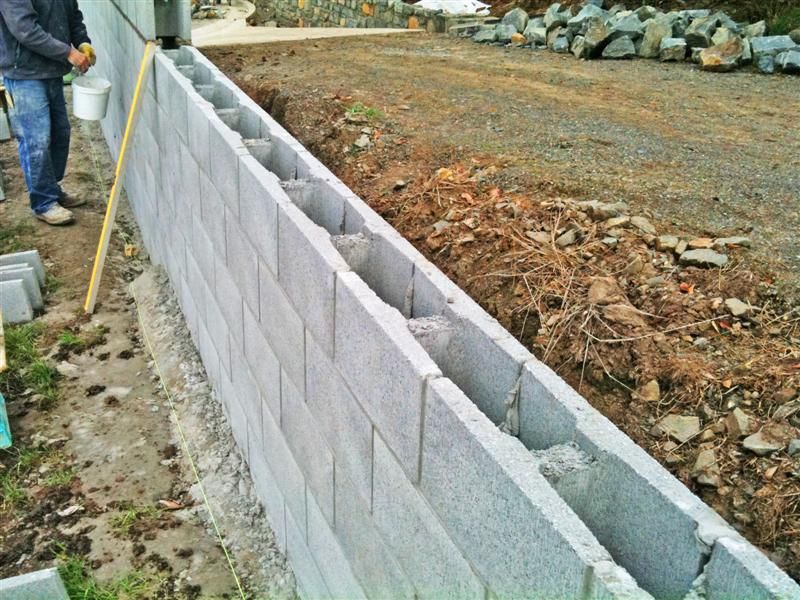
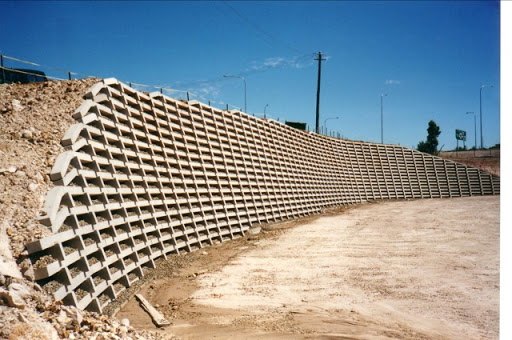
Gravity wall
Gravity walls depend on their mass (stone, concrete or other heavy material) to resist pressure from behind and may have a ‘batter’ setback to improve stability by leaning back toward the retained soil. For short landscaping walls, they are often made from mortarless stone or segment concrete units (masonry units). Dry-stacked gravity walls are somewhat flexible and do not require a rigid footing. Today, taller retaining walls are increasingly built as composite gravity walls such as: geosynthetics such as geocell cellular confinement earth retention or with precast facing; gabions (stacked steel wire baskets filled with rocks); crib walls (cells built up log cabin style from precast concrete or timber and filled with granular material).
Reinforced Retaining Wall
Reinforced concrete and reinforced masonry walls on spread foundations are gravity structures in which the stability against overturning is provided by the weight of the wall and reinforcement bars in the wall. The following are the main types of wall:
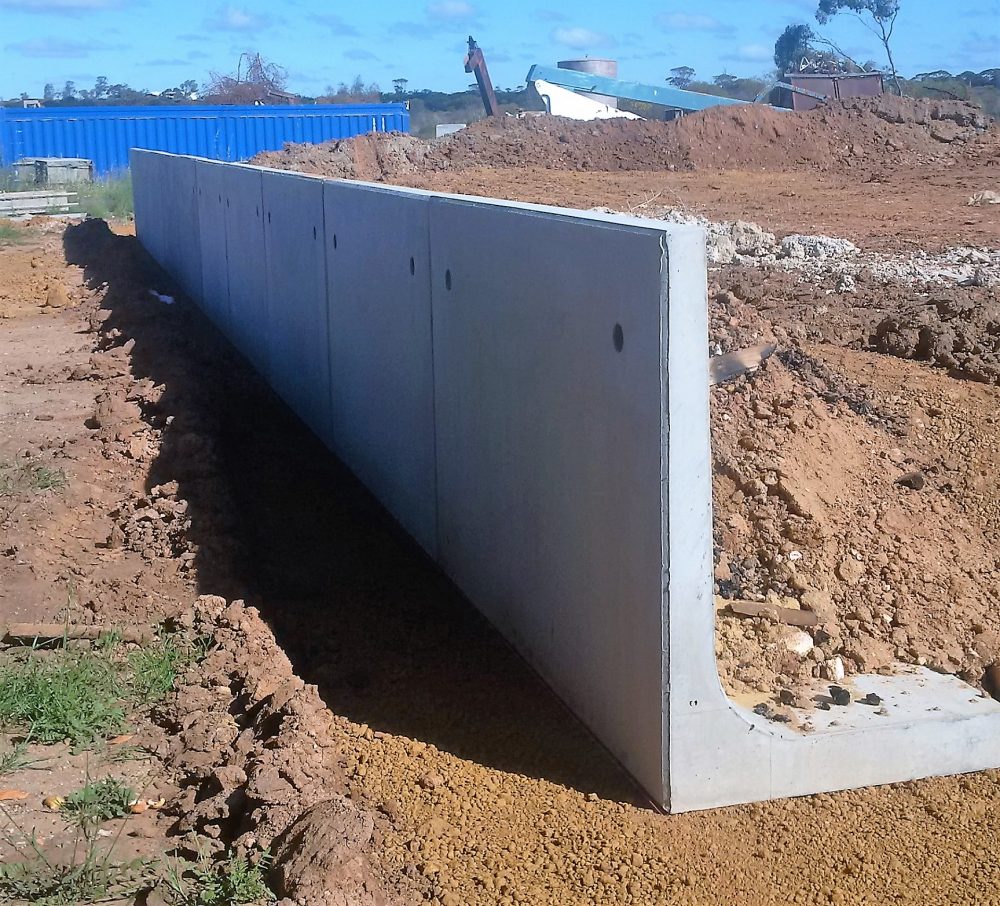
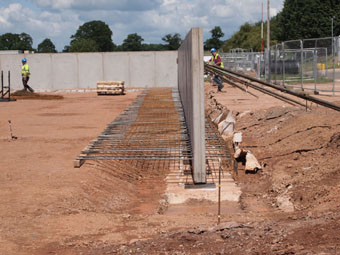
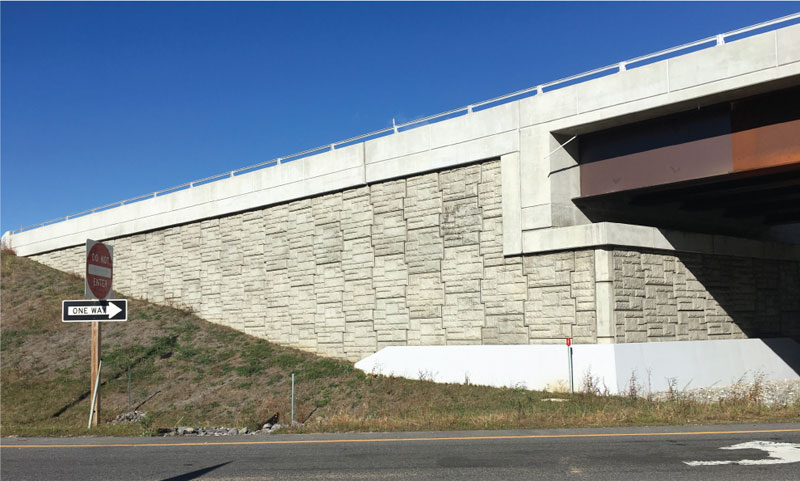
Concrete Cantilever retaining wall
A cantilever retaining wall is one that consists of a wall which is connected to foundation. A cantilevered wall holds back a significant amount of soil, so it must be well engineered. They are the most common type used as retaining walls. The Cantilevered wall rests on a slab foundation. This slab foundation is also loaded by back-fill and thus the weight of the back-fill and surcharge also stabilizes the wall against overturning and sliding.
Counter-fort / Buttressed retaining wall
Counterfort walls are cantilever walls strengthened with counter forts monolithic with the back of the wall slab and base slab. The counter-forts act as tension stiffeners and connect the wall slab and the base to reduce the bending and shearing stresses. To reduce the bending moments in vertical walls of great height, counterforts are used, spaced at distances from each other equal to or slightly larger than one-half of the height Counter forts are used for high walls with heights greater than 8 to 12 m.
Cantilevered wall
Cantilevered retaining walls are made from an internal stem of steel-reinforced, cast-in-place concrete or mortared masonry (often in the shape of an inverted T). These walls cantilever loads (like a beam) to a large, structural footing, converting horizontal pressures from behind the wall to vertical pressures on the ground below. Sometimes cantilevered walls are buttressed on the front, or include a counterfort on the back, to improve their strength resisting high loads. Buttresses are short wing walls at right angles to the main trend of the wall. These walls require rigid concrete footings below seasonal frost depth. This type of wall uses much less material than a traditional gravity wall.

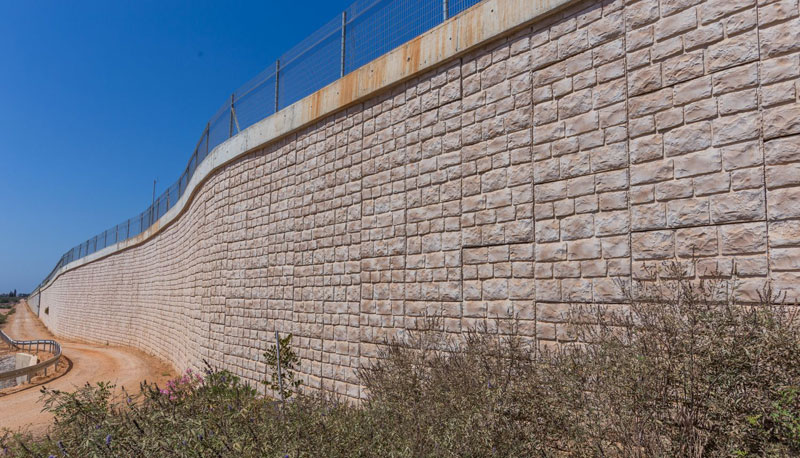
Reinforced Soil Retaining Wall
Mechanically stabilized earth walls are those structures which are made using steel or GeoTextiles soil reinforcements which are placed in layers within a controlled granular fill. Reinforced soils can also be used as retaining walls, if they are built as an integral part of the design and to act as an alternative to the use of reinforced concrete or other solutions on the grounds of economy or as a result of the ground conditions.
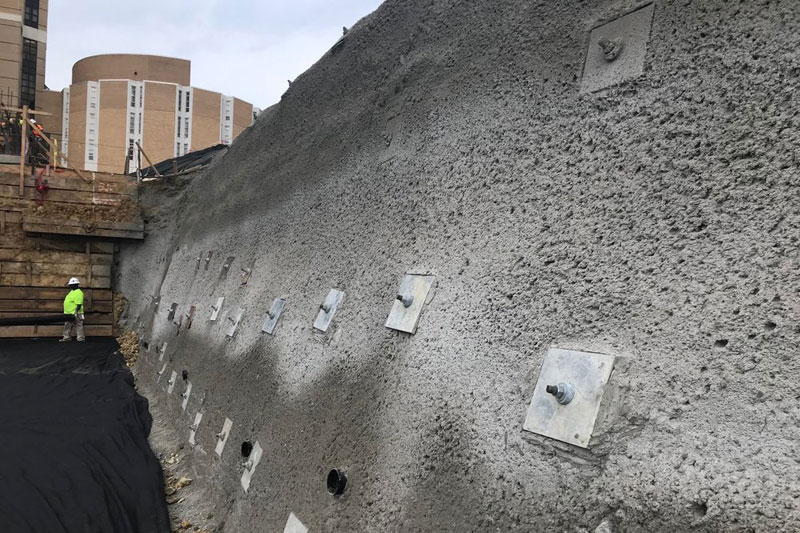
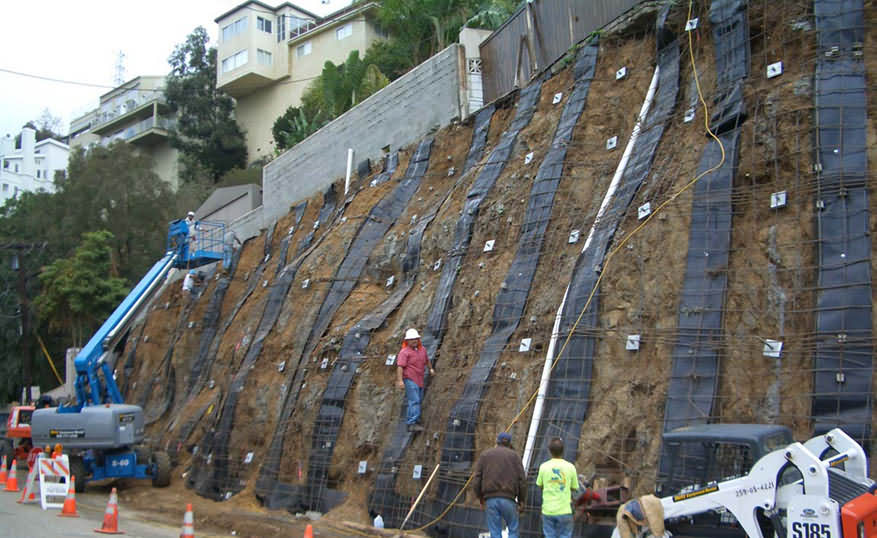
Soil nailed wall
Constructing a soil nailed wall involves reinforcing the soil as work progresses in the area being excavated by the introduction of bars which essentially work in tension, called Passive Bars. These are usually parallel to one another and slightly inclined downward. These bars can also work partially in bending and in shear. The skin friction between the soil and the nails puts the nails in tension.
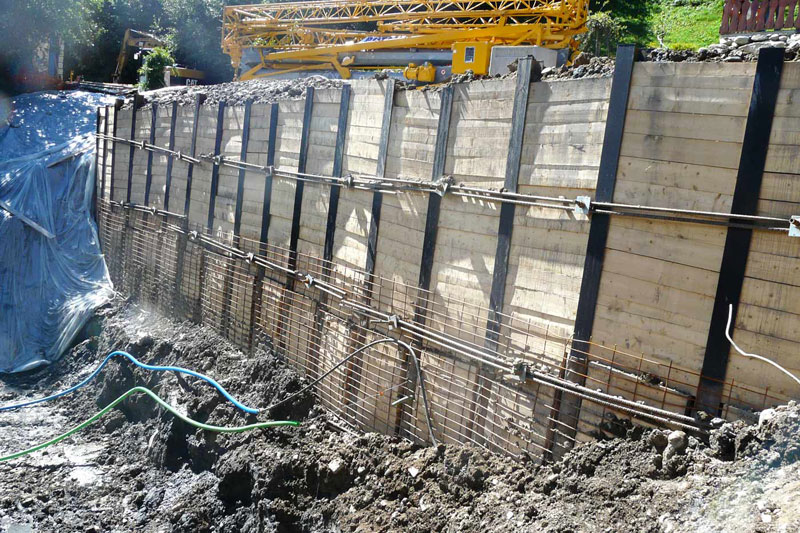
Anchored wall
An anchored retaining wall can be constructed in any of the aforementioned styles but also includes additional strength using cables or other stays anchored in the rock or soil behind it. Usually driven into the material with boring, anchors are then expanded at the end of the cable, either by mechanical means or often by injecting pressurized concrete, which expands to form a bulb in the soil. Technically complex, this method is very useful where high loads are expected, or where the wall itself has to be slender and would otherwise be too weak.

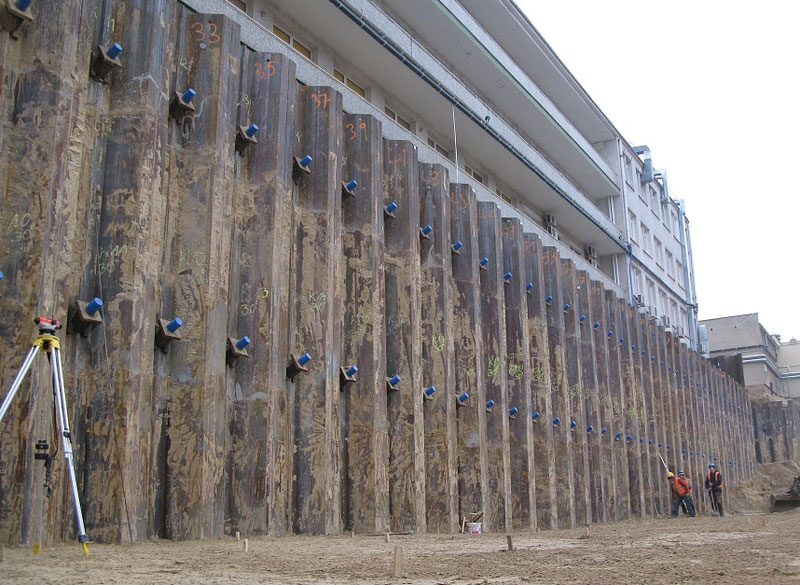
Sheet Piled wall
Piling is earth retention and excavation support technique that retains soil, victimization sheet sections with interlocking edges. Pile acts as a temporary certificate wall that has been driven into a slope or excavation to support the soft soils collapse from higher ground to lower ground. It provides high resistance to driving stresses and helps to lightweight. Sheet piles will be reused on many comes and long service life above or below water with modest protection. Simple to adapt the pile length by either attachment or bolting and joints square measure less apt to deform throughout driving.
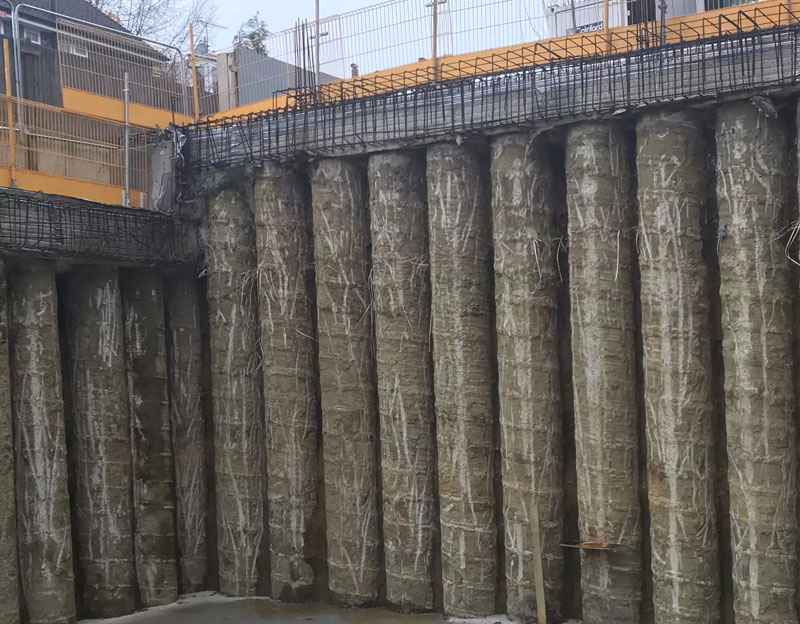
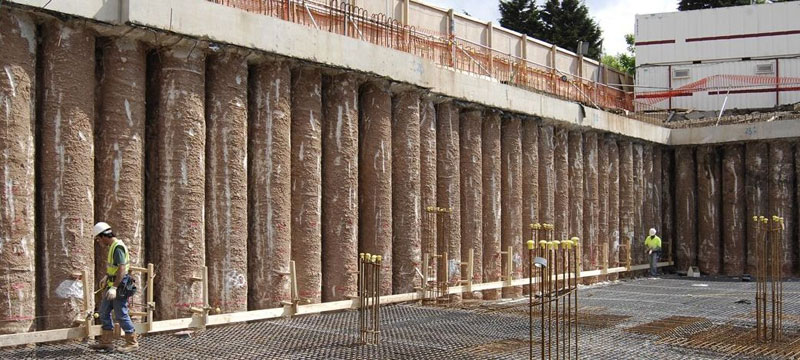
Pile wall (secant piles, tangent piles)
These walls square measure shaped by the intersection of individual concrete piles. These piles square measure designed by victimization lubricator and augering. The secant piles overlap by concerning three inches. Another is that the tangent pile walls, wherever the piles do not have any overlap. These piles square measure made flush with one another. The important advantage of secant and tangent walls is that the exaggerated alignment flexibility. The walls conjointly might have exaggerated stiffness, and therefore the construction method is a smaller amount abuzz. Among the disadvantages square measure that waterproofing is troublesome to get at the joints, their higher price, which vertical tolerances square measure arduous to attain for the deeper piles.
Berliner wall (soldier pile)
This kind of wall was proverbial to Roman military engineers and was used for deep excavations. It is a comparatively cheap system, simple and quick to construct. it is primarily restricted to temporary construction, and can’t be employed in high formation conditions while not in-depth dewatering and expense. it is not as stiff as different styles of retentive walls.
Soil nailing wall
Soil nailing may be a technique that will not reinforce and strengthen existing ground. It consists of putting in closely spaced bars into a slope or excavation as construction income from the highest down. Soil nailing is an efficient and economical methodology of constructing a wall for excavation support, support of hill cuts, bridge abutments, and high ways in which. This method is effective in cohesive soil, broken rock, sedimentary rock or fixed face conditions. This kind of wall to Stabilization of railroad and road cut slopes and excavation retentive structures in urban areas for high-rise building and underground facilities. It is conjointly useful in tunnel portals in steep and unstable stratified slopes. The development and retrofitting of bridge abutments with advanced boundaries involving wall support underneath heaped-up foundations.
Bored pile wall
Bored pile retaining walls are built by assembling a sequence of bored piles, proceeded by excavating away the excess soil. Depending on the project, the bored pile retaining wall may include a series of earth anchors, reinforcing beams, soil improvement operations and shotcrete reinforcement layer. This construction technique tends to be employed in scenarios where sheet piling is a valid construction solution, but where the vibration or noise levels generated by a pile driver are not acceptable.
Mechanical stabilisation wall
Mechanically stabilised earth (MSE) walls are walls that can tolerate some differential movement. The wall face is infilled with granular soil whilst retaining the backfill soil. The advantage of MSE walls is the ease of construction, as they do not require formwork or curing. The use of soil nailing in MSE walls, involves introducing slender steel reinforcing bars to the soil, placed parallel to one another on a slight incline and grouted into place. Anchored earth walls
Crib wall
Where timber, steel or concrete cages or boxes are interlocking, this may be described as a crib wall.
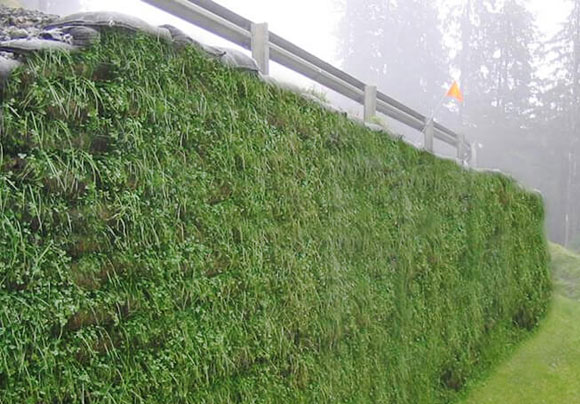
Green retaining walls
Green retaining walls can be used to retain more gentle slopes. A geocellular structure such as a series of ‘honeycomb’ cells can be embedded into the surface of the slope to stabilise it, and the individual cells can then be planted.
Barrette retaining wall
A barrette retaining wall is constructed from reinforced concrete columns of a rectangular plan form with the long axis in the direction of retention.
Conclusion
The main uses of retaining walls are to help prevent soil erosion, create usable beds out of steep terrain and to provide decorative or functional landscaping features. They may be independent structures, or may be part of a wider construction work, such as a building. Planning permission is required if the wall is to be over 1-metre high and next to a road or pathway; or over 2-metres high elsewhere. Independent, freestanding retaining walls may not require building regulation approval; however, any structures must be structurally sound and well maintained.
Image Source: vikonprecast.com.au, reconwalls.com, islandblock.com.au,equipment4all.blogspot.com, aarsleff.co.uk, martellopiling.com, acro-btp.fr, oil-nailing.com, volkergroundengineering.co.uk, reinforcedearth.com, retainingsolutions.com.au, igmbag.com, acp-concrete.co.uk,pinnacledesignbuild.com, designingbuildings.co.uk, structville.com, sobindustry.shikunbinui.com
]]>
Besides the need for a stunning exterior design, builders are now looking for strong, durable, energy-efficient, and insulation capability architectures as well as ease of installation, maintenance, and so on, when looking for designs with an exterior deception.
There have been new experiments being conducted on exterior façade techniques recently. Listed below are a few of the most successful sustainable exterior façade techniques that can be used on your home.
These sustainable exterior façade techniques have been found to be more effective and efficient than traditional methods.
Some examples of best Exterior Sustainable facades
Here are some examples of the best exterior sustainable facades design for your home:-
Green wall on the entrance
Green walls are another great way to spruce up the exterior of your house, and if you keep them up, they are a lovely, bright option for enhancing the exterior design of your house in an environmentally friendly way.
In addition to being very energy-efficient, both vertical gardens and green walls contribute to reducing carbon emissions as a result.
As well as serving as a carbon sink, they also serve as a filter and absorb rainwater, reducing pollution as well. In addition to adding to the sustainability movement, a green wall can also enhance the aesthetic look of the façade without detracting from it.
Installation of exposed Brick wall
Unquestionable structural advantages of an exposed brick wall go beyond aesthetic considerations.
The thermal efficiency and sustainability of brick are significant factors in its widespread usage in construction.
Along with its advantageous structural qualities and simplicity of construction, minimalism is supported by the fact that less material is utilized in building.
We are restricting the usage of plaster to just the internal facades with the exposed brick wall. This will not only lessen the environmental impact of producing extra materials, but it will also cut down on the cost and duration of building.
It serves as the main focal point for external design since it not only has a rustic appeal but also gives texture to an otherwise dull environment.
Applying the Stucco
An exposed brick wall has undeniable structural benefits that go beyond cosmetic concerns. Brick’s extensive use in buildings is largely due to its thermal efficiency and sustainability.
Minimalism is backed by the fact that less material is used in construction, in addition to its excellent structural characteristics and ease of construction.
Only the internal façade with the exposed brick wall will be covered with plaster. This will reduce the cost and time of construction as well as the environmental effect of creating more materials.
Since it not only has a rustic charm but also adds texture to an otherwise bland setting, it acts as the primary focal point for exterior design.
Installing wood plastic composite cladding
A fantastic substitute for wood cladding is composite cladding. Essentially, it is constructed from reclaimed wood and plastic.
It is well known that composite cladding combines the classic beauty of wood with the sturdiness of an engineered composite.
In contrast to wood, which has to be replaced more frequently and consumes more resources, wood plastic composites are made to last for decades. Additionally, composite cladding doesn’t need chemical sealants to preserve it.
Panels made of aluminum composite
Aluminum, polymer and a few minerals are recyclable components that are used to make aluminum composite panels.
Since ACP sheets are 100% recycled, they are very sustainable and maintain all of their original characteristics during manufacture and design.
ACP sheets contribute to insulation, lowering the need for active systems. Additionally, they emit a lot less heat into the atmosphere. They are durable and relatively simple to maintain, according to the climate.
They are very adaptable and cost-effective because these sheets can be etched with patterns and designs that resemble marble brick or stone cladding.
Wrapping it up
The creation of a modern home necessitates current sustainability solutions, therefore the outside façade concepts described above not only make your home sustainable but also give it character, making it stand out.
Working with nature rather than attempting to counteract its effects is the fundamental functional principle of façades. In other words, integrating the building with its surroundings starts with the outer façade.
]]>
What is Geogrid?
Geogrids are synthetic meshes that are made to be flexible and used for slope stabilization and earth retention. These grids come in a number of different materials, sizes, and strengths. They are normally packaged in rolls at the manufacturer and are constructed of high tensile strength polymers or woven polyester yarns.
The use of woven geotextiles and geogrids to provide internal drainage for Geosynthetic reinforced soil (GRS) walls with poorly draining marginal backfill improves the internal stability of buildings.
How do these Grids act?
The sandcastle test involves putting vertical force on two cylinders of the earth to observe how they perform. The initial cylinder consists only of compressed material. The second is made out of compacted material with mesh screens added to approximate the usage of geogrid reinforcement.
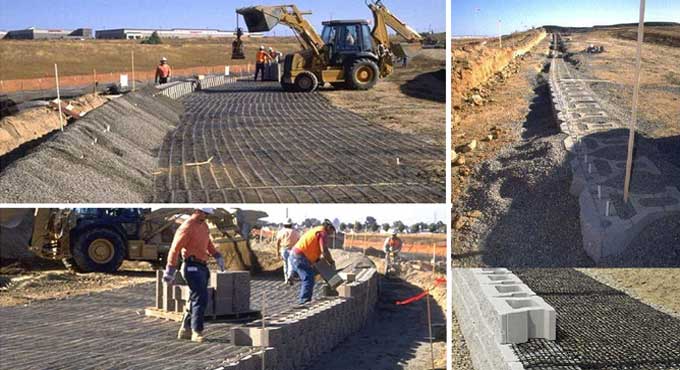
How can you construct a reinforced retaining wall using Geogrid?
Before continuing the process, make sure your primary layer of blocks is flattened and has been sufficiently covered on the front side of the wall. If done, you may proceed with the installation as follows:-
- Make your first drainage blanket section.
- Backfill to the height of the first block and at least the length of the geogrid you’ll be installed behind the wall.
- Lay the geogrid at the top of the first block layer once the backfill has been suitably compacted and is the same height as the first block layer.
- The geogrid edge on the lower block should be set as far forward as feasible on the lower block without poking out of the face of the wall.
- You can simply roll out biaxial geogrid (also known as two-way geogrid) along the length of the wall if the roll width is large enough to satisfy the Geogrid Length equation.
- If you bought uniaxial geogrid (also known as one-way geogrid), cut it to the length you need and lay it out such that the heavy or stiff strands are perpendicular to the wall.
- You can now set the second block layer to pin the grid in place after you have covered the entire first block layer with geogrid of the correct length.
- With the grid anchored in place by the second row of blocks, begin carefully constructing your next drainage blanker, entirely wrapped in geotextile and backfilled on top of the grid, ensuring that the grid remains tight.
- Place the backfill in place and compact it.
- Do not forget to add the third row of blocks.
- Backfill to the height of block row 3 and compact it in place.
- Similar to Steps 1/2/3, place geogrid on the third row of blocks.
- Continue until you reach your desired wall height, compacting each backfill layer, constructing your drainage blanket, and installing geogrid on every second layer.
Few Advantages of using Geogrid Reinforcement:
A few advantages of using Geogrid in constructing reinforced retaining walls are as follows:-
- Land in-takes are reduced.
- Environmentally satisfying wall.
- Steeper and stronger walls.
- SuDS docile solutions.
- Less material consumption.
- Supply, design, installation, and maintenance from a single source.
- Don’t allow the planting to damage the formation.
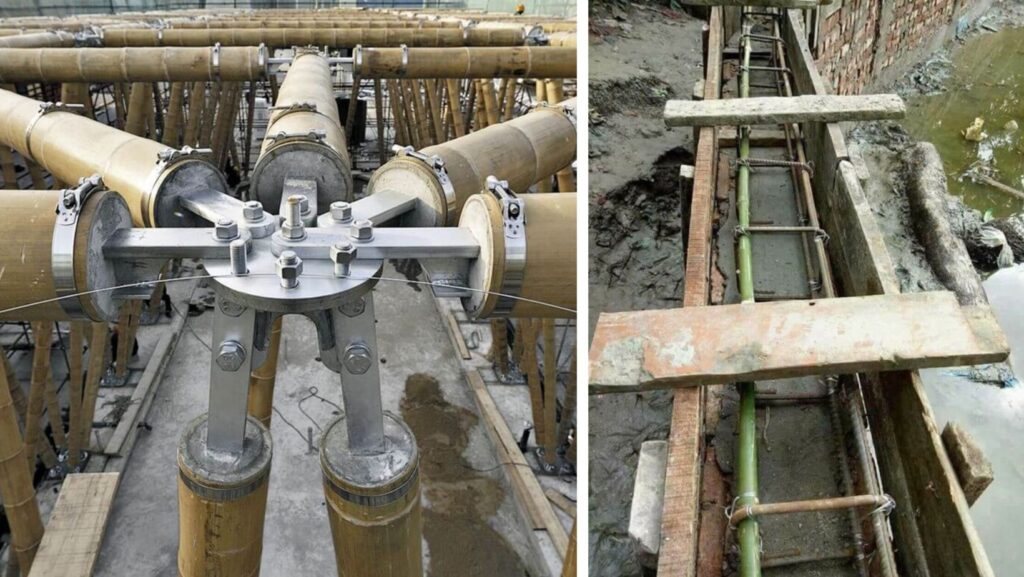
Bamboo has quite a high tensile strength. It is comparable with steel. Apart from this, bamboo has an impermeable protective layer on the outer side which protects it from rotting due to water, which is a major problem for almost all organic material.
#1.

#2.
Bamboo has quite a high tensile strength. It is comparable with steel. Apart from this, bamboo has an impermeable protective layer on the outer side which protects it from rotting due to water, which is a major problem for almost all organic material.
#1.
#2.
#3.
#4.
#5.
In tensile load application, results shown by bamboo are exciting because the ratio of tensile strength to the specific weight of bamboo is six times greater than steel.
#6.

#7.
#8.
#9.
#10.
#11.

#12.
#13.
#14.
#15.
#16.
#17.
#18.
#19. 
#20.
#21.
#22.
#23.
#24.
#25.
#26.
#27.
#28.
#29.
#30.
#31.
#31.
#33.
#36. 
What do you think? Comment and share your friends!
]]>
Cavity in a construction? Don’t you find it alarming enough? Actually yes, cavity in a construction wall can be disastrous indeed, but when it is about having a cavity wall, it’s something special. In fact, it is an architectural splendor that can add some specific advantage to a building. The use of cavity wall was once considered a trend especially in mediaeval age, howsoever, modern construction has explored it as a trend setter for a building. Adding cavity walls in a building will have many impacts even at the age of 22nd century.
Here in this article, we are going to learn the purpose of cavity wall, its advantages, disadvantages, and the nitty-gritty about its construction.
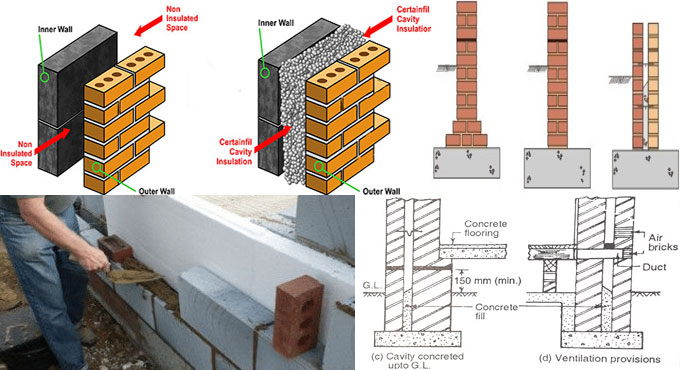
According to ‘R. Barry’ (Author of The Construction of Building), cavity wall became quite common a feature for external walls of almost all small buildings. The trend was mostly seen in the constructional anatomy between 1920 and 1940. It was constructed as the cavity walls with an outer leaf of bricks or blocks, a consistent hollow space intermediate, and an inner leaf of bricks or blocks.
Cavity walls were common in Greek and Roman times, but later were developed as a component of contemporary construction in the 18th and 19th centuries. Even during this time, construction of cavity walls was rare, and generally involved two leaves of masonry bonded by headers spanning across the cavity. The use of metal ties to connect the two layers only emerged in the second half of the 19th century. The trend became more common in use toward the beginning of the 20th century.
Purpose of Cavity Wall
The cavity walls are constructed for the following purposes:
01. Damp Prevention
Cavity walls reduces the chance of moisture intrusion from outer leaf to the inner leaf and thus helps in keeping inside of the building free from dampness.
02. Thermal Insulation
The air in the cavity wall acts as a non-conductor of heat and hence minimizes the transmission of heat from the outer leaf to the internal face of the interior leaf. Thus, cavity walls help in maintaining the thermal insulation of a premise.
03. Sound Insulation
The air in the cavity acts as a cushion for absorbing sound. By building cavity walls, a premise may work as a sound proof zone as a large quantity of external noise gets absorbed within the cavity.
04. Efflorescence Prevention
As dampness is not allowed to penetrate the cavity, the inner leaf of the cavity, which is always a load bearing wall, is kept free from efflorescence effects.
05. Economy
According to ‘W. B. McKay’ (Author of Building Construction), building a 275 mm cavity wall costs less than constructing a 328 mm solid wall (which is of the minimum thickness if dampness has to be mostly avoided). This measuring data may vary from one place to another and on the specific climate of the construction site. One has to calculate the customized details before deciding the measurement of a cavity wall.
What is a Cavity Wall?
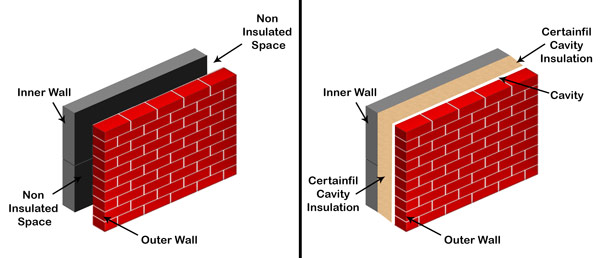
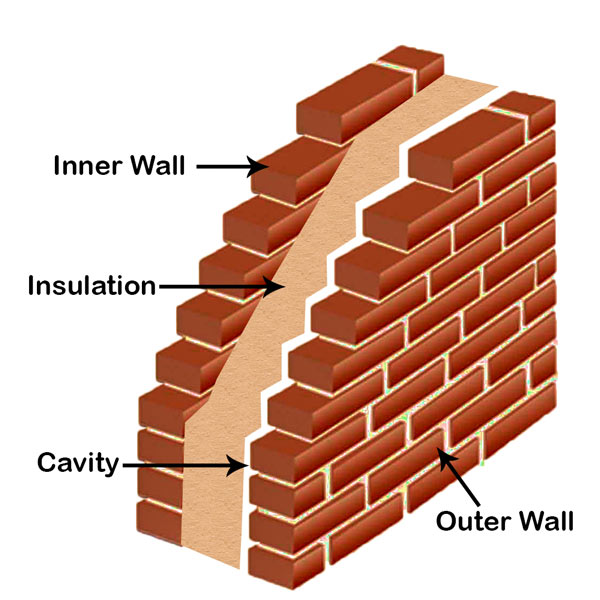
According to the ‘National Building Code of India’ (1983), “A wall comprising two leaves, each leaf being built of masonry units and separated by a cavity and tied together with metal ties or bonding units is called a cavity wall”. The structure is made in a way that the two leaves behave as one structural unit, and the space between the leaves is either kept as a continuous cavity or it is filled with waterproofing material or a non-load bearing insulating material. Ideally, the thickness of each leaf of a cavity wall shall not be less than 7.5 cm.
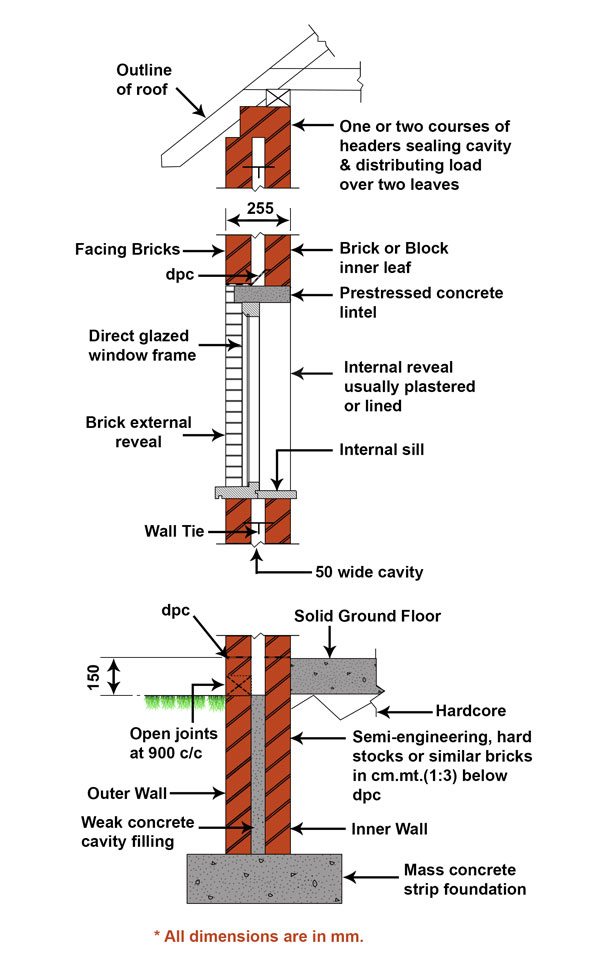
A cavity wall consists of two parallel walls with a 5 cm to 8 cm gap or a cavity between them. It is also known as a hollow wall but sometimes, this cavity may be filled with insulation material. The outer wall also known as an outer leaf, consists of a 10 cm (half brick) thick wall and the inner wall is sufficiently thick and strong to carry the imposed load safely if it is load bearing structure. The minimum thickness of the inner wall or inner leaf is restricted up to 10 cm. The provision of a continuous cavity in the wall efficiently restricts the spreading of dampness to the inner wall. Cavity walls are used to construct the outer wall of a house.
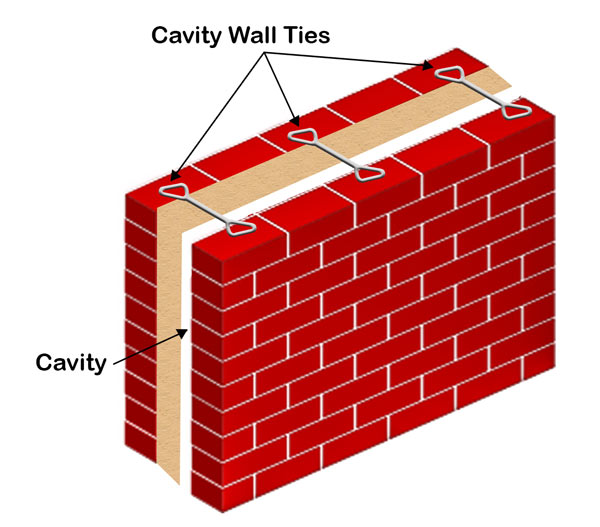
The outer leaf is essentially built with a decorative face, generally made of brick. It helps to keep the rainwater out, at the same time also adds to the wind load resistance of the entire wall. To make sure that the entire wall structure is stable, the brick outer leaf is kept “tied” to the inner leaf with the use of wall ties. These are plastic or metal ties that are permanently fixed into the mortar of both block and brick.
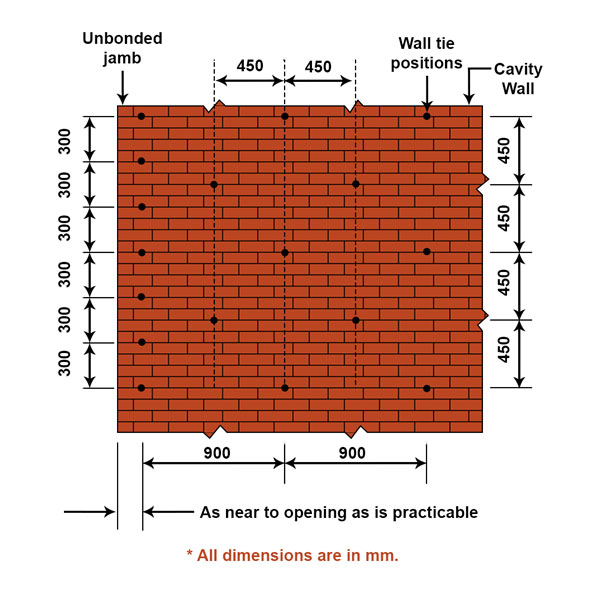
Wall Ties
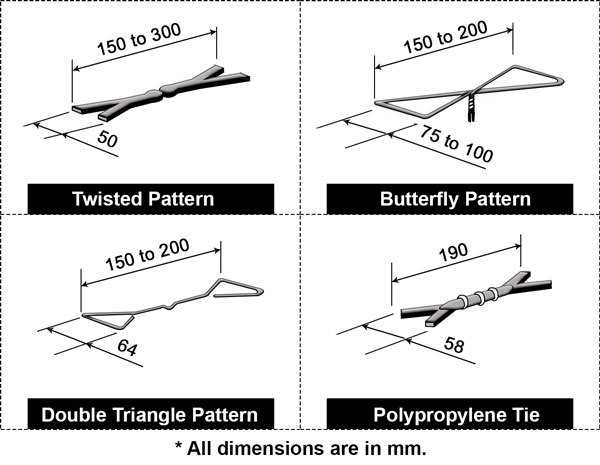
The two walls are tied together with the metallic or some terra-cotta ties to achieve structural stability. The wall ties are spaced 90 cm apart horizontally and 30 to 45 cm apart vertically in staggered positions to ensure the best stability.
Position of Cavity
The cavity should start from the ground level and ideally should get terminated near eaves level in case there is a sloping/pitched roof or near coping in case of a flat roof with the parapet wall. The cavity should rather start 15 cm below the damp-proof course level. This has the advantage of draining of any condensed moisture below the level of the damp-proof course.
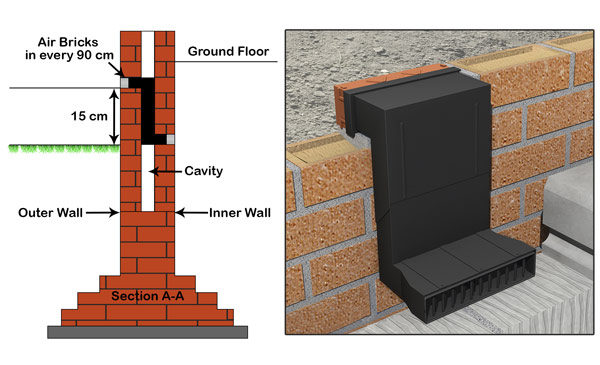
Likewise, to prevent infiltration of moisture, the bottom of the cavity should lie at least 15cm above the outside ground level. The damp-proof course for the outer and inner leaves is laid separately although the same level is ensured. This is vital to continue the cavity below the damp-proof course. The cavity is kept fully ventilated by providing air bricks in the external wall immediately above the damp-prof course. The air bricks should be placed 90 cm apart. Similarly, air bricks are provided near the top of the cavity.
Construction of a Cavity Wall
(a) Cavity Wall at The Door or Window Openings
The constructional treatment of the cavity wall at the door or window openings requires some special arrangement. Since the object of the cavity is to separate the two leaves, the placement of a vertical damp-proof course is essential to seal the cavity at the window and the door point. The openings of doors and windows can provide an easy access to the dampness to pass into the cavity. At the sill level, it is always advantageous to keep the back of the sill flush with the back face of the external wall. In case of wooden sills, a horizontal damp-proof course is a better choice, which ideally should be made of a flexible construction suitable material.
At the top of openings of doors and windows, stone or brick arch or concrete lintel is built to carry the loads from the structure above the opening. In order to distribute the load evenly, the cavity may lay continuous, the two walls should have the separate lintels or arches. Sometimes a common lintel is provided for both the leaves.
In such a case, an inclined strip of lead or any other flexible damp-proof course membrane is provided to bridge over the cavity. The damp-proof course should extend lengthwise beyond the frame for a distance of about 15 cm on either side. This treatment helps in draining condensed moisture if any beyond the sides of the frame.
(b) Cavity Wall in Roof
In case of a flat roof, the cavity is made continuous for the full height of the parapet wall and is sealed by the coping. In case of inclined roofs/pitched roofs, the cavity is made closed at eaves level. It is important to take special precautions so that no mortar fall inside the cavity during the process of construction.
For this purpose, a wooden batten of adequate length and having a width equal to that of the cavity is used. The batten is supported over the wall ties and construction of brick masonry wall is carried out (on either side of the batten) to the height where next row of wall ties has to be provided. By this method, the cavity remains clean of mortar droppings.
(c) Cavity Wall in Parapet Wall
If the cavity has to be continued up to the coping level, the layer of damp-proof course should be laid continuous covering the full thickness of the wall immediately below the coping. Damp-proof course layer is laid alongside the full thickness of the wall at a level where the cavity joins the solid wall.
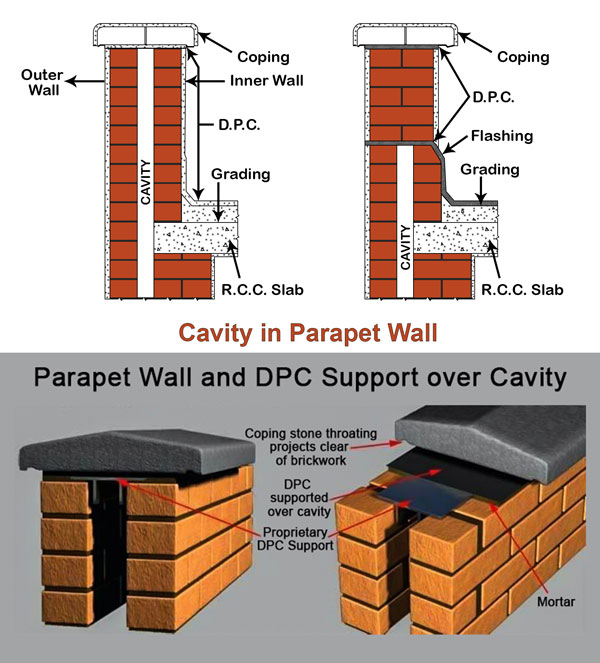
Exposure of the two faces of a solid parapet wall may develop cracks due to the temperature variations or on account of bad workmanship which may allow dampness to intrude inside. By constructing two separate wall thickness, the risk of moisture and damp infestation can be successfully reduced/stopped.
Each wall thickness is exposed to the weather on one side and protected/covered on the other side. In heavy rainfall areas, when the damp resistance capacity of the outer wall material exceeds, the rainwater may find its way into the cavity and gets harmlessly drained off at suitable points. Thus, the cavity system of construction works useful for the parapet walls.
Types of Cavity Wall Insulation
Most common types of cavity wall insulation materials are:
01. Mineral Wool or Rockwool
Mineral Wool or Rock wool is the cavity wall insulation material used commonly for insulation in residential buildings. It is made from an igneous rock which is heated and spun to create fiber material. This is blown into the cavity wall which then occupies the space between the exterior and interior walls of the building. The material is water resistant and it can prevent moisture intrusion caused by rain, which usually gets through the outer leaf of the wall to reach the inside leaf of the building.
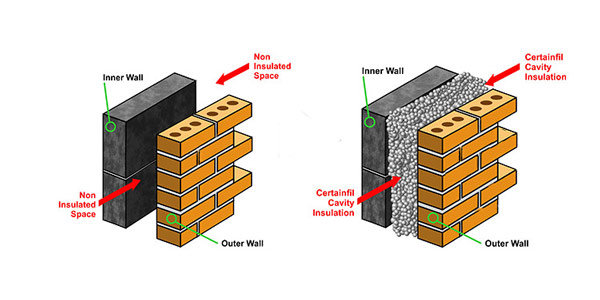
02. Polystyrene Bead
Expanded Polystyrene Beads or EPS beads are utilized in the cavity of cavity walls. These are pushed into the cavity of the walls, which is mixed with an adhesive to hold the beads together in order to avoid the risk of spilling of the same outside of the wall. This type of insulation is generally used in narrower cavity walls. It is a preferred insulation material rather than using mineral wool insulation. Polystyrene Bead insulation is also preferred in some stone-built houses.
03. Cavity Foam Insulation
Urea formaldehyde foam was normally used for the insulation of cavity walls. This insulation material usually has the benefit of insertion: the insertion of insulation material is done via smaller holes which are to be drilled in the walls or on the brickwork. However, it is not a popular option presently. Most people use Polyurethane foam both as cavity wall insulation material and a material to stabilize the wall structure where the wall ties have been futile, as an option to replace the wall tie itself. However, where work is done purely for thermal insulation effect only, either polystyrene beads or mineral wool are the most preferred ones
Advantages of Cavity Wall
The advantages of cavity walls are,
- As there is no direct contact between the two leaves except at the wall ties (which are impervious material), there is hardly any possibility of the moisture intrusion from the outer leaf to the inner leaf. According to ‘R. Chudley’ (Author of Construction Technology Vol-1), cavity walls can withstand a driving rain in all situations from penetrating to the inner wall surface.
- The layer of air in the cavity being non-conductor of heat reduces the transmission of heat from the external face to the internal one and as such cavity walls are the best suitable for temperature control in room in a tropical country like India. Cavity walls gives good thermal insulation keeping a premise warm in winter and cool in summer.
- They offer a good sound insulation property. A nominal 255 mm cavity wall has a higher sound insulation value than a standard thick brick wall. As a result they can reduce the effect of external sound.
- Cavity walls are fire-resistant.
- Cavity wall can reduce the risk of moisture condensation.
- The wall can reduce the cooling cost of the building.
- It gives protection against efflorescence.
Disadvantages of Cavity Wall
- Highly skilled masons, labors, as well as expert designers and implementing workmanship are the basic requirement for the construction of a well-built cavity walls.
- Cavity wall construction requires good supervision during its construction phase.
- It requires installation of a vertical damp-proof course to all openings.
- There is always a risk that moisture may get its way to the inside, whatever is the insulation material.
- It decreases carpet area efficiency.
- Saturation and settlement of cavity-fill lead to cold bridging or thermal bridging. (Thermal bridging is the process of the movement of heat across an object that is more conductive than the materials around it.)
- There is also the possibility that the installation will leave unfilled air pockets –causing ‘cold spots’ on the inside walls which will attract condensation.
- Another problem is wall-tie corrosion; cavity insulation makes the outer brick leaf colder, and therefore wetter. The condition can speed up the rusting of the wall ties. Alternatively, if the ties have to be replaced, there is no satisfactory way of refilling the holes further in the insulation, whatever was the insulation material.
- The thickness of insulation is restricted by the width of the cavity.
- There is a significant number of buildings with mortar droppings on ties within the cavity which results in penetrating dampness.
Conclusion
From the above discussion, we may safely conclude that you can control moisture intrusion in your home by the construction of the cavity wall as an exterior wall of your house. Cavity wall also provides thermal as well as sound insulation benefits.
However, building cavity wall requires skilled labor and good supervision during the construction. If you can construct it in the right manner, it will be highly beneficial for you and your home in terms of comfort and maintenance.
]]>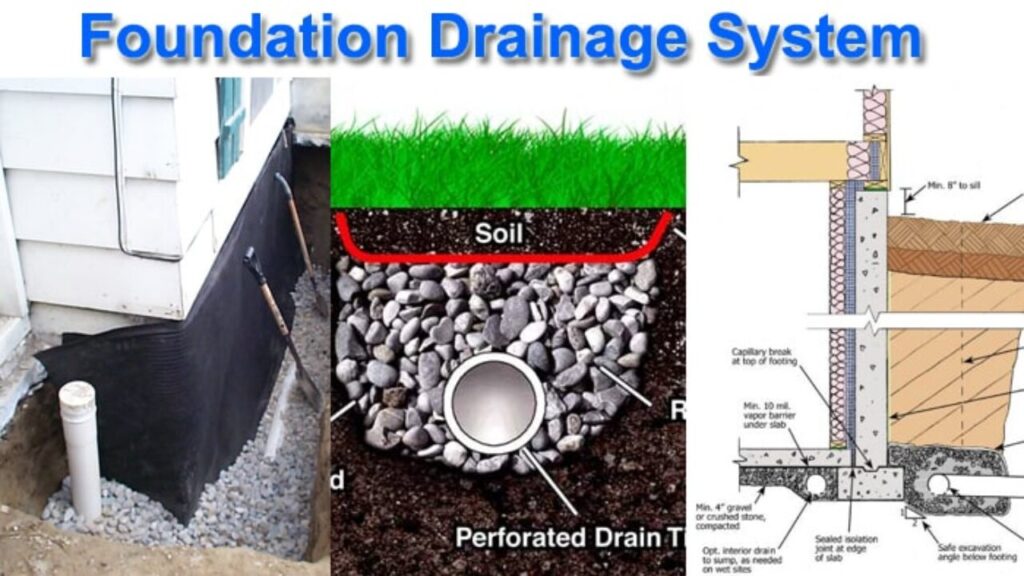
What is Foundation Drainage?
Foundation drains are pipes put beneath your foundation or basement floor to collect water and transport it away from your home, preventing your basement from flooding.
If your house was built after 1920, foundation drains are a network of pipes beneath the basement floor that is supposed to catch groundwater before it seeps into your basement. If your house was built before 1954 (approximate year), your foundation drain is most likely immediately connected to the sanitary sewer near your floor drain via a palmer valve.
A foundation drain is a gravel-covered exterior drainage system constructed on the outer face of the foundation wall and near the wall footing for the purpose of draining excess water seeping into the foundation.
Types of Foundation Drainage:
French Drain:
A “French Drain” is an underground outdoor drain line designed to convey water away from a building and into a drywell or catch basin. Our diagram depicts how water is removed from roof runoff that flows down a gutter.
Footing Drain:
A footing drain is an exterior foundation drainage system that is installed outside the foundation wall near the wall footing, covered with gravel at the level we show, and if the footing drain is going to do anything, it is piped to daylight or to a catch basin, which is then pumped to daylight or to a storm drain.
Components of Foundation Drainage System Include Following:
Gutters and downspouts are well-maintained and directed below the soil surface.
Trees must be kept at a safe distance from the building or foundation (should not be closer to the structure than their mature height)
Moisture consistency in the soil (ensure that water can drain from the soil and be replenished effectively).
Drainage of surface water (ground should have a minimum slope of 3 percent to move water away from the foundation wall).
Drains in channels (to trap water and direct it away from the foundation).
Drainage boards for the foundation (installed on the outside of concrete walls to direct water to the drain tile, used in conjunction with waterproofing membranes).
Rigid drain tile is used for subsurface drainage (either connected to a sump pump system or directed to daylight exposure).
Drain pipes go alongside the footing of the foundation.
Building codes are followed (international code requires drain pipe for most structures with concrete or masonry below grade).
Synthetic materials and geotextiles (many modern drainage systems now incorporate these materials to prevent fine soil particles from passing through and clogging drain pipes).
Advantages of Foundation Drainage:
It decreases the risk of settling by preventing water collection near the foundation. Stagnant water can also boost mosquito breeding and cause plant deterioration.
Installing a foundation drain can help to prevent soil erosion.
Draining water properly can aid in the removal of toxic and harmful organisms from stagnant water.
Disadvantages of Foundation Drainage:
A drainage system is an expensive investment. It necessitates the use of competent and professional labour.
Because of the deposition of silt in the pipe, the perforated pipe has the disadvantage of becoming clogged on a frequent basis. As a result, foundation drain maintenance is time-consuming.
Contamination of water bodies – According to the study, nitrate can be carried by subsurface drainage systems through drain pipes and straight into bodies of water such as streams, rivers, and lakes.
]]>
The term structure refers to anything that is formed or made from interconnected elements and has a fixed location on the ground in the built environment. Buildings are included, but anybody constructed to take loads, even if it is not intended to be occupied by humans (engineers refer to them as ‘non-building’ structures – such as bridges, tunnels, and so on) can be included.
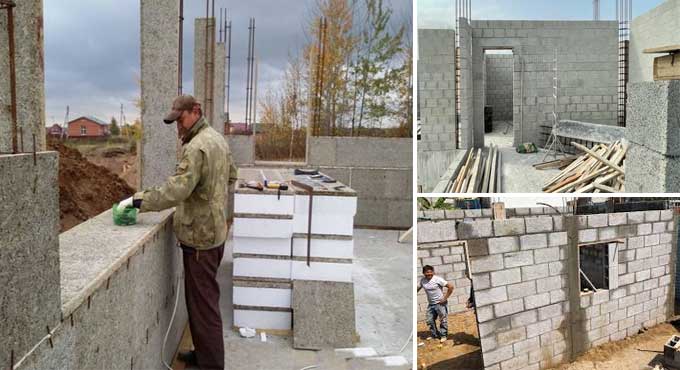
1. Load Bearing Structure:
The weight of a load-bearing structure is transferred to the walls in the form of roofs and floors supported directly on the walls in a load-bearing structure.
The load is transferred to the underlying soil via wall footing that is ideal and cost-effective for two to four-story buildings.
Because of its load-bearing purpose, the wall thickness decreases as the number of stories increases.
This structure is used when firm strata are accessible at shallow depths and the wall footings are placed directly on them.
Load-bearing structure benefits include:
- The load-bearing construction is extremely strong and long-lasting.
- These constructions are extremely fire resistant.
- Masonry units come in a variety of colors and textures, allowing for a lot of creativity.
- These structures don’t need to be prepared in advance.
- They have a pleasing appearance.
- Masonry construction tools and equipment are simple and inexpensive.
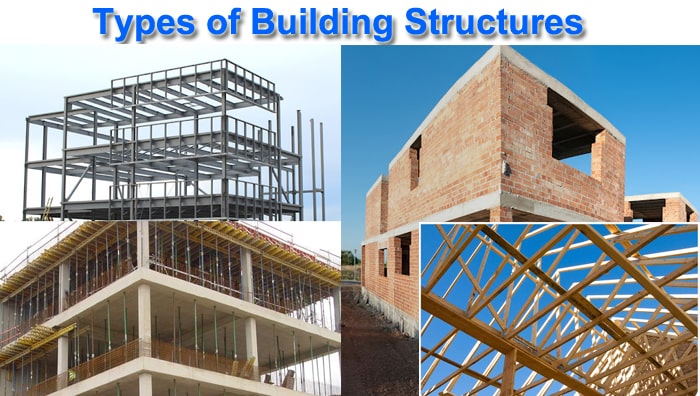
7 Types of Building Structures in Construction
The term structure refers to anything that is formed or made from interconnected elements and has a fixed location on the ground in the built environment. Buildings are included, but anybody constructed to take loads, even if it is not intended to be occupied by humans (engineers refer to them as ‘non-building’ structures – such as bridges, tunnels, and so on) can be included.
1. Load Bearing Structure:
The weight of a load-bearing structure is transferred to the walls in the form of roofs and floors supported directly on the walls in a load-bearing structure.
The load is transferred to the underlying soil via wall footing that is ideal and cost-effective for two to four-story buildings.
Because of its load-bearing purpose, the wall thickness decreases as the number of stories increases.
This structure is used when firm strata are accessible at shallow depths and the wall footings are placed directly on them.
Load-bearing structure benefits include:
- The load-bearing construction is extremely strong and long-lasting.
- These constructions are extremely fire resistant.
- Masonry units come in a variety of colors and textures, allowing for a lot of creativity.
- These structures don’t need to be prepared in advance.
- They have a pleasing appearance.
- Masonry construction tools and equipment are simple and inexpensive.
2. Pre-engineered Structure
The ideal building structure is sometimes pre-engineered because it goes together quickly and allows you to start utilizing it sooner than you expected. Often, you can design the building to your requirements, and then the sections are manufactured and assembled before being sent to the job site.
Pre-engineered products have the advantages of being quick to assemble, sturdy, and simple to personalise.
3. Truss Structure
A truss is a type of truss that is utilized in structures with a large span but little depth. A truss is made up of thin parts that are placed in a triangle pattern. A planning truss is a truss that has all of its members in the same plane and is commonly used for bridges. The space truss is made up of three-dimensional parts.
Loads that cause the truss to bend are converted into tension and compression forces by truss. Because of these advantages, truss uses fewer materials than beams and is made up of slender and long parts. Trusses can span distances ranging from 9 metres (30 feet) to 122 metres (400ft).
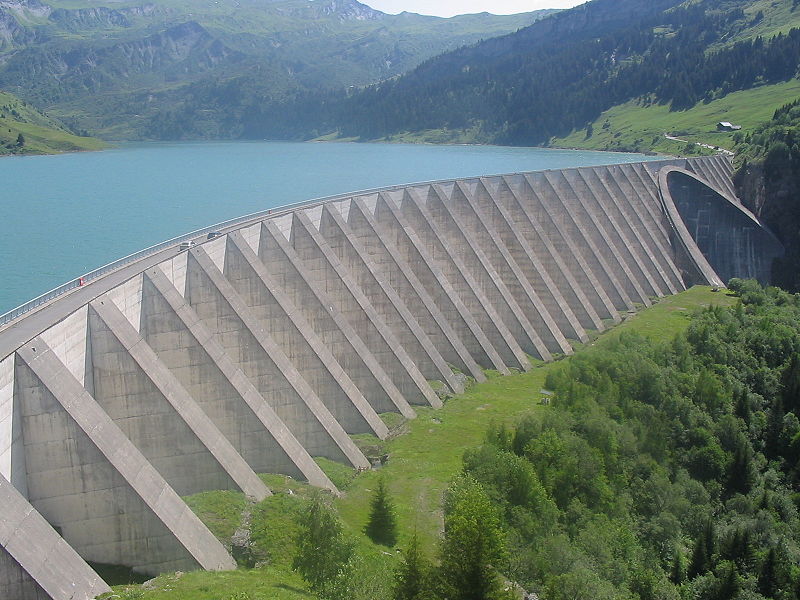
4. Cable and Arches
Cables are used to support long spans where truss is not feasible and could result in a significant increase in structure cost and size. Cables carry loads in tension and can be used for spans longer than 46m(150ft). Cables are also used in bridge structures, but their use is limited by their sag, weight, and anchorage method.
Arches commonly used in bridges and dome roofs transport loads in compressions, and the arch should be rigid to retain rigidity and forms. Secondary loading involves shear and moment, and these secondary loadings must be considered in the design.
5. Wood Frame Structure
Wooden frame buildings have been present for a long time, and they are the oldest of all building structures. It is also the type that is most widely used around the world. These constructions are entirely constructed of wood that is cut and assembled on-site. That means the workers are cutting the studs, plates, joists, and rafters as needed and installing them before the drywall, paneling, and other materials are installed.
The advantages of timber frame building structures include the fact that the materials are renewable, the cost is relatively inexpensive, and they can be constructed fast using common construction tools. Of course, there are drawbacks, such as the building being combustible, prone to deterioration owing to the environment, and insufficiently sturdy to withstand hurricane and tornado gusts.
6. Tension Structures / Tensile Structures
A tensile structure is made up of exclusively tension-carrying parts with neither compression or bending. Tensile membrane structures are commonly utilised as roofs because they can span great distances inexpensively and beautifully. Sports facilities, warehousing and storage facilities, and exposition venues are all examples of this type of structure. The types, shapes, and benefits of tensile constructions are briefly discussed in this article.
Advantages of Tensile Structures
- Environment protection (sun, rain, wind)
- Translucency in general, as well as the ability to create light effects
- Durability and little weight
- Form options are endless, and the character is captivating.
- Short construction duration, structural manufacture off-site, and less time on-site disruption
- Large stretches of time
- Eco-friendliness and recyclability
- Adaptability to cutting-edge construction technology (steel, glass, cement, stone)
- Maintenance is simple, and repairs or replacements are simple.
7. Composite Structures
The non-residential multi-story building industry is dominated by composite construction. For more than two decades, this has been the situation. Its success can be attributed to the strength and stiffness that can be achieved with the least amount of materials.
Concrete is good in compression, while steel is good in tension, which is why composite construction is typically so good. These qualities can be leveraged by structurally connecting the two materials together, resulting in a highly efficient and lightweight construction.
]]>
1. Introduction
Soil nailing is defined as the construction technique to reinforce and strengthen the natural or excavated soil slope by installing nails into holes made in slopes by drilling and grouting procedure.
Soil nailing can be applied for different soil types like glacial soils, sandy clays, clayey silts, gravels, etc.
But it is not suitable for loose granular soils, high corrosive soils, soft fine-grained soils, organic soils, etc.
The main aim of using soil nailing is to stabilize slopes and retaining walls.
2. History of Soil Nailing
Soil nailing technology was first introduced in France. The project, undertaken in 1961, was the first where steel nails were used to reinforce a retaining wall.
The first soil nail wall to use modern soil-nailing technique was built near Versailles in 1972.
3. Components
Some of the components used in soil nailing are explained below:
a. Soil Nail
This component includes tendon, grout, and corrosion-proof soil nail.
i. Tendon
Tendon is the ground-reinforcing element like steel (hollow or solid) bar that is inserted behind a soil nail wall.
ii. Grout
Grout is used for transferring the shear and tensile stresses from the tendon to the ground to improve stability.
Portland cement and water are used to be placed in drilled holes under gravity by using the tremie method.
iii. Corrosion proof
For long-lasting, the soil nail should be protected against corrosion.
To protect the soil nail from corrosion, it is encapsulated by a sheath of a fusion-bonded epoxy coating or galvanization.
b. Facing
Facing can be done by shotcreting that includes initial and final phase depending upon excavation period for temporary and permanent stability.
Reinforced shotcrete is done during initial facing with the installment of welded-wire mesh over the excavated slope of soil consisting of precast-concrete spread with the help of shotcrete machine-like Aliva-520.
The final facing gives the structurally stable aesthetic design finishing.
c. Other Components
Other components like nuts, bolts, washers, bearing plates and headed studs are embedded with soil nails. There should be a proper drainage system around soil nailing sites using ground anchors, geosynthetic materials, and so on.
4. Cost
The cost of soil nailing depends upon a range of soil nailing applications, materials used, manpower, complexities during construction procedures, and the effectiveness of soil nailing work.
Cost of soil nailing installation and removal, maintenance differs nationalize.
5. Machinery Used for Soil Nailing
a. Rotary machine with a downhole hammer.
b. Air compressor (of 100psi and (300-700) CFM.
c. Grout Mixer
d. Grout Pump (for shotcrete)
6. Design Considerations
a. Immediate inauguration of soil nailing work after excavation should be done to reduce the chance of collapse of soil slope.
b. According to the strength of soil surface, spacing of soil nails should be chosen wisely for better soil slope stabilization.
c. Strength limit state of soil should be analyzed carefully from potential failure.
d. Every property should be checked carefully.
e. Nail length, diameter, external loads due to wind, hydrostatic force, earthquakes, vibrations, etc. matters during the designation of the soil nailing process.
f. Drainage system and freeze-thaw action should be taken into consideration.
7. Types of Soil Nailing Methods
a. Drilled and grouted soil nailing method
In this method, in naturally or excavated slope faces, holes are made by drilling machines like Ak-10, and nails are inserted in these drilled holes with grouting materials (concrete, shotcrete) in the spacing interval of 1.5m using (100-200mm) diameter nails.
b. Driven soil nailing method
In this method, excavated slopes are temporarily stabilized as quickly as possible using nails of (19-25mm) diameter with a spacing of (1-1.2m). This method doesn’t assure corrosion protection to reinforcement (steels or nails).
c. Self-drilling soil nailing method
Hollow bars are inserted into the slope surface with the filling of grouting materials. It is faster than drilled soil nailing method and having more corrosion resistive features.
d. Jet grouted soil nailing method
Less corrosive steel bars are installed in the holes made by eroding soil using jets in slope surfaces. Then, holes are grouted with concrete.
e. Launched soil nailing method
This method involves nailing steel bars forced to the soil with a single shot using compression by an air mechanism.
It is a difficult method to penetrate the ground with nails in a single shot.
8. Soil Nail Installation Considerations
1. Soil nails should penetrate beyond the slip plane into the passive zone generally for 4 m to 5 m.
2. The spacing of soil nails in the horizontal or vertical directions must be linked to the strength of the soil. Surplus soil nails should be placed at the edge of any surface being stabilized.
3. Soil nailing should begin immediately after excavation. Any late may result in the collapse of the soil slope.
9. Construction Sequence
The algorithmic sequence of construction work of soil nailing is:
Step 1: Initial excavation (of depth 3-5 ft)
Step 2: Drilling of holes using drill machines(downward 15° inclination from horizontal).
Step 3: Insertion of nail reinforcement and grouting into the slope face.
Step 4: Construction of initial facing of the slope.
Step 5: Construction subsequential level.
Step 6: Repeat steps 1 and 4.
10. Applications
1. It is used to reinforcing and stabilizing the slope of soil and retaining walls.
2. Soil nailing is done for widening roadways, railway embankment, landslide and flood protection on the banks of rivers, highway embankment and cuttings, etc.
3. It can be used for constructing Shored Mechanically Stabilized Earth (SMSE) walls.
4. It is used for retrofitting and constructing the bridge abutments.
11. Advantages
1. Shotcrete facing is economical.
2. Cost-effective method for durability and stability of slope soil failure.
3. It can be applied to a relatively large area.
4. It is suitable for various applications like temporary excavation shoring, tunnel portals, repairing of failures structures, etc.
5. Installation process takes less time.
6. It has less impact on the environmental system.
7. It uses fewer materials and machinery.
8. It has no height limitations.
12. Disadvantages
1. Unsuitable for high water table areas.
2. For soil having low shear strength, high soil nail density is difficult to use.
3. Expert contractors and manpower are crucial.
4. 3D modeling designation is required.
5. Not suitable where strict deformation control is needed for structures.
6. Metal Soil nails can corrode easily.
]]>