What is Septic tank?
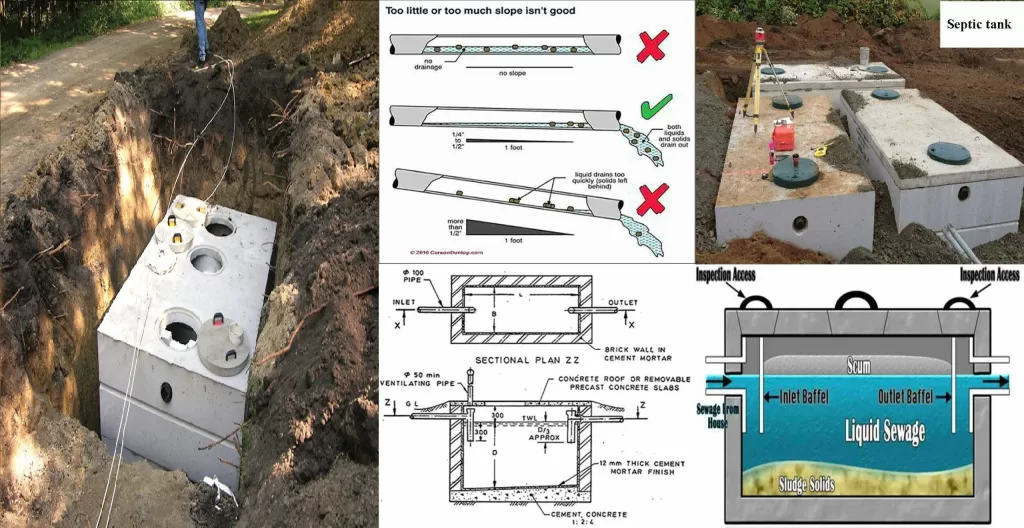
A septic tank can be defined as primary sedimentation tank with large detention time (12 to 36hrs against a period of 2hrs in an ordinary sedimentation tank). In non-sewered rural and urban areas septic tanks are suitable for disposal of night soil. But sufficient water should be available as water is required for flow of the night soil from latrine to the septic tank and for proper functioning of the septic tank. The size of the septic tank is so designed that the sewage is retained in the tank for 24hrs during which certain biological decomposition by the action of anaerobic bacteria takes place which liquefies and breaks the night soil leaving small quantity of soil which is known as sludge and settles at the bottom of the tank and clear water known as effluent flows out of the tank. The effluent from the septic tank is usually disposed by absorption in the soil through soak pit, if no municipal drainage system is prevailing in the area. If municipal drainage line exists in the area, the effluent is discharged to the drain. It is to be noted that disinfection agent such as bleaching powder, phenol etc. should not be used in cleaning latrines as disinfectant entering the septic tank kills the bacteria growth as a result of which rate of biological decomposition is retarded.

Design of Septic Tank
Report this ad The capacity of septic tank depends on number of users and interval of sludge removal. Normally sludge should be removed every 2 years. The liquid capacity of tank is taken as 130 liters to 70 liters per head. For small number of users 130ltr per head is taken. A septic tank is usually provided with brick wall in which cement mortar [not less than 20cm (9 inch)] thick and the foundation floor is of cement concrete 1:2:4. Both inside and outside faces of the wall and top of the floor are plastered with minimum thickness of 12mm (one-half inch) thick cement mortar 1:3 mix. All inside corners of septic tank are rounded. Water proofing agent such as Impermo, Cem-seal or Accoproof etc. is added to the mortar at the rate of 2% of the cement weight. Water proofing agent is to be added in similar proportion in to the concrete also for making floor of the tank. For proper convenience in collection and removal of the sludge, the floor of septic tank is given a slope of 1:10 to 1:20 towards the inlet side. Which means that floor of the outlet side will be on the higher elevation than the floor at inlet side.
Dimensions of Septic Tank Components
i) Length, Width and Depth of Septic Tank
Width = 750mm(min) Length = 2 to 4 times width Depth = 1000 to 1300mm. (min below water level) + 300 to 450mm free board Maximum depth = 1800mm + 450 mm free board Capacity = 1 cubic meter (10 cubic feet) minimum
ii) Detention period
Detention period of 24hrs (mostly) considered in septic tank design. The rate of flow of effluent must be equal to the rate of flow of influent.
iii) Inlet and outlet pipes
An elbow or T pipe of 100mm diameter is submerged to a depth of 250-600mm below the liquid level. For outlet pipe an elbow or T type of 100mm diameter pipe is submerged to a depth of 200-500mm below the liquid level. Pipes may be of stone ware or asbestos.
iv) Baffle Walls of Septic Tank
For small tanks, RCC hanging type scum baffle walls are provided in septic tanks. Baffle walls are provided near the inlet. It is optional near the outlet. The inlet baffle wall is placed at a distance of L/5 from the wall, where L is the length of the wall. The baffle wall is generally extended 150mm above to scum level and 400-700mm below it. Scum being light, generally floats at the water level in the tank. Thickness of the wall varies from 50mm to 100mm. for large tanks lower portion are having holes for flow of sludge.
v) Roofing Slab of Septic Tank
The top of the septic tank is covered with a RCC slab of thickness of 75-100mm depending upon the size of the tank. Circular manholes of 500mm clear diameter are provided for inspection and desludging. In case of rectangular opening clear size is kept as 600X450mm.
vi) Ventilation Pipe
For outlet of foul gases and ventilation purpose cast iron or asbestos pipe of 50-100mm diameter is provided which should extend 2m (min) above ground level. Top of the ventilation pipe is provided with a mosquito proof wire mess or cowl.

Fig: Sectional plan ZZ shoes the typical layout of the septic tank. Section XX shows the Cross-Sectional detail of septic tank.
Example – Design of Septic Tank for 20 Users
Liquid capacity of the tank:
@120lts per user = 0.12 X 20 =2.4cum Take liquid depth as 1.3meter. Therefore Floor area of the tank = 24/1.3 = 1.85m2 Taking length as 2.5times the breath L X B=1.85 2.5B X B = 1.85 B = Sqrt(1.85/2.5) = 0.86 say 0.9m Therefore, the dimension of the tank is 22.5 X 0.9m
Suitable Sizes of Septic Tank Based on Number of Persons
Suitable sizes of septic tanks for use of 5, 10,15,20,50 persons are given in following table.
| No of users | Length L in m | Breath B in m | Liquid Depth in m | Liquid Capacity to be provided in m3 | Free Board in m | Sludge to be removed(m3) | Interval Cleaning |
| 5 | 1.5 | 0.75 | 1.0 1.05 | 1.12 1.18 | 0.3 0.3 | 0.36 0.72 | 1 year 2 year |
| 10 | 2.0 | 0.9 | 1.0 1.4 | 1.8 2.0 | 0.3 0.3 | 0.72 1.44 | 1 year 2 year |
| 15 | 2.0 | 0.9 | 1.3 2.0 | 2.3 3.6 | 0.3 0.3 | 1.08 2.16 | 1 year 2 year |
| 20 | 2.3 | 1.1 | 1.3 1.8 | 3.3 4.6 | 0.3 0.3 | 1.44 2.88 | 1 year 2 year |
| 50 | 4.0 | 1.4 | 1.3 2.0 | 7.3 11.2 | 0.3 0.3 | 3.60 7.20 | 1 year 2 year |
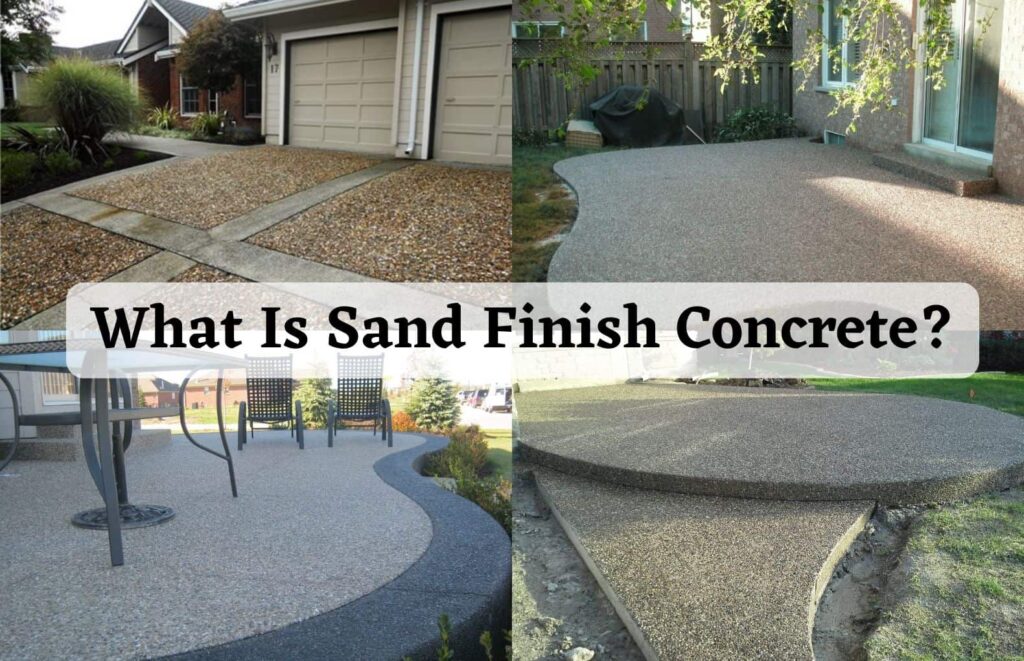
What Is a Sand Finish Concrete?
Similar to concrete with a standard finish, concrete with a sand finish has a more polished appearance. Mix 1 part cement with 2 parts sand and 3 parts gravel to create sand-finished concrete. Water is gradually added after all of the dry ingredients have been completely combined.
Because of its sand-textured look and resemblance to the hard sand found on beaches and seashores, sand-finish concrete is also known as “sand-washed finish concrete.“
In this article, we will try to understand what is sand finished concrete and what are its types.
What Functions Does the Sand Finish Concrete Serve?
The texture of sand-finished concrete is outstanding. It is less abrasive, gritty, and slippery all at once, therefore it is more frequently used in the backyard and by the pool.
In addition, sand finish concrete is available in many other designs and patterns, such as squares, checkerboards, diamonds, and many others. Sand-washed concrete is very pliable and adaptable. Additionally, it makes your home smoother and cleaner, which enhances its appeal.
Types Of Concrete Finishes
Sand finish concrete includes the following concrete types:
- Smooth Trowel Concrete Finish
- Stamped Concrete Finish
- Normal Concrete Finish
- Broom Concrete Finish or Scratched Concrete Finish
- Salt Finish Concrete
- Aggregate Appearance Concrete Finish
- Terrazzo Concrete Finish
- Rosette Concrete Finish or Swirl Concrete Finish
- Sandblasted Concrete Finish
- Colour Finish Concrete
1. Smooth Trowel Concrete Finish
The concrete surface is coated with either cement paste slurry or cement dust, which is then continually pressed and dragged to maintain a smooth appearance all around it.
They are typically used in locations like pathways, verandas, restrooms, and other areas with easy water drainage and low water permeability. Additionally, this type of concrete has a very smooth and lustrous texture.
2. Stamped Concrete Finish
In this stamped concrete finish, the top layer of the concrete is softly pressed with a variety of plates and rubber pads, leaving the stamp on it after a few hours to resemble tiles, blocks, and paving stone.
3. Normal Sand Finish Concrete
This type of concrete is frequently tamped and vibrated with wooden tampers before being placed over the formwork and on the ground. It results in a naturally finished concrete surface that is neither very smooth nor very rough.
4. Scratched or Broom Concrete Finish
In this type of finish concrete, the first setting of the stage of concrete is scratched with the help of a broom, wire brush, and trowel. They consequently impart a very harsh and rough texture to the surface. The broom is typically used to prevent slick pathway surfaces in homes and on highways. It is made of bamboo wood that has been coarsely cut. It also creates a solid bond between the base surface for mortar application and the tiles.
5. Salt Finish Concrete
This kind of concrete finish is made by first evenly distributing wet, fresh concrete over the surface, followed by inserting crystals made of big lumps and slats inside the concrete surface. These ingrained salts are eliminated from the concrete using water jetting so that it can harden. The salts create a depression over the implanted region as a result, giving the concrete a rougher, more natural texture.
6. Aggregate Appearance Sand Finish Concrete
This kind of concrete has a finish similar to terrazzo, except it uses aggregates rather than marble chips. The aggregate is first deeply implanted over the concrete surface using a power float.
Other options for giving the concrete surface a shiny, glossy appearance include chemical treatments or paint. Granite, basalt, quartz, and other stones with aesthetically attractive textures are typically used.
7. Terrazzo Concrete Finish
At this type of concrete, grey or white cement blended with variously coloured marble chips replaces the coarse aggregate in a ratio of 1:1.25 or 1:2. After placement and hardening, concrete chips are exposed by grinding, and the surface is then polished with a more suitable chemical procedure or paint to produce a shiny and glossy finish.
8. Rosette Concrete Finish or Swirl Concrete Finish
Any form of finished concrete has a level and smooth surface, however semi-circular arc intersections cause the surface of this kind of concrete to undulate. This concrete surface was given an undulating appearance by using the right technique to press down on the recently slumping concrete with a trowel.
9. Sandblasted Concrete Finish
This method is used to sandblast the surface after the concrete has dried, using a pressurized blast of mix and air. so that the texture of the concrete is rough.
10. Color Concrete Finish
In this type of concrete, colour tinting is applied either during the curing process or by spraying the concrete’s top surface, which is subsequently smoothed with a trowel. There are powder variations of every pigment colour.
To give the concrete surface a colourful, artistic feel and various hues to make it more appealing, use concrete stains and concrete dyes. Colors have been added, but it’s still concrete.
How Can Concrete Get A Sand Finish?
It is easy to get concrete with a sand wash finish for patios and pool decks. Cement and common sand cannot be combined to create a washed-finished surface in a mortar. Finishes can be made with concrete sand. In contrast, mortar sand is utilised to add texture to surfaces by combining it with water and cement.
A sort of sand wash that is generally recovered from the earth’s interior and stone grits is concrete sand. The sand is cleaned after extraction to remove salt, clay, dust, and other impurities.
For concrete with a sand wash finish, M20 grade proportion suggests (1:1.5) or M-grade concrete, which is stronger. Use a trowel to gradually add water after completely combining all of the dry ingredients to create concrete of the M20 grade. After that, use high water pressure to thoroughly wash the concrete to get rid of the cement paste on top.
]]>
Post–tensioning is a method of reinforcing concrete in a slab and beam. Post-tensioning is a form of prestressing.
In post tension slab tendons are prestressing steel wires inside plastic ducts or sleeves or metallic sheets and it is positioned in the forms before the concrete is placed.

After this process concrete gets strength but before the service loads are applied the cables are tensioned and anchored against the external edges of the concrete slab.
What Is Post Tension Slab?
Post tension slab is a combination of conventional slab reinforcement and extra projecting high-strength steel tendons which are continually subjected to tension after the concrete has been settled down.
This method helps to achieve the formation of a thinner slab with a longer side span devoid of any column-free spaces.

Post–tensioned concrete means the concrete is filled after the tension is applied, but it is still getting stressed before the loads are applied.
The Post Tension Slab is the type of slab in which the reinforcement goes through ducts and is made of steel cables, not bars. These wires have to be made out by tensioning them after the concrete has hardened and before the scaffolding is taken away from buildings.
This means that the slab bends upward direction so all the concrete works as in compression through the slab.
The Post Tension Slab is usually called post-stressed concrete when there is pre-stressed concrete (the wires need to be tightened before pouring the concrete) and once the mixed concrete has hardened, it can be released from the wires.
The effect is also the same the slab is bending upward side by the tension and there are no sections of the slab where the concrete is pulled. It all works in compression form.
The slab with cables in the pipe is ready to be stressed. It is done after the concrete has to get hardness, so it is post-stressed.
Principal of Post-Tension Slab
Concrete has high compressive strength and steel has high tensile strength when combined it is used to bear loads, and the efficiency increases manifold.
When a heavy live load is applied to the structure its concrete slab undergoes tension form, which leads to the constitution of cracks and ultimately deformation.
To reduce this problem in the post-tension slabs, post-tensioned steel tendons are entered at the time of concreting and tensioned after concreting with conventional rebars.
Types of Post-Tension Method
Bonded Posts

Bonded Post Test
Bonded post-tension slab is used for large structural elements like beams and transfer girders. This method was used for Crete monolithic slabs for house construction where adobe clay Crete problems in the perimeter foundation.
Also used in the construction of bridges. Design advantages include increased span lengths in building and load-carrying capacity and decreased deflection. In this method, Hooke’s law was used to maintain tension and wedge position.
Unbonded Post-Tensioning

It is typically used in new construction for elevated slabs, slabs on grade beams, transfer girders, joists, shear walls, and mat foundations.
In the post-tension slab method, the tendon is coated with lithium–based grease and covered in a plastic sheet formed. Light and flexible these two are the unbounded mono strand that can be easily and rapidly installed for providing an economical solution.
Freyssinet System

It was inaugurated by the French engineer Freycinet. High-strength steel wires of 5 to 7mm diameter of 8 -12-16-24 numbers are grouped into a cable with a helical spring inside steel wires are carried along these grooves at the ends.
it is pulled by Freycinet double-acting jacks which can pull through suitable grooves for all the wires in the cable at one time.
Magnel Blaton System
It is having two wires stretched at one time. This method was introduced by the magnel of Belgium. In this method, the anchor consists sandwich plate having grooves to hold the wires.
All plates carry 8 wires. Approx 5-7mm wires are used in this method. One cable consists of 8 wires. These wires with sandwich plates are used as a tapered wedge.
Gifford Udall System
It was introduced by Great Britain, the type of system used in India. In this system single wire is used and all wires are stressed freely using the double jack.
In this system two types of anchorages are used: 1) tube anchorages and 2) plate anchorages.
Components of Post-Tension Slab

Ducts
It is placed inside the slabs to allow the tendons to pass. The main purpose of ducts is to connect cables with tendons. It is available in metal sheet ducts and plastic ducts.
It is thin sheet metal pipes with claw coupling and welded overlapped seam supplied in length of 4 to 6 meters respectively and used as standard ducts are pinned to each other by an outer screw coupling and locked with PE tape.
Plastic ducts are also available on the market to be used besides metallic ducts in post-tension slabs. Ducts are used as waterproof, frictionless, and fatigue-resistant.
Anchors
One of the most useful aspects of a post-tension slab is an anchor. It is used to bind the tendons into the concrete while deducting or joining two tendons.
The main function of anchorage is to transfer the stressing force to the concrete after the stressing process is completed. Extra reinforcement is provided along the anchors.
In some countries, the anchor is also referred to as a trumpet cone. Also used in houses grouting inlet and outlet pipes to allow grouting of the tendon duct in post tension slab.
This device used the following principal,
1) Wedge action,
2) Direct bearing
3) Looping the wires.
Strands
The steel member that is pre-stressed and embedded in concrete loses the initially given stress exponentially with time. Up to a 10% reduction in steel, requirement is possible. Also reduction in concrete requirements due to the reduced size of structural members.
Jacks
It is the most important part of PT construction. When the placing of strands and casting of concrete is successfully done after 5 to 7 days the jacks are used to give stress to these strands and pulled out to tighten these strands in concrete.
Bearing Plate
It is used to save strands from concrete and avoid casting in a post-tension slab. Provide a proper front for stretching.
The Keeper Plate/ Looping Plate
It is used to support the bearing plate.
Coupler/Barrel
It is used at the time of stretching of HT strands and connects strands or bars. This device was tested to transmit the full capacity of strands.
Vent Coupler
It is used at the corners. Used for grouting purposes at ends.
Grouting Equipment
It is the concrete filling of the duct with a strong bond between the tendons and surrounding grout.
The grouting is prepared by the water-cement ratio of about 0.5 with water-reducing admixture, expansion agents, and pozzolans.
Construction Of Post Tension Slab
The following are the steps for the construction of post tension slab,
1. Set up strands in position then set up duct in position and connect ducts with couplings. Insert strand introduces at that one time one strand. set up bar chairs at the right location given on the drawing. Tape all duct joints.
2. Now tendons are set up in the right position as given in the drawing. Set up stressing anchorage parts and stressing recess on slab edge formwork. Now install the bearing plate at the right position using a chair and also provide a grout vent. Fix out anchorage bursting reinforcement. Tape all connections carefully.

3. Prepare dead-end anchorage parts. Bulb dead-end type will be used. All strands are formed with a bulb dead end by a hydraulic jack.
4. Filling of concrete is done when MS bars and PT components are installed. Tendons need to be observed during concreting any misalignment of tendons results face failure. After concreting concrete should be cured until the specified strength not gets.
5. Now tack off side formwork and prepare for stressing operation. When stressing operation starts carefully clean up all strands. Used colar mark strand for elongation measurement.
6. Set up the anchor head and wedge it into all strands. Start pt stressing after concrete gets compressive strength. Stressing pull load on all strands should be locked off.
7. Stressing can be conducted in both ways transverse and longitudinal. Elongation should be observed.
8. The pressure did by conformation to the calibration document. After the elongation has been approved the strand should be cut using an abrasive disc.
9. Grouting performed asap after stressing operation is completed. Also, a grout vent provides an anchorage for all cables.
10. Anchorage should be capped with concrete grouting equipment have specified sprinkling pressure and material should be taken in a given proportion, not greater than a low slump level.
11. After the grouting process is done some projection surfaces are cut down by an abrasive disc.
Applications
The following are applications of the post-tension slab,
- It reduces or eliminates shrinkage cracking so no joints or fewer joints are needed.
- Cracks the form is held tightly together.
- Permission for slabs and other structural members to be thinner.
- It allows for constructing slabs on expansive or soft soils.
- It designs longer spans in elevated members like floors or beams
- In parking, slots were heavy reinforced thick concrete slabs.
- In bridge decks used slabs allows bridges to span longer lengths without the need to have extra piers or supports.
Advantages
Lower long-term costs
when maintenance requirement is less anyone can save on long-term costs. Then the customer can enjoy some energy savings and the opportunity to earn LEED credits.
Structural Durability
PT slabs show reduced cracking, improved durability, and reduced maintenance costs.
Since they won’t deflect their loading so the immediate hairline cracking is no more observed that otherwise looks odd.
Their bending can be controlled by changing the amount of post-tensioning to balance any portion of the given loads immediately after the given stress.
Fast Construction
when reducing rebar allows for saving considerable time that is otherwise taken up by rebar fixing. The same strands are true with formwork and rebar pouring.
Architectural Benefits
The pt slab has advantages over others as it makes a very efficient base for floor design with thin slabs and columnless spaces in larger spans. It gives architects the independence to work freely with the building’s slab designs.
Reduced Dead Weight
when the pt slabs have a lesser thickness, the quantity of concrete and reinforcement used in the building is reduced by up to 20 to 30% when compared to conventional concrete slabs.
Popularity
because of the benefits, the popularity of pt slabs has skyrocketed for years. The demand for PT slabs throughout all countries continues to increase because of some of the profitable benefits for developers, architects, engineers, contractors, and customers of using buildings.
Improved Performance
The pt slabs are ideal for structures where customers need improved seismic behavior, less vibration, and deflection and crack control. These are perfect for watertight and flexibility in building flooring.
Commercial Real Estate
the post-tensions results in thinner concrete slabs, making the valuable savings in floor-to-floor height available as additional floors. It can provide some extra space within the same overall building height for use as rentable.
Material Saving
while saving the PT slab using a thinner concrete slab. There is substantial material saving. These reduce overall 20% and reinforcement by as much as 75%.
Certification
There are only two groups that offer certification related to PT construction:
PT Institute
PTI has a certification license for manufacturing plants and their parts (level 1 and level 2)
Ironworkers Union
it is introduced by JimRogersand has evaluation and certification licenses also he is the publisher of PT magazine.
FAQs:
What do you mean by Post Tensioning Slab?
Post–tensioning is a method of reinforcing concrete in a slab and beam also. Post-tensioning is a form of prestressing.
What are the advantages of the Post Tension slab Method?
1. Lower long-term costs
2. Structural Durability
3. Fast Construction
4. Architectural Benefits
5. Popularity
6. Improved Performance
What is the Principle of PT Slab?
Concrete has high compressive strength and steel has high tensile strength when combined it is used to bear loads, and the efficiency increases manifold.
]]>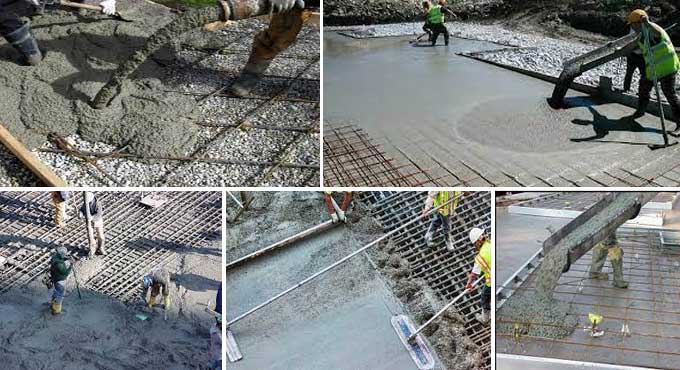
Table of Contents
- A. Concrete Placing
- 1. Avoiding Segregation
- 2. Aiding Compaction
- B. Precautions of Concrete Placing
In this article, we will discuss concrete placing.
Concrete placing may be defined as the process of pouring concrete into the formwork to have a defined shape and size.
Concrete placement is an essential process in construction that defines the success of the structure and its life. Technical and environmental needs are carried into tough care while setting the concrete.
A. Concrete Placing
Here are 2 things you need to take care of while concrete placing listed below:
1. Avoiding Segregation
The considerable practices for ignoring segregation at the time of placing concrete, in any element, are:
a. Concrete must be positioned vertically and closely as much as feasible to its final position.
b. It should not be completed to flow into position. Where concrete must be transported it must be shoveled into the final position.
Other techniques for neglecting segregation at the time of placing rely on the type of element being created and on the type of distribution equipment being employed.
For concrete placing of flat work and slabs incorporating ribs and beams (i.e. shallow forms), the techniques shown below should be considered.
For concrete placing of walls and columns (i.e. deep, narrow forms), problems arise when the concrete is poured from a height and bounces off the reinforcement and forms faces, outcoming in segregation.
The means of evading this vary with the type of distribution equipment being employed as shown in the figure below.
2. Aiding Compaction
To assist in subsequent compaction of the concrete, care should be carried to place concrete in layers that are of a suitable depth for the compaction gear.
Layers that are too deep make it virtually unfeasible to sufficiently compact the concrete, leaving entrapped air that will make voids and blow holes in the surface of the concrete, and prevent it from achieving its potential durability and strength.
The two main types of compaction equipment are immersion (poker) vibrators and vibrating-beam screeds. The effective radius of action of an immersion vibrator relies on its frequency and amplitude.
The standard sizes available in normal concrete construction work include a radius of action between 200 and 350 mm. This means, in practice, concrete should be positioned in uniform layers varying from 250 to 400 mm, relying on the vibrator employed.
To ensure each layer is correctly melded together, the vibrator should penetrate about 150 mm into the lower layer as shown in the figure below.
B. Precautions of Concrete Placing
The precautions that need to be carried out during concrete placing are as follows:
1. During placing, it should be observed that all edges and corners of the concrete surface stay unbroken, sharp, and straight in line.
2. As far as possible, the concrete should be set in a single thickness. In the case of deep sections, the concrete should be placed in successive horizontal layers and proper care should be carried out to develop sufficient bonds between successive layers.
3. It is hoped to prepare concrete as near as practicable to its conclusive position.
4. Large quantities of concrete should not be deposited at a time. Otherwise, the concrete will start to flow along the formwork and consequently, the resulting concrete will not have uniform composition.
5. The concrete must be poured vertically from a proper height. For vertical laying of concrete, care must be carried to employ a stiff mix.
Otherwise, the bleeding of concrete through cracks in forms will occur. The term bleeding is employed to convey the diffusion or running of concrete through formwork.
6. The placing of concrete should be carried out uninterrupted between predetermined construction joints.
7. The concrete should be deposited in horizontal layers of about 150 mm in height. For mass concrete, the layers may be 400 mm to 500 mm in height.
The collection of surplus water in upper layers is known as the laitance and it should be controlled by employing shallow layers with a stiff mix or by placing dry batches of concrete to soak the surplus water.
8. The concrete should be simply worked around the reinforcement and tapped in such a way that no honeycombed surface occurs on the disposal of the formwork. The term honeycomb is employed to indicate a comb or mass of waxy cells initiated by bees in which they hold their honey.
Hence, if this precaution is not considered, the concrete surface so formed would have a honeycomb-like surface.
9. The concrete should be positioned on the formwork as soon as possible. But in no case, it should be positioned after 30 minutes of its preparation.
10. The formwork or the surface which is to obtain fresh concrete should be adequately cleaned, prepared and well watered.
]]>
Introduction
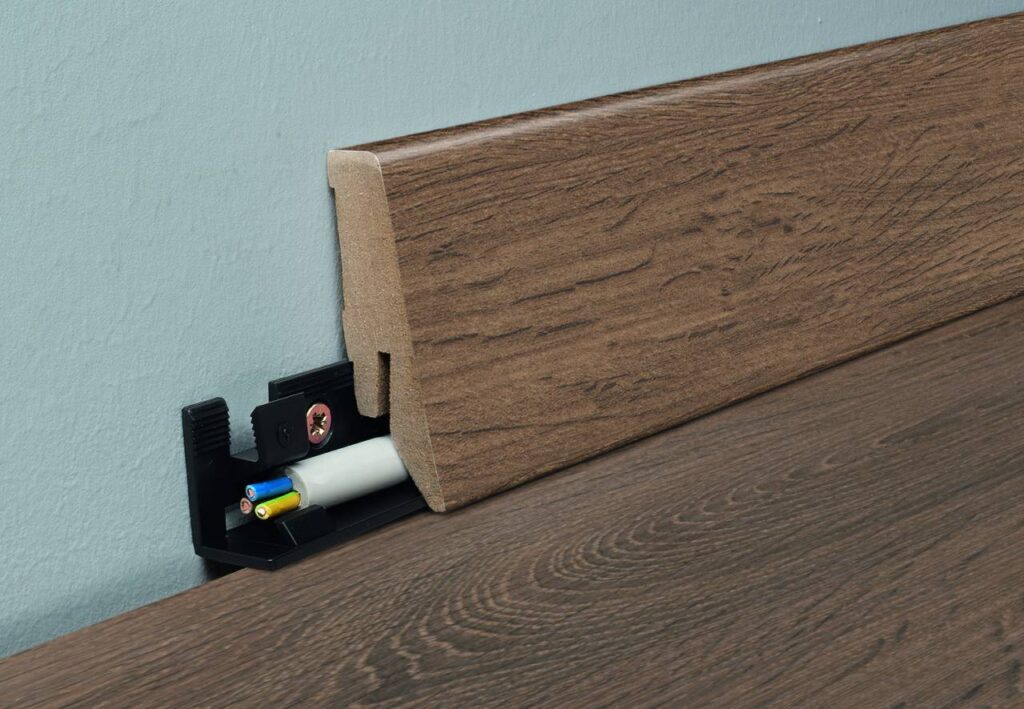
Types of Skirting – How to Choose the Right Skirting Boards for Your Home: Skirting is the method involved with covering the improper edge or boundary generally for aesthetic purposes. Different materials of various qualities and properties can be utilized for the purpose of skirting according to the need and requirements. Skirting isn’t just performed for stylish purposes. One more utilization of skirting is to prevent the exposure of a portion of anything to the outer climate to preserve the materials from deterioration.
Additionally, skirting should be possible to conceal the different unwanted highlights, components, and materials from specific parts like water pipes, electric wirings, and so forth.
Prior, timber was the material utilized for making skirt boards. However, as the innovation progressed, different skirt board materials were introduced.
What are Skirting Tiles?
Skirting tiles are the tiles or boards that lay in the corner or intersection of the floor and wall. The skirting boards assist your room in looking bigger than it really is, as the eye will move towards the floor and up the wall, which makes a consistent impact by a transition between floor and wall.
What is Foundation Skirting?
Skirting is a vinyl accessory that is installed between the bottom edge of the manufactured structure and the ground underneath. Cottages and trailers are generally built on a raised foundation or piers, so vinyl skirting is an extraordinary way to conceal the foundation.
What is the Size/Height of the Skirting
For the most part the height of skirting ranges from 4 inches to 6 inches. In public buildings like a hospital, processing plants, hotels, and so on skirting heights are kept around 6 inches. While for residential buildings it is kept around 4 inches or 5 inches.
Purpose of Skirting
Skirting in certain projects is an aspect of beautification and as far as some might be concerned, it’s a method to hide the undesirable features in the interior walls. These skirting boards were referred to as mop boards as they protect the wall from water when the floor was mopped. Various purposes for which skirting is installed are referenced underneath:-
A) Hide Exposed Electrical Wiring
Skirting can be utilized to cover up the exposed electrical wires and connections that can’t be eliminated. Hiding these wiring under the skirting board is found more affordable and practical contrasted to hiding it under the ceiling board. The functionality and usefulness of skirting boards isn’t the only advantage of having them installed in your home. These boards do wonders for the interior stylistic themes, making your home look more elegant. The variety of baseboard styles accessible to homeowners empowers them to find the ideal fit for their decor. There’s a vast range of vintage and contemporary models suitable for moderate and memorable homes.
B) Improve Interior
The functionality of skirting boards isn’t the main advantage of having them installed in your home. These boards do wonders for interior decor, making families look more exquisite. The variety of baseboard styles accessible to homeowners empowers them to find the ideal fit for their stylistic layout. Because of the extensive choice of materials, people can without much of a stretch match baseboards to their ground surface plan and furniture. Likewise, these boards can be painted in any color you track down alluring to mix in with the other components or accomplish a contrasting effect.
C) Excellent Durability
One more benefit of deciding to utilize skirting boards is their incredible life span. Both MDF and wooden baseboards are viewed as exceptionally durable and non-demanding with regard to their maintenance. For example, MDF models are particularly convenient for homeowners adapting to dampness, as these impede water from damaging the material. MDF skirting is probably the wisest solution for washrooms and kitchens where moisture is no stranger.
D) Cover the Gap between the Walls and Floors
Some construction failures might bring about undesirable gaps between the wall and the floor. It is tedious and expensive to Re-try such works. Homeowners are in many cases bothered by the gaps between their walls and flooring, ordinarily brought about by bad floor installation. These aren’t just unattractive but lead to different kinds of household damage like dampness and nuisances. Nevertheless, these gaps aren’t generally a consequence of badly installed floors, as workers for hire will quite often leave such tiny holes in the event that the ground surface shrinks or contracts over the long run.
E) Easy Installation and Maintenance
Numerous homeowners invest in ornamental skirting because of the simplicity of installation and maintenance. One needn’t be an expert to install baseboards since the installation process is very clear. You want to cut the boards, decide on the right point, and join them with the assistance of a drill and somewhat cement. With respect to, skirting boards are easy to clean with one purpose the right cleaning specialists. You ought to begin dusting the surface either with a textured material or a vacuum cleaner. Ensure you utilize the brush attachment that accompanies the vacuum for better admittance to the hard-to-reach spots.
F) Avoids Marks from Furniture: Prevention of Wall Damage
One of the numerous benefits of installing skirting boards in your house is having the option to safeguard the lower section of walls. The foundation of walls is under consistent exposure to different types of damage, especially while vacuuming or wiping. The heads of vacuum cleaners and mops will generally scratch the surface, as people knock them against walls on various occasions while cleaning the house.
Furthermore, utilizing a wet mop to clean the flooring leads to noteworthy damage since mops leave wet patches on a superficial level. Installing baseboards shields the walls from getting wet, preventing moisture from deteriorating their structure. For this reason, numerous homeowners decide to have MDF skirting installed, as these are well known for their moisture-resistance properties.
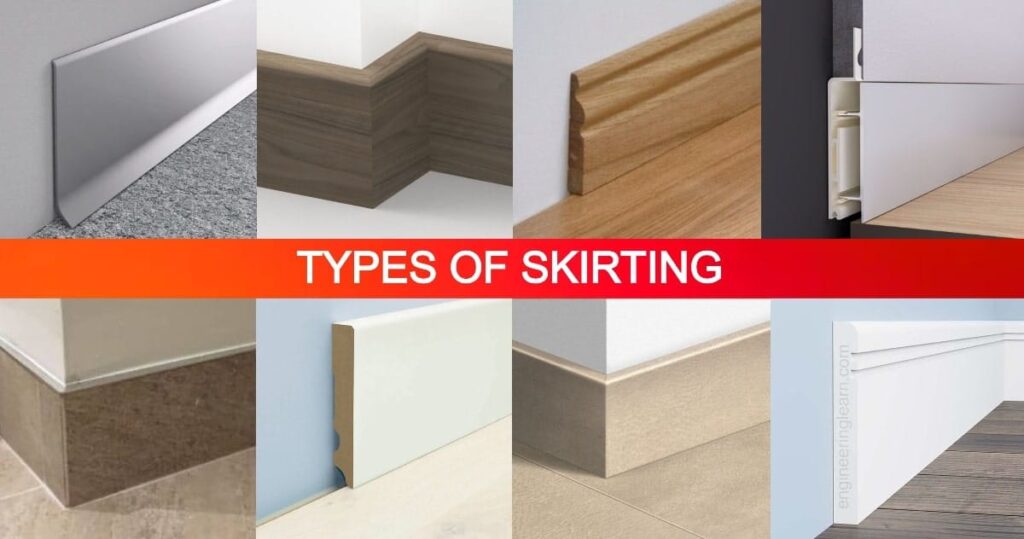
Types of Skirting
1. Metal Skirting:
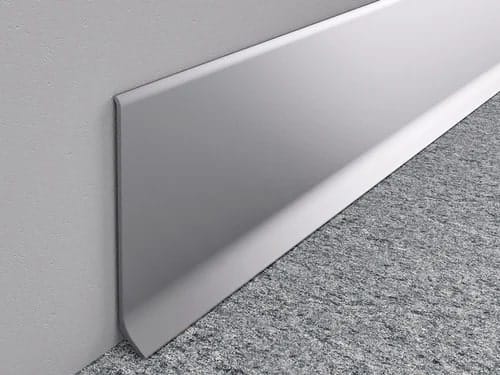
Metal skirting is a sort of skirting which is highly utilized in nowadays. As the name suggests, metals like stainless steel are used for making metal skirting as it gives modern looks and an unprecedented completion as it has shiny looks. Metal skirting is exceptionally preferable in industrial or commercial buildings on the grounds that the durability and strength of this sort of skirting are very high. Metal skirting is giving all the more light reflection in the room.
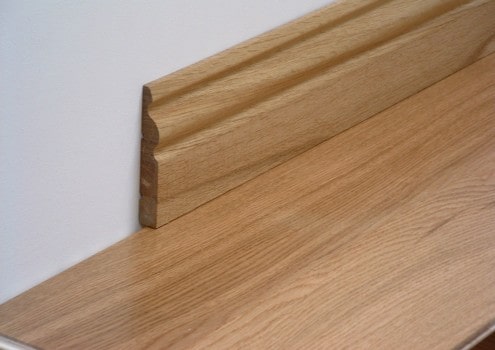
2. Pencil Skirting:
Pencil skirting is the type of skirting which is mostly used in maximum houses. Most of the people prefers pencil skirting because of its perfect and finished look, which enhances the internal beauty and magnificence of the room. Pencil skirting is the type of skirting which is mostly used in maximum houses. This sort of skirting is utilized for different walls like plane walls, designed walls, textured walls, and so on.
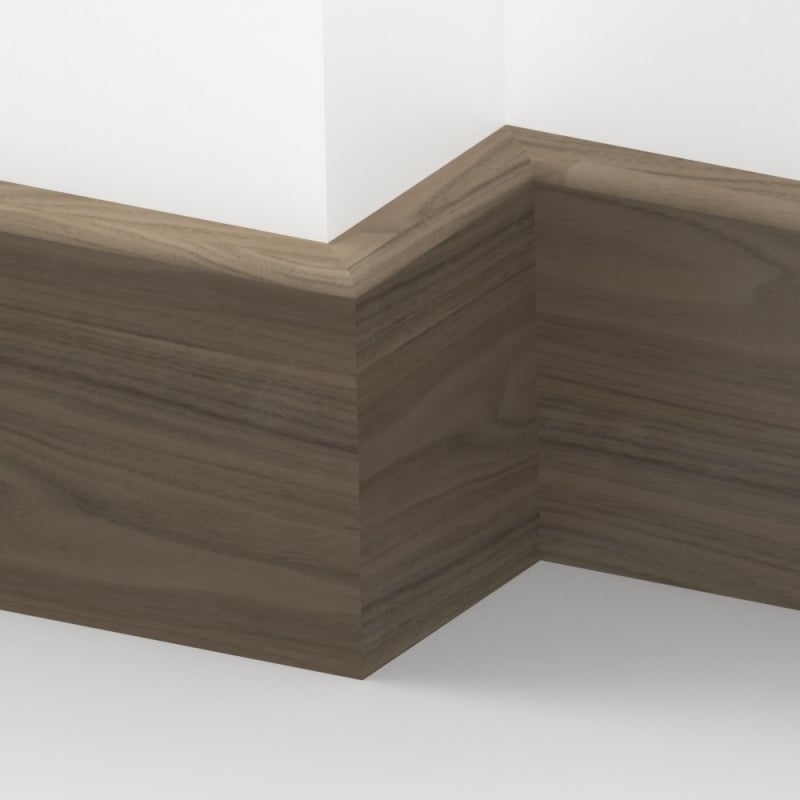
3. Wooden Skirting:
Different hardwood and softwood boards can be utilized for wooden skirting as this skirting gives beautiful propitious aesthetic looks. Many individuals’ best option is wooden skirting, which is pretty impressive. Wooden skirting is a decent decision for granite, marble, and tiles floors. They give sophisticated look to the house. One more utilization of wooden skirting for roof works, walls, and light floors. Wooden skirting is accessible in the market in various sizes and shapes and various tones, designs, and so on.
4. Flush Skirting:
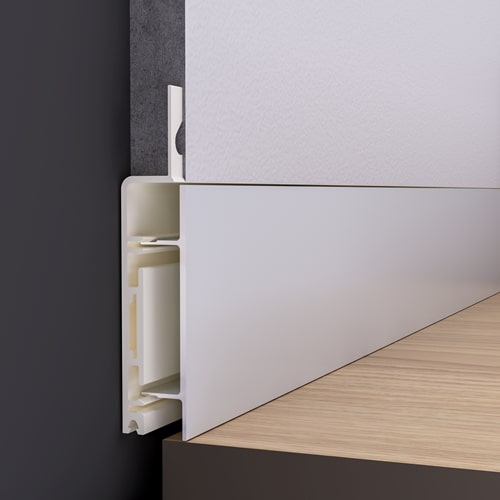
Flush skirting is a type of skirting that increases the aesthetic beauty and internal beauty of the house. Flush skirting is broadly utilized in recent times in light of the fact that it enjoys a few excellent benefits for its users. In flush skirting, the wall and skirting boards are of the same level on the floor. Flush skirting doesn’t contain dust since it’s an exceptionally smooth nature surface. Among a wide range of skirting, just this type is projected outward from the wall, But sometimes lights are provided in that projected part which increases or expands the aesthetic excellence of the room. This sort of skirting provides more space to impeccably fit the furniture in the room.
5. Plaster Skirting: ( Types of Skirting )
Plaster skirting is exceptionally popular and many individuals are utilizing this sort of skirting. Plaster skirting is an unconventional style of skirting board.
Which is embellish the walls and makes them a modern and chic look. Plaster skirting is fundamentally smooth in nature which is provided in the intersection of the wall and wooden floor.
6. Continued Skirting: ( Types of Skirting )
Continued skirting is a slightly different type of skirting and it’s uncommon also. In continued skirting, as the name suggests or proposes which is provided as a continuation of any components or members in the interior spaces as displayed in the figure, the dark brown skirting boards are continued as a part or piece of the comparable shade of the staircase.
7. Double Layered Skirting: ( Types of Skirting )
Double-layered skirting is also known as two-toned skirting. These types of skirting boards are helping to give a detailed design to the room. Double or Twofold layered skirting is utilized for private, commercial, and institutional structures or buildings. The installation cost of double-layered skirting is reasonable for everyone. Doubled or twofold layered skirting provides an itemized overview of the design of your home.
8. Bullnose Skirting: ( Types of Skirting )
Bullnose skirting is used to give a modern and elegant look to the house. Bullnose skirting is a type of skirting which provides an elegant and modern look to the room. These days everybody wants to install Bullnose skirting, in light of the fact that it is available in the market with various heights, which is exceptionally viable for any sort of installation. Bullnose skirting is available at the height of 50 mm to 300 mm in height. The primary benefit of this kind of skirting is it’s matched the interior design of the room.
9. MDF Skirting: ( Types of Skirting )
MDF skirting is an exceptionally common type of skirting which is utilized in a large portion of houses. MDF skirting is accessible in the market in many varieties and this kind of skirting is made with compressed fiber. There are for the most part two sorts of MDF skirting, those are pre-primed and pre-finished. Pre-primed MDF skirting is essentially economical skirting, which doesn’t require such large amount of cash yet you can decorate the skirting boards with your own decision and even you can utilize different colors. This sort of skirting is likewise very durable in nature. PMDF skirting produces a classy look to your home concerning the other kind of skirting.
10. Movable Floor Skirting: ( Types of Skirting )
Movable floor skirting is an innovative type of floor skirting that is installed beneath the cabinet, it has a secret locker behind it. The drawers can be pulled out to access the storage unit behind them, and when it is closed, and then they look like the skirting below the cupboard. You can pull the skirting and it is utilized as a drawer or cabinet and provides some space to put a few things when you push the drawer then it looks like an a skirting; so, this is the main advantage of movable floor skirting. Movable skirting is a good option for small city houses.
11. Color Skirting: ( Types of Skirting )
Refreshing woodwork within a space is a simple and straightforward as well as a successful approach to updating an existing scheme. Most often, skirting boards are painted a neutral or white shade without really thinking, yet their proportion makes them the ideal opportunity to add a little color. Paint walls and skirting boards in the same shade for an all-over wrap-over a scheme that feels comforting and wrapping. This functions admirably with warm, jewel tones or muted greens to bring out the serenity and the calm of the outdoors.
12. Contrasting Color Skirting: ( Types of Skirting )
It’s so vital to utilize the best skirting board paint for your joinery as it comes under a lot of pressure from day-to-day life. In this skirting, will give a different look to your home with contrasting shades and designs. Contrasting color skirting is a kind of colored skirting. We utilize contrasting color skirting to magnify the excellence of the room. In contrasting color skirting, there are various varieties in the skirting boards with some color matching.
How Skirting Provides a Different Look to your Bathroom?
The washroom or Bathroom is one of the most essential parts of your home, hence to provide skirting tiles in your washroom will be of great significance. Since the flooring tiles are required cleaning on a regular premise including rigorous clearing and mopping. Similar flooring tiles are utilized in skirting.
How Skirting Provides a Different Look to your Kitchen?
One more space in the house, where cleanliness and regular mopping or wiping, and sweepings are required in the kitchen. High skirting is required in the kitchen on account of the humid condition and prerequisite of cleanliness.
How to Choose the Right Skirting Boards for Your Home
A) Style
The style of skirting boards comes in a more extensive range. That it is absolutely dependent upon you, how to pick that one which will fit your home incredibly.
B) Materials
Materials are likewise a significant factor for a few types of different reasons. The first thing which will be kept in mind skirting board or baseboard material is profoundly durable and the overall quality is great. Obviously, we can’t disregard the beautification purpose here so you can choose modern materials, exemplary and conventional ones.
C) Scale and Proportion
Consider the size of your room while picking the skirting baseboards for your home, assuming you have high ceilings, all things considered, you should pick taller or heightened baseboards or skating boards.
D) Maintenance
Assuming that you want the baseboard should keep going an extensive stretch so that maintenance has come into the picture, and that implies prior to picking the board contemplates your day-to-day activity and routine since maintenance requires time to cleaning it.
Conclusion
In civil engineering, skirting is one of the most essential parts. Skirting is constructed in almost every residential building, commercial building, modern structure, etc. A more functional purpose behind skirting boards is to go about as protection for the wall from abrasion, unintentional thumps from furniture, wear and tear, etc. They can likewise be utilized to hide an unattractive wall or floor edges that might be uneven and untidy.
]]>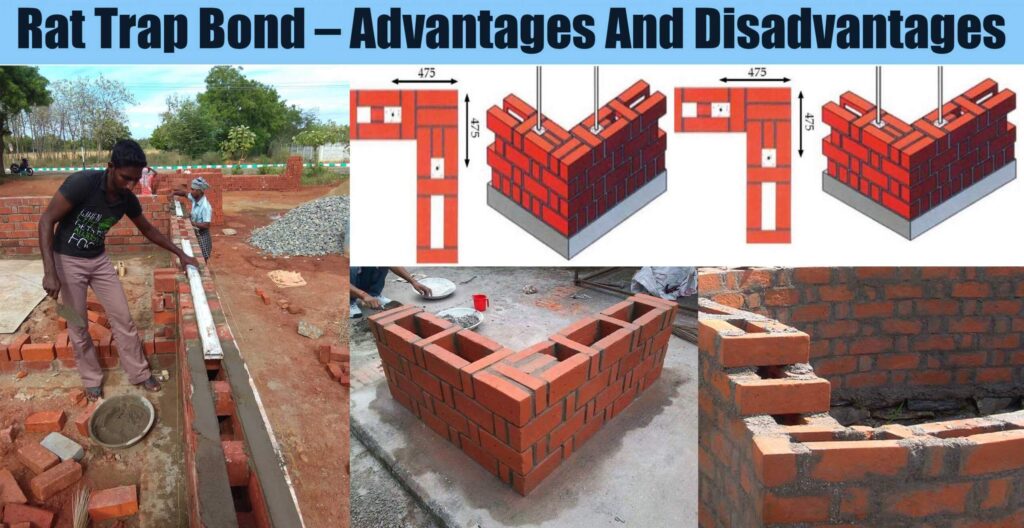
This is one of the wall constructing method of brickwork on wall construction. This method is having slight differences while placing bricks during brickwork; furthermore, it is working on a void making principle.
It means there is space between two blocks when placing on layer. Bricks position in this method is vertical, so brick face with fog remains remain inner face where hollow space created due to the upright position of the bricks.
This kind of new pattern of bricklaying introduced by Mr.laurie Baker in the 1970s in Kerala. The primary purpose of this idea was to draw down cost in the material in construction as much as possible moreover, parallelly, it decreased in material requirements, and also it provides excellent thermal efficiency when it compares to the older pattern of brick masonry.
The main thing that needs to note down is that due to this method, the strength of the wall not affected.
How to Use Rat Trap Bond Method Practically?
- This method is less prominent due to people accustomed to the conventional way of brickwork. At present, these types of masonry construction are new in many areas.
- In this type of bricklaying pattern, bricks are situated on edges; hence face with fog remains inside of the wall, and it built a small rectangular section of four blocks.
- Due to this, the wall has an inside void or free space, which plays a vital role in getting effective thermal insulation inside the room.
Advantage of Rat Trap Bond Method
Here, the pros of rat trap bond methods are as follows.
- This method is adaptable on the basis of its less consumption of construction material means it provide benefits in material costing.
- This method consuming roughly 30% fewer bricks moreover 50% less mortar compare to conventional masonry.
- Most people avoid using this method due to the unawareness of this method. However, the strength is as equal as an old method of bricklaying.
- If considering the main benefit of this method is thermal insulations, it is beneficial to decreased room temperature, and it reduces electricity costs.
- This way of bricklaying method is playing a crucial role in resisting heat and cold in both weather conditions.
- This bricklaying pattern in the construction is eye-catching from both inside and outside of the wall; the plastering process is avoidable if it is not necessarily
- Well, this brick laying method also used in partition wall; moreover, even capable of holding a load on it means its load-bearing capacity is not affected.
- This way is very well useful in case of decreasing material cost; It reduces material consumption, which results in cost saving in the construction budget.
Disadvantage of Rat Trap Bond
Here, the cons of rat trap bond methods are as follows.
- This way of construction is not capable of resisting sound. Hence, the soundproof wall is not possible b this way.
- Mason has to be careful while laying bricks. Extra care must be taken while designing the wall length and heights for a structure.
- Pre-training required if workers are not familiar with this pattern of bricklaying, if not possible, then hired experienced workers; hence the cost of a worker may increase.
Points to Be Considered in Construction for Rate Trap Brick Bonds
Following Care Should Be Taken While Using This Pattern:
- Firstly, the quality of bricks is always checked before used, quality with regular size, and even sharp edges.
- The surface layer or first bottom layer and last or topmost layer of the wall should be solid where no use of vertical bricks.
- Other areas, like sill and lintel levels at opening or sides of opening have to be solid, so it is easy to provide strength to fix frames for door and windows.
- If the building requires more power than we can adopt reinforcement bars to place vertically at hollow space and corners and also at around openings of doors to resist earthquake effects o building.
- In this case, advanced planning and smart work required to installed electrical appliances and plumbing pipes.
- Sum up all things, this way of construction has overall cost in saving on cost is about 25% of a used by building value by traditional 9inch brickwork construction.
- As per the experiment or survey, 350 bricks per CFM in the old method, while in this, it required only 250 blocks; moreover, mortar consumption also decreased, so it affects the building budgets directly.
FAQ
Rat Trap Bond
Rat trap bond is a brick masonry method of wall construction, in which bricks are placed in vertical position instead of conventional horizontal position and thus creating a cavity (hollow space) within the wall.
What Is Rat Trap Bond Used For?
Rat trap bond is a brick masonry method of wall construction, in which bricks are placed in vertical position instead of conventional horizontal position and thus creating a cavity (hollow space) within the wall.
Is Rat Trap Bond Load Bearing?
Walls constructed using rat trap bonds can be used both as load-bearing walls as well as thick partition walls. Rat trap bond technique is relatively durable and maintenance cost is also lower
Rat Trap Bond Masonry
Rat trap bond is a modular type of masonry bond in which the bricks are placed in a vertical position, creating a cavity in the wall while maintaining the same wall thickness as the conventional brick masonry wall. It is also known as a Chinese brick bond.
Who Developed Rattrap Bond?
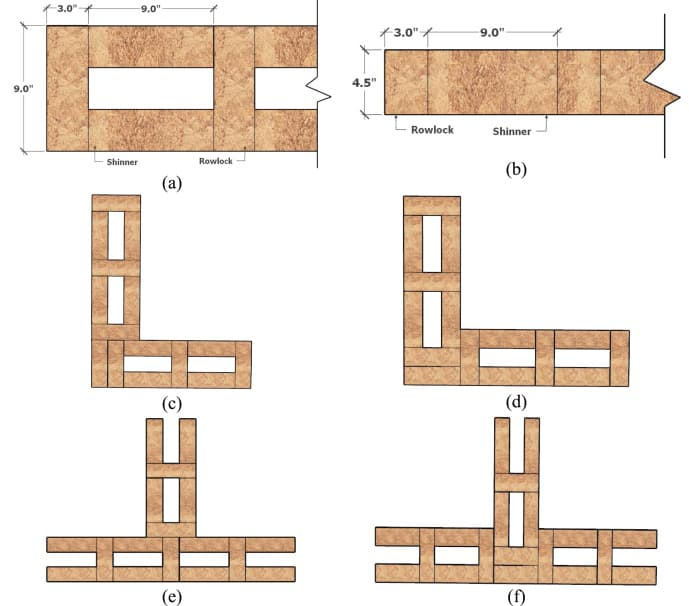
The rat-trap bond was invented and popularised the famous architect Laurie Baker. This system uses bricks-on-edge with a cavity behind every facer brick. Each course of brickwork is 115mm high, comprising of two parallel facers followed by brick placed at 90o to lock the bond. In the next course, the vertical mortar joints are broken by spanning the cavity at its centre with the locking brick. T and L junctions are made solid by filling the cavity with a brick-on-edge. Horizontal courses of brick-on-edge may be taken below the damp proof course (DPC), or at lintel and roof levels to provide horizontal tying. For every 230mm height of brickwork, there is a saving of one layer of mortar.
Rat Trap Wall
Rat trap bond is a brick masonry method of wall construction, in which bricks are placed in vertical position instead of conventional horizontal position and thus creating a cavity (hollow space) within the wall.
Rat Trap Bond Wall
Rat trap bond is a modular type of masonry bond in which the bricks are placed in a vertical position which creates a cavity in the wall while maintaining the same wall thickness as that of the conventional brick masonry wall. It is also known as a Chinese brick bond.
Rat Trap Bond Plan
Advantages of Rat Trap Bond
Here, the list of Rat Trap Bond Advantages are as follows.
- Requires approximately 25% less bricks and 40% less mortar than traditional masonry.
- Reduced material requirement results in considerable cost saving.
- Strength of wall is not compromised, it remains same as traditional masonry wall
Rat Trap Bond Brickwork
Rat trap bond is a brick masonry method of wall construction, in which bricks are placed in vertical position instead of conventional horizontal position and thus creating a cavity (hollow space) within the wall.
Rat Trap Bond Uses
Strength of wall is not compromised, it remains same as traditional masonry wall. Cavity induced in wall provides better thermal insulation, resulting in cooler interiors during summer and warmer interiors during winter.
Rat Trap Bond Elevation

Rat Bond Brickwork
Rat trap bond may be defined as the type of modular masonry in which the bricks are placed in a vertical position such that a cavity is formed in the wall while the thickness is maintained the same as that of the conventional brick wall masonry.
Rat Trap Bond Construction
The rat trap bond construction is a modular type of masonry construction. In this type of brick, masonry bricks are placed on edges making visible the shinner and rowlock.
Thus 110 mm face is exposed from front elevation (for brick size of 230mmx110mmx75mm). This gives the wall an internal cavity that provides effective thermal insulation.
Rat Trap Construction
Rat trap bond is a modular type of masonry bond in which the bricks are placed in a vertical position which creates a cavity in the wall while maintaining the same wall thickness as that of the conventional brick masonry wall. It is also known as a Chinese brick bond.
Rat Trap Bond Disadvantages
- It does not provide good sound insulation.
- Extra care must be taken while designing the wall length and heights for a structure.
- It requires trained masons, otherwise wastage of mortar falling into the cavity.
Rat Trap Bond Houses
The older rat trap bond houses dating from the 1930s mostly are I suppose 9″ construction without timber sub walls. It gets really hot in summer and equally cold in the winter. 0 or even -degrees Farenheight is not unknown here and it routinely gets over 100 in the summer but as we are up in the mountains it cools down quickly in the evenings.
Rat Trap Brick Wall
On average a rat trap brick wall needs cleanness of external surface (if not plastered) every three years.
Rat Trap Bond in Brick Masonry
Rat trap bond is a brick masonry method of wall construction, in which bricks are placed in vertical position instead of conventional horizontal position and thus creating a cavity (hollow space) within the wall.
Rat Trap Bond Brick Size
The bricks are placed in vertical position, so that 110 mm face is seen from front elevation, instead of the 75mm face (considering brick of standard size 230 X 110 X 75 mm). Since width of wall remains 230mm, an internal cavity is created.
]]>
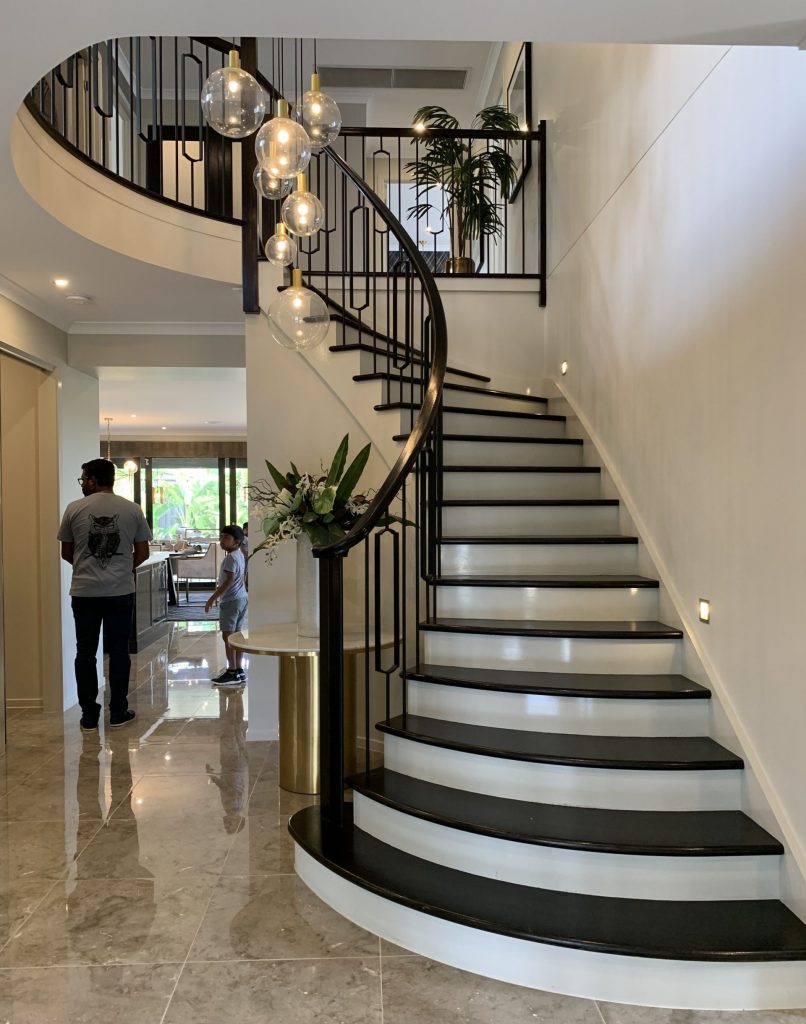
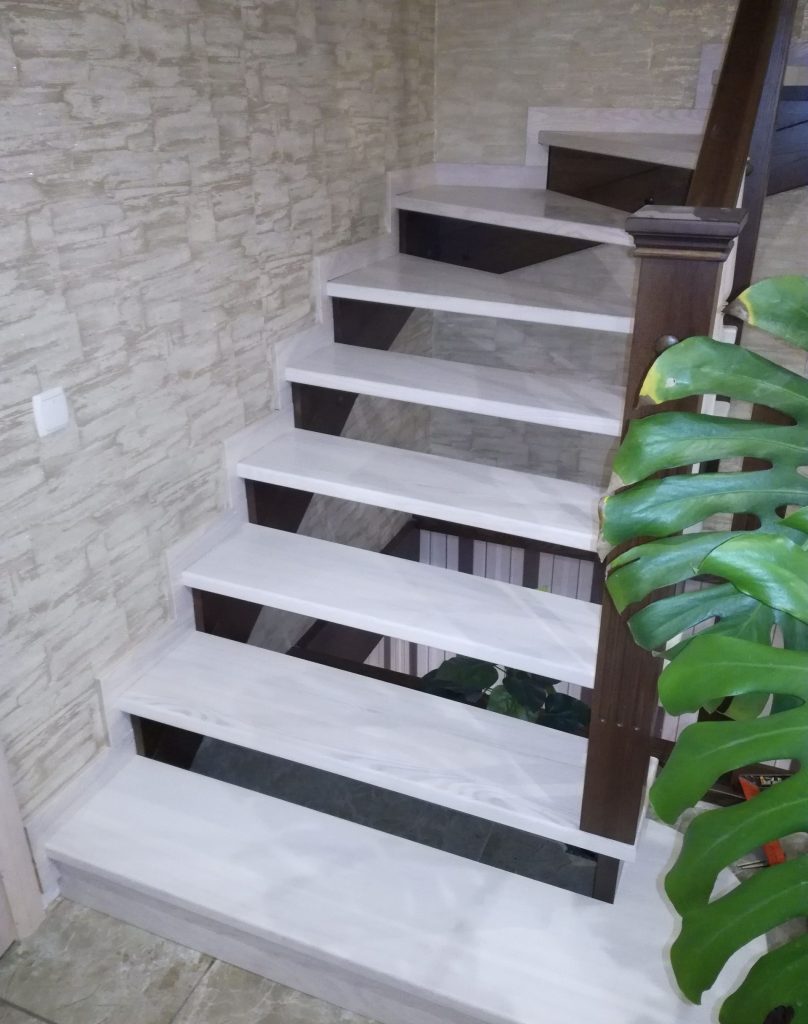
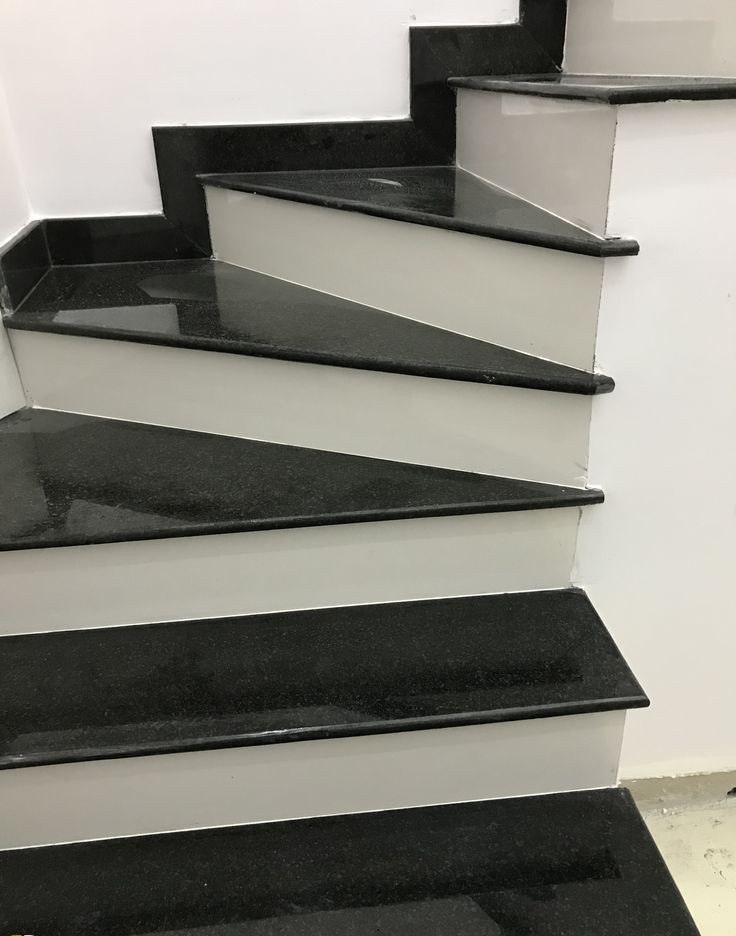
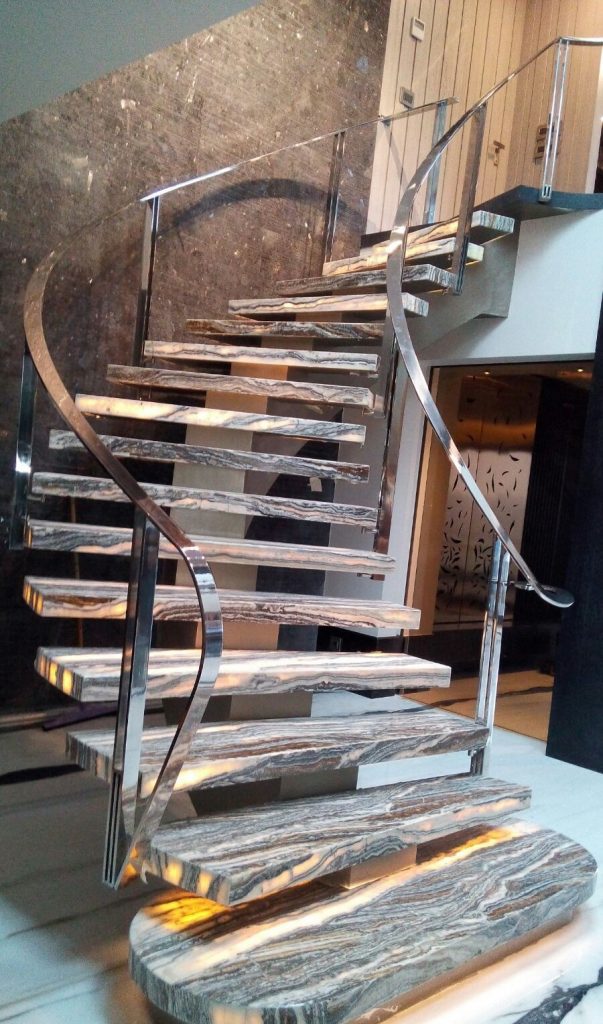
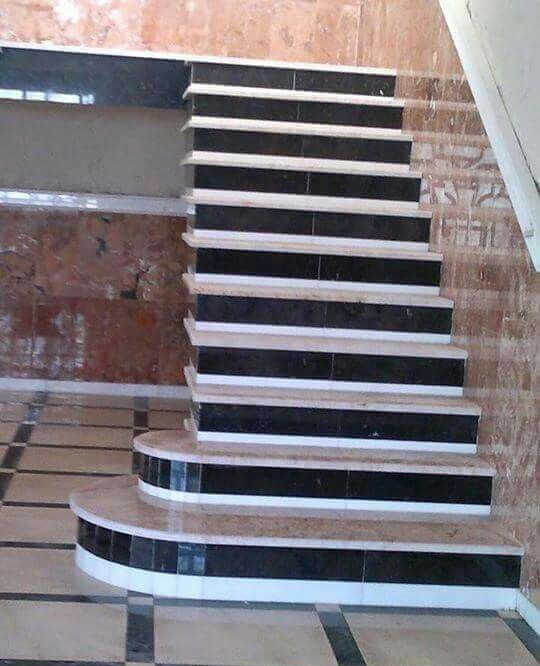
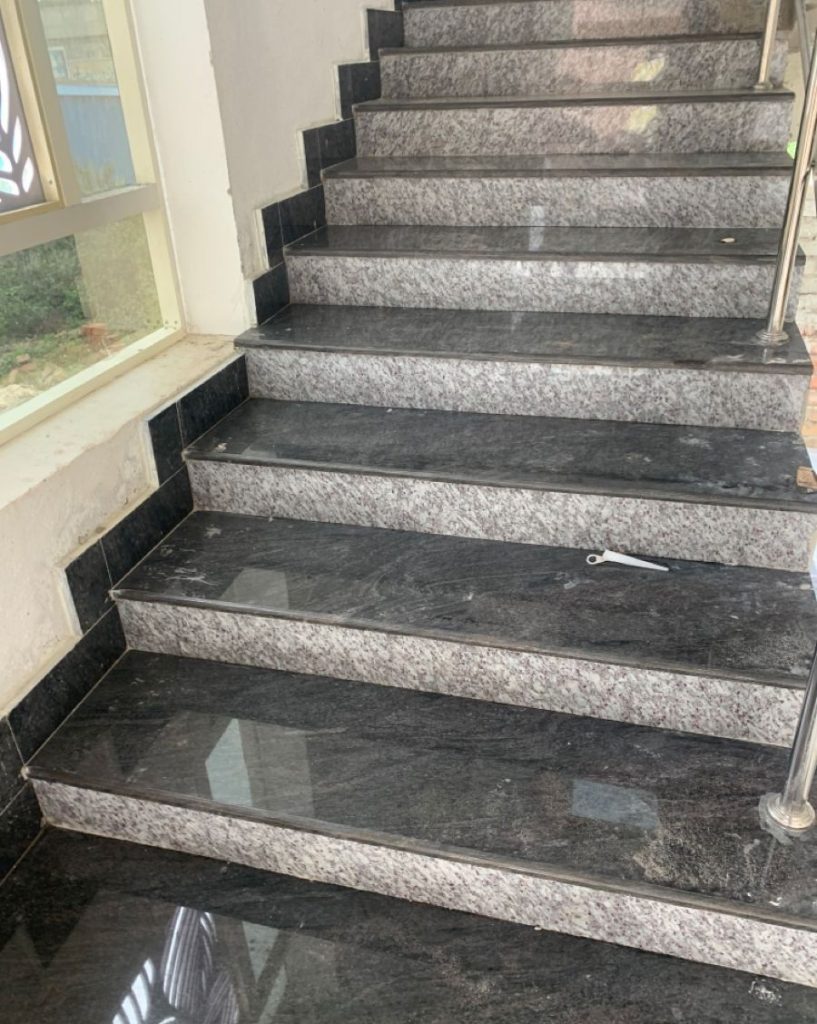
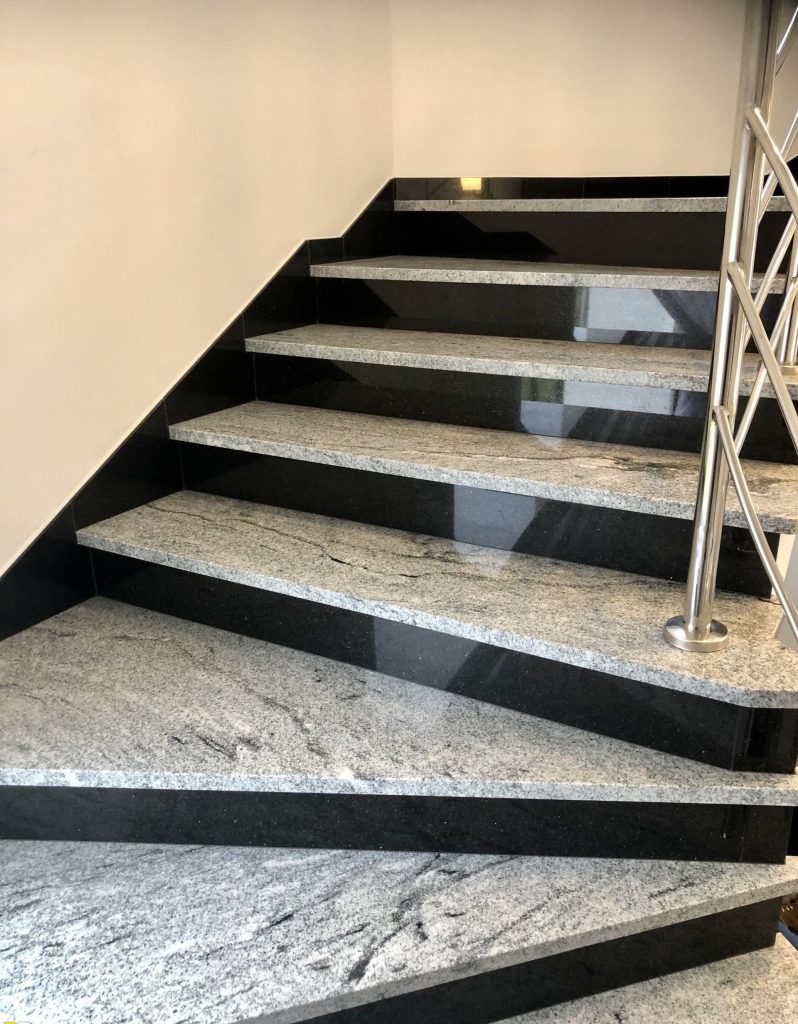
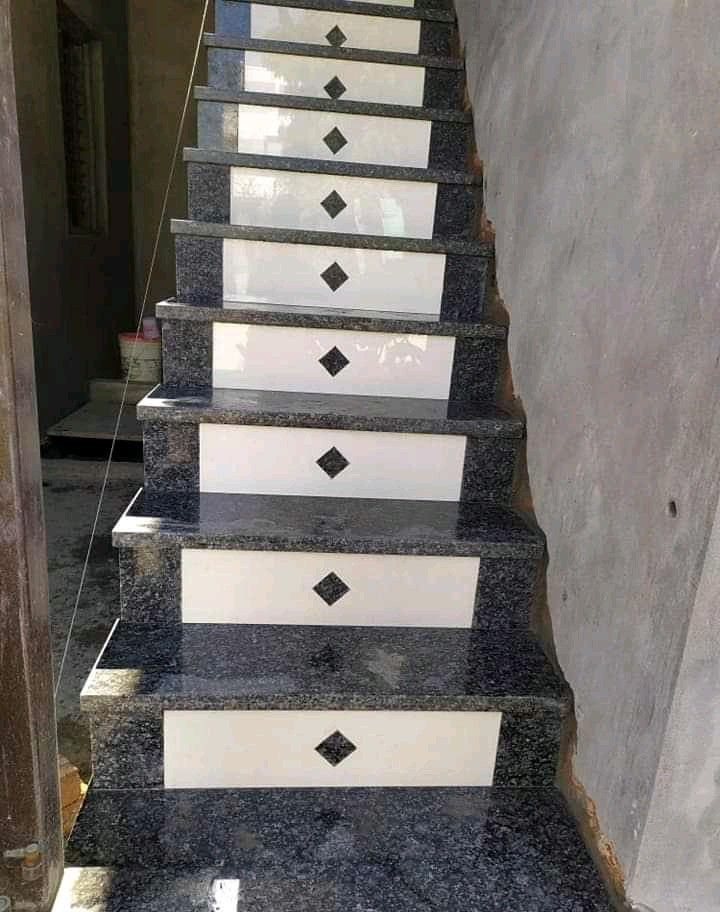
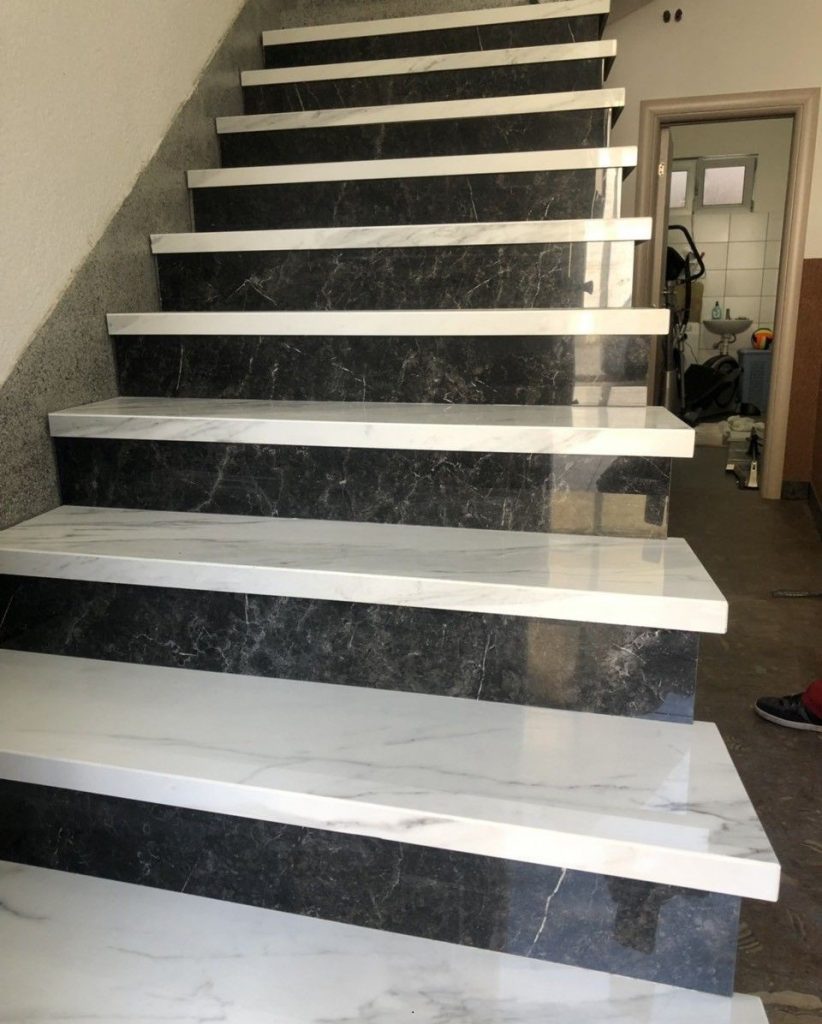
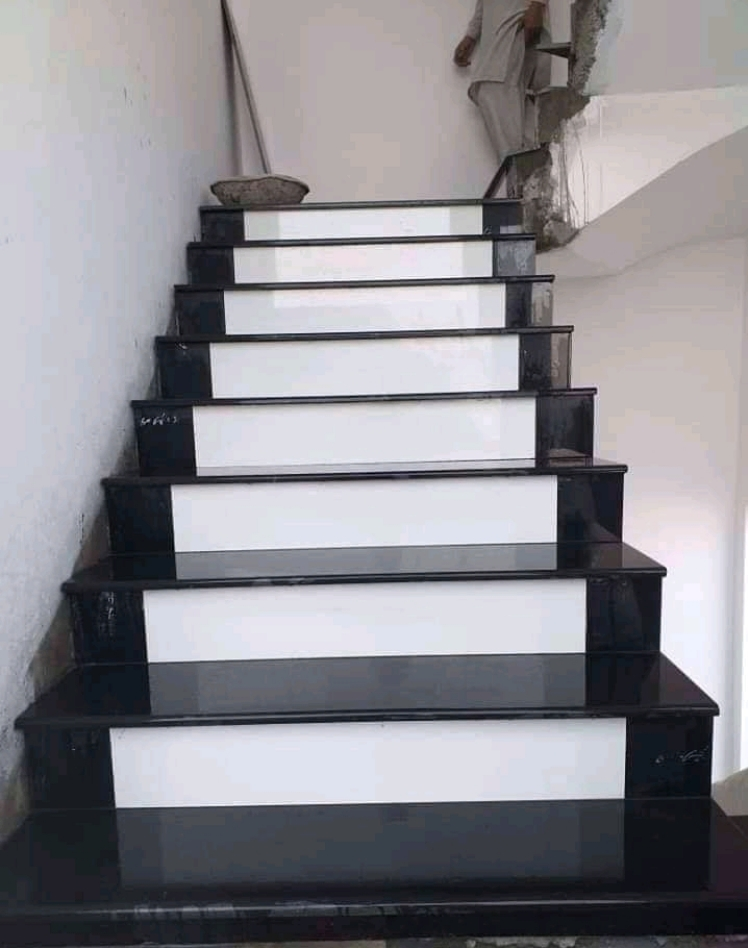
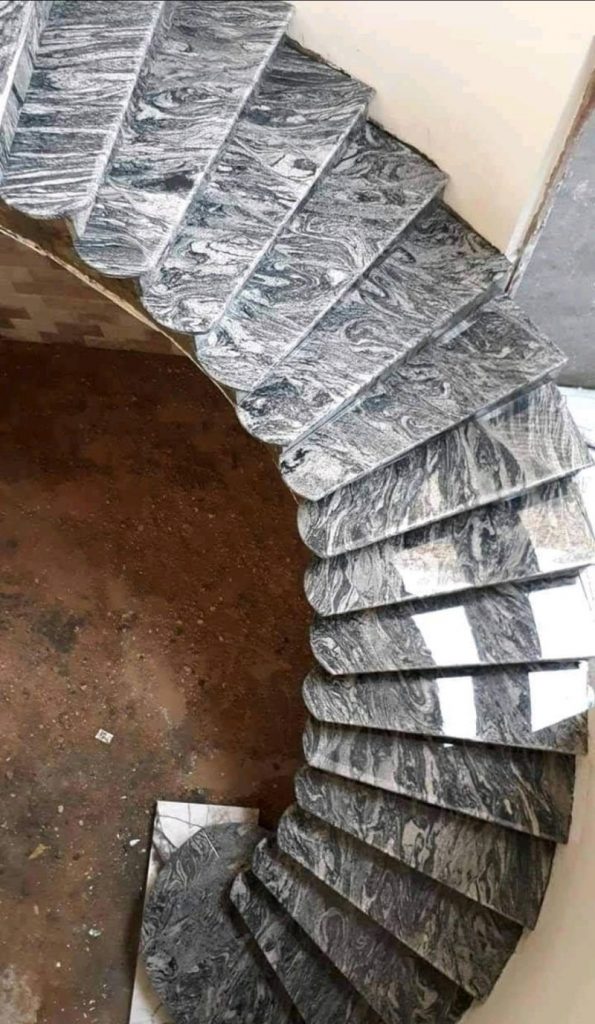
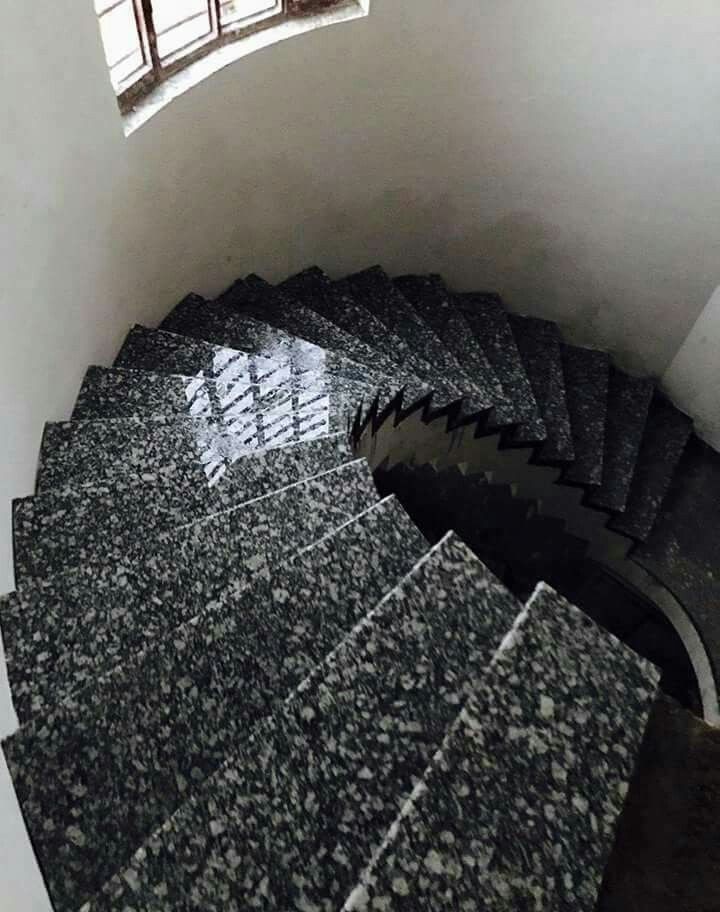
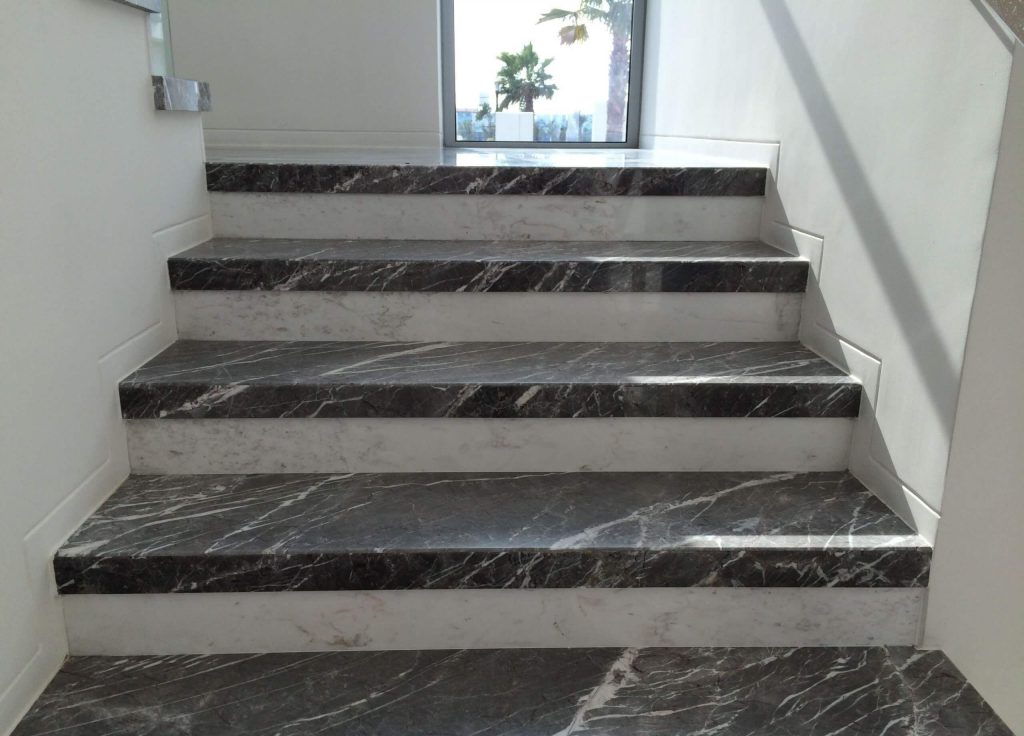
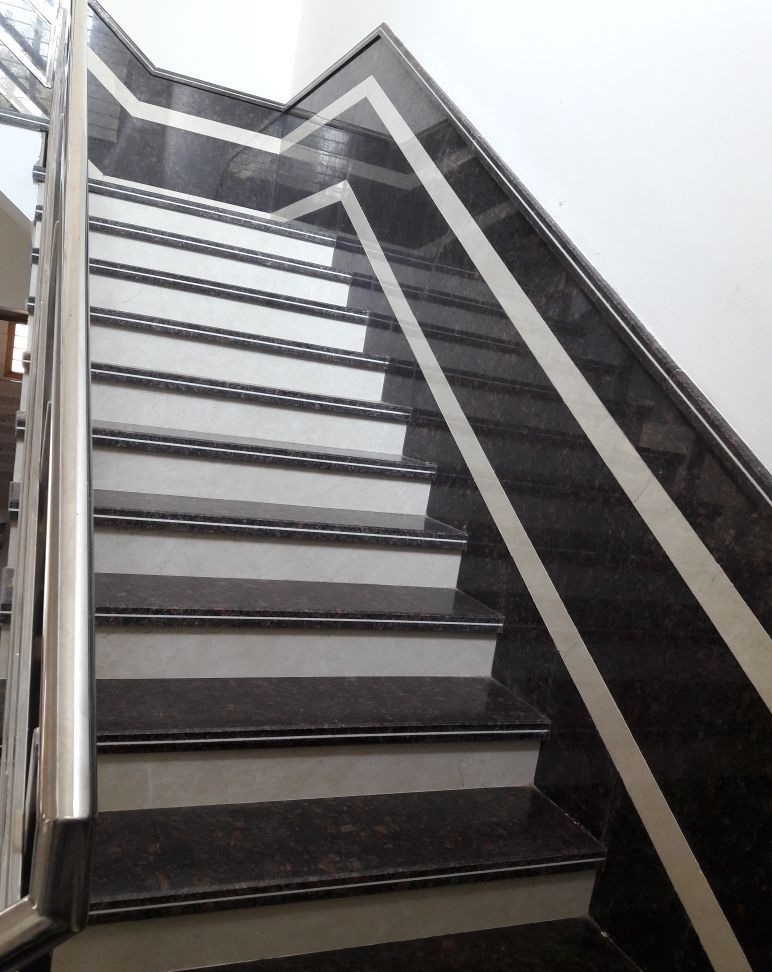
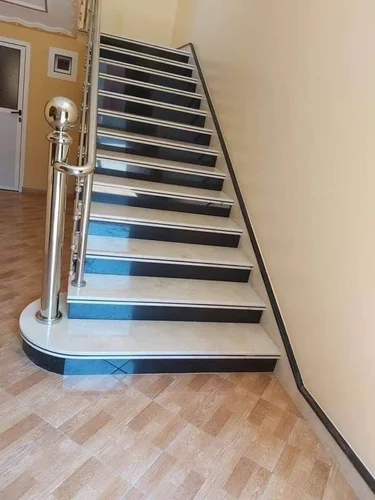
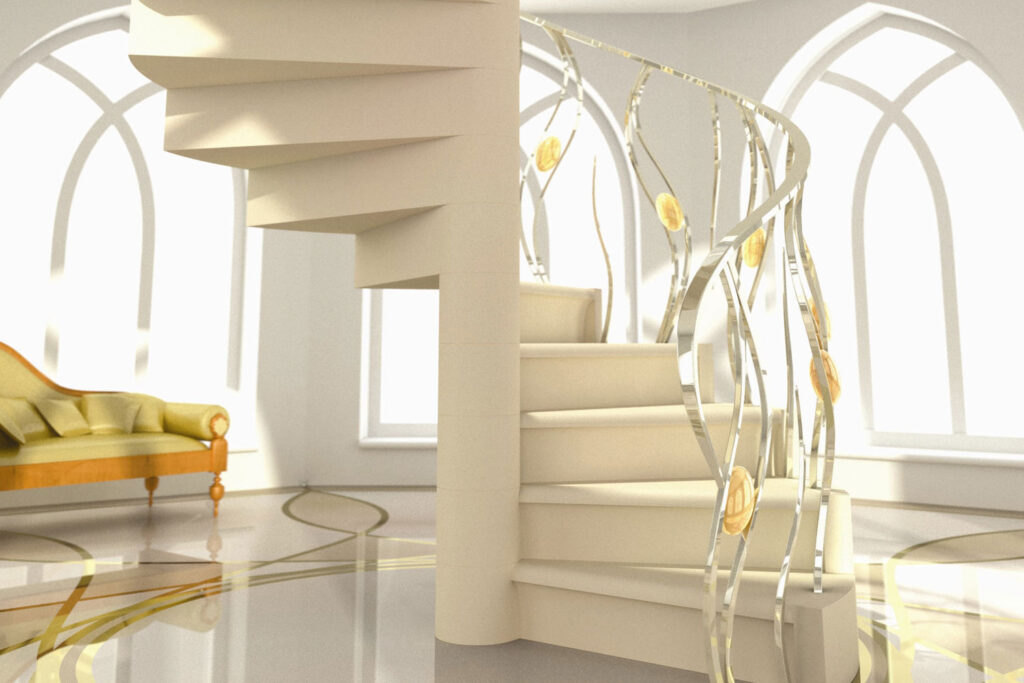
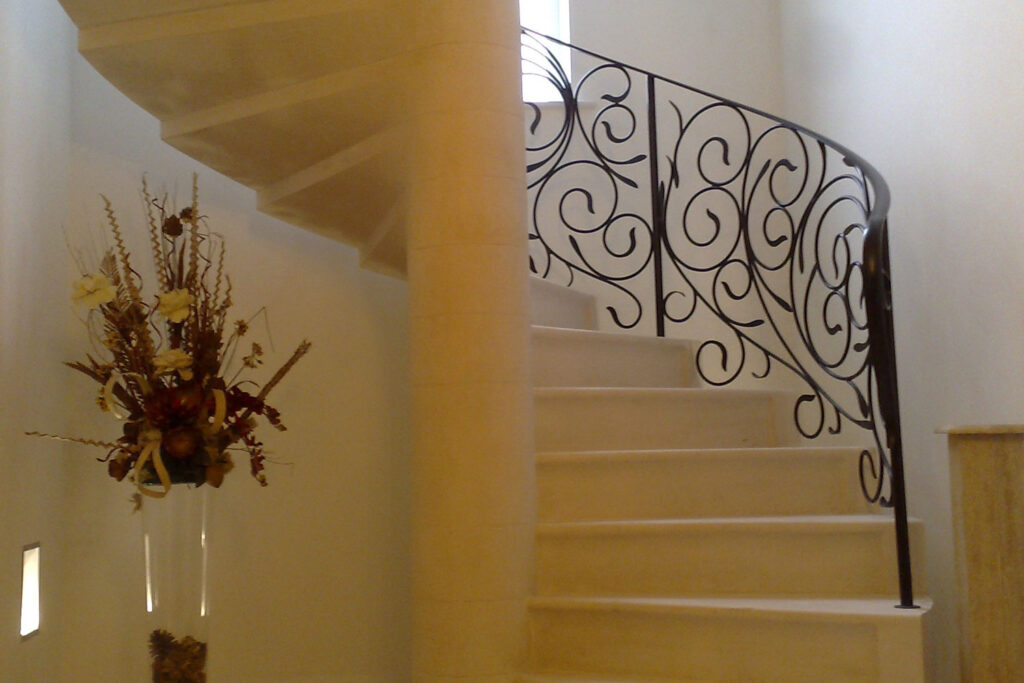
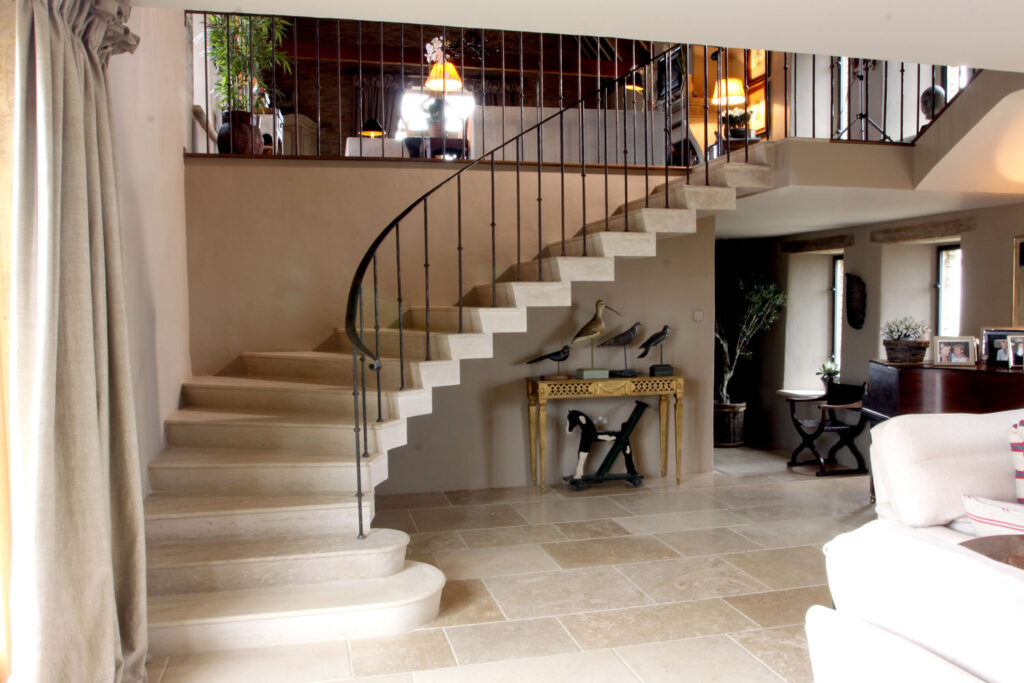
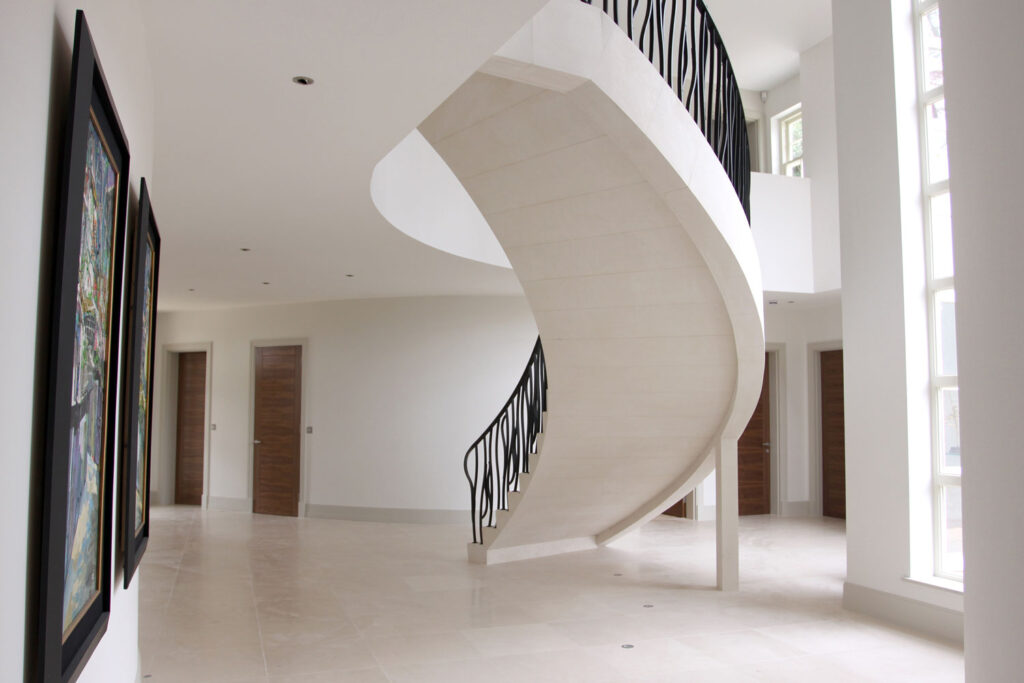
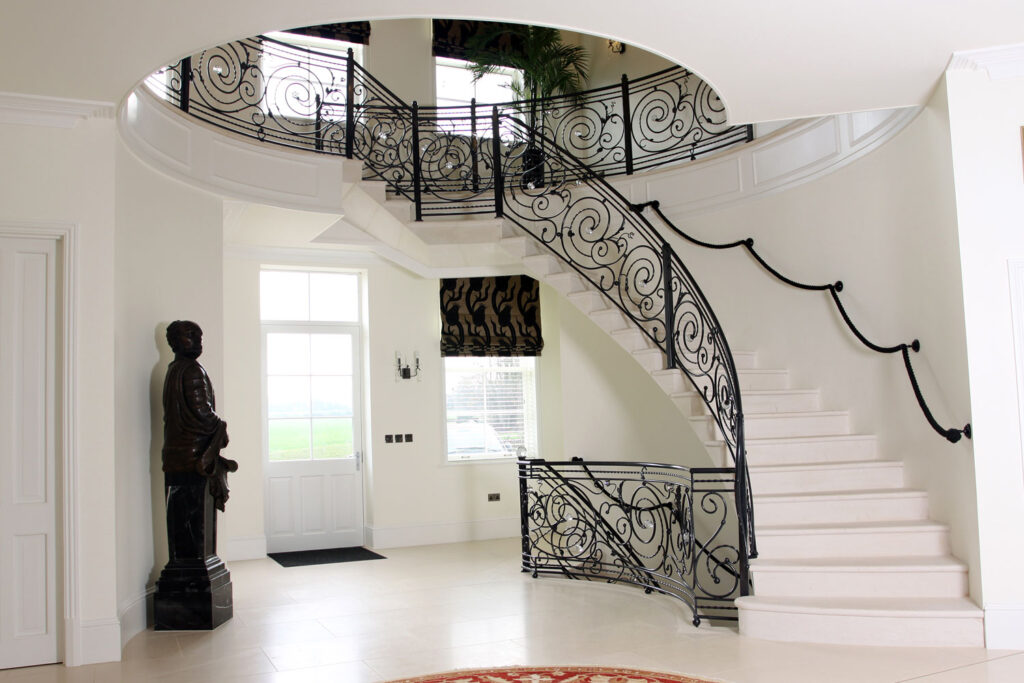
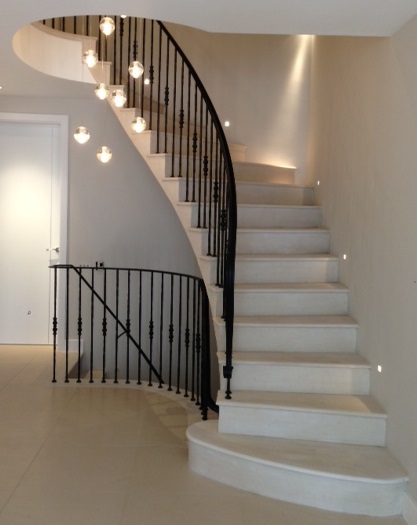
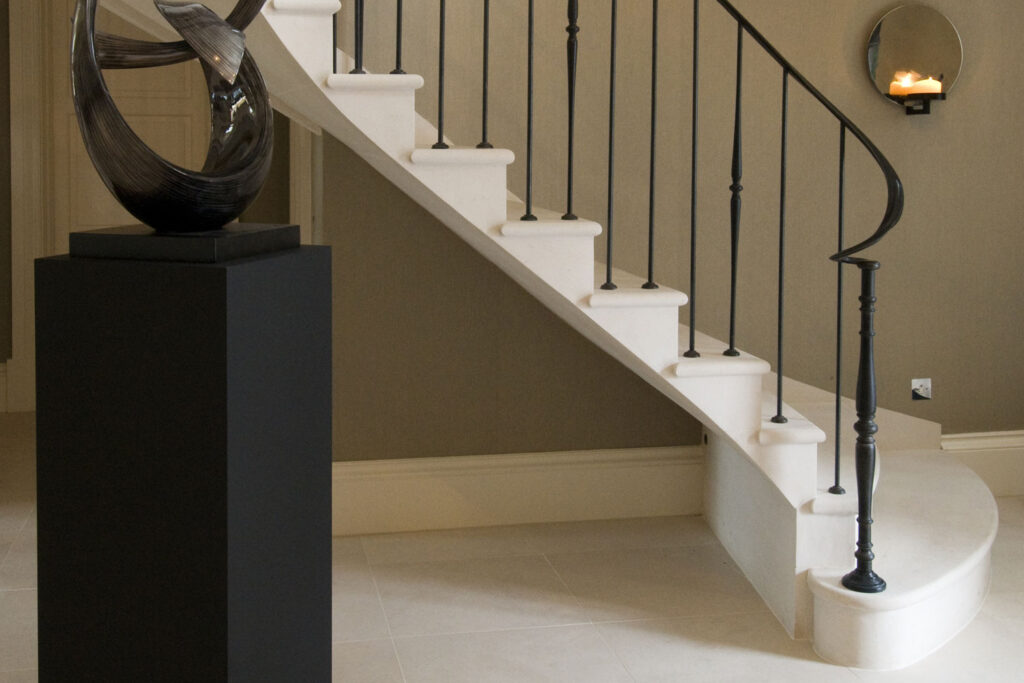
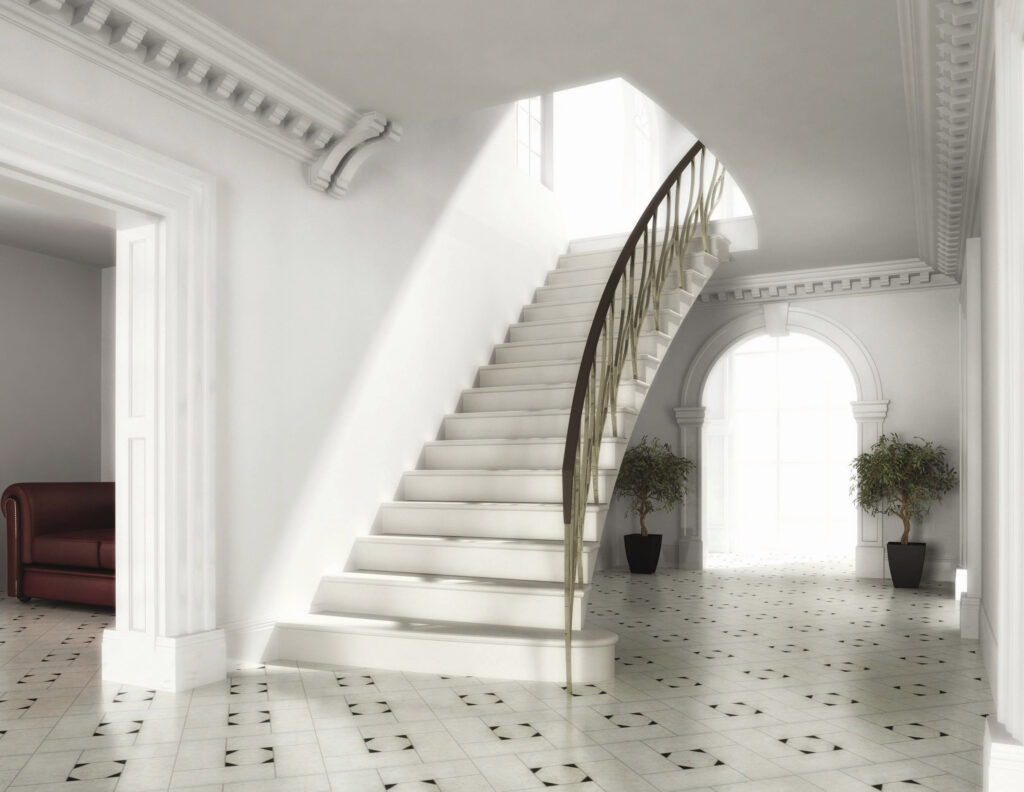
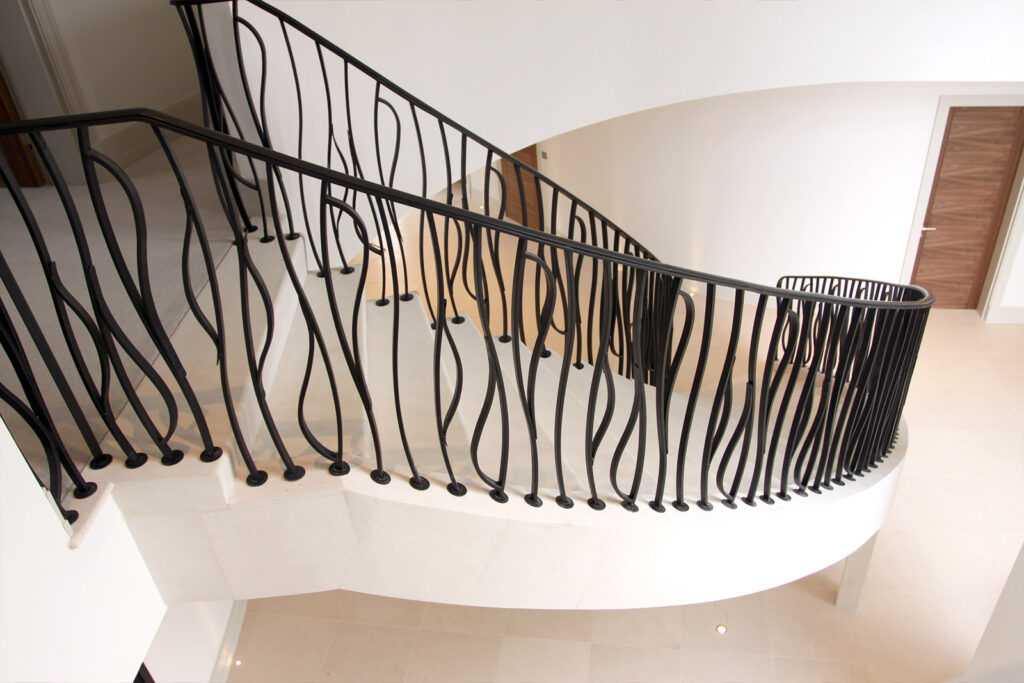
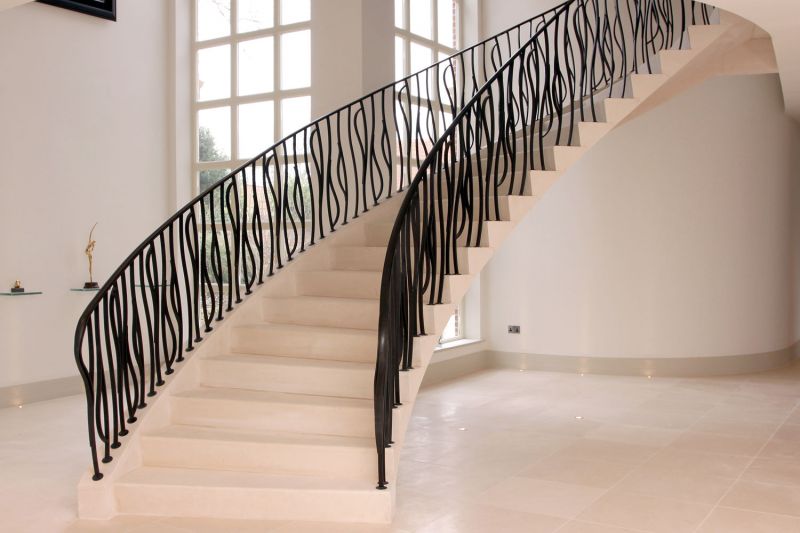
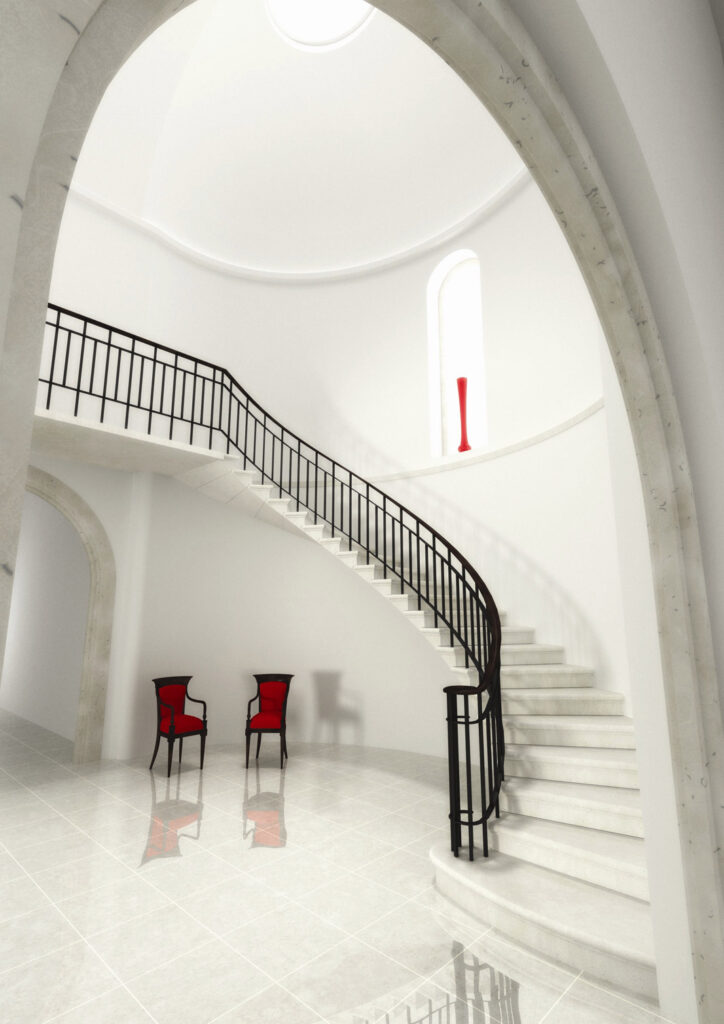
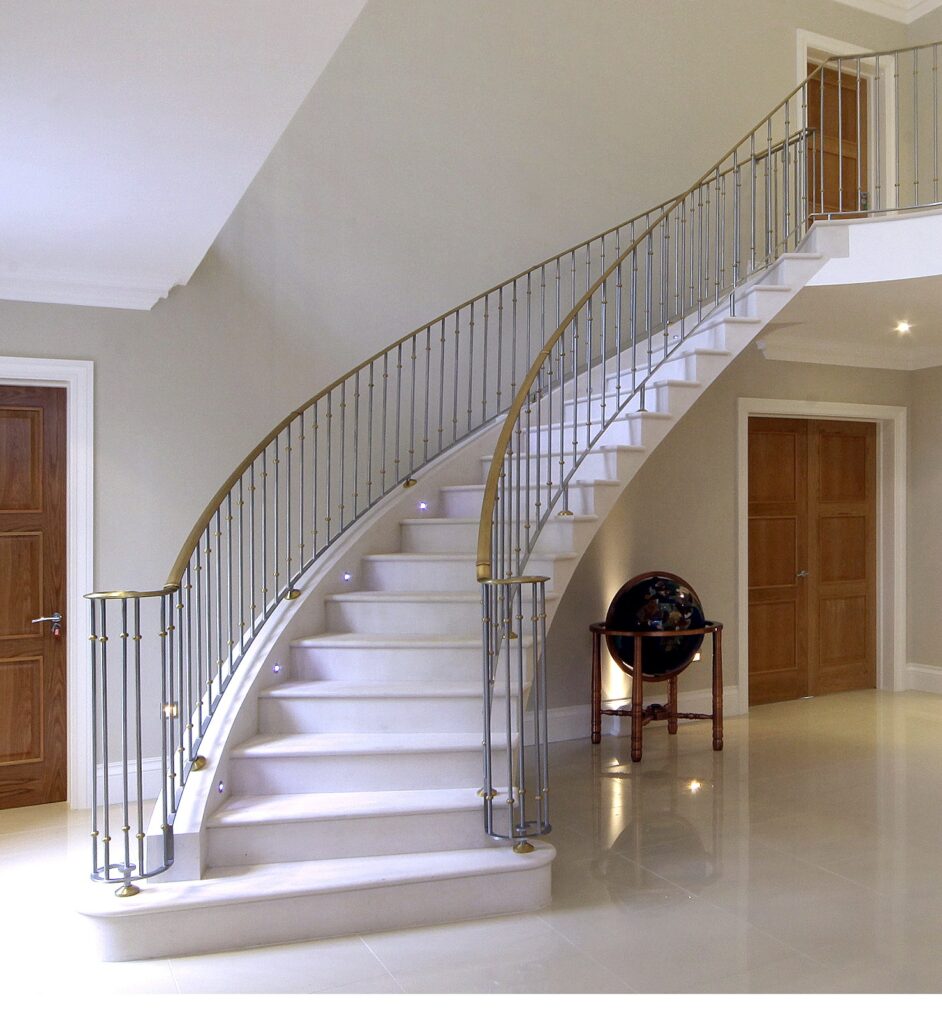
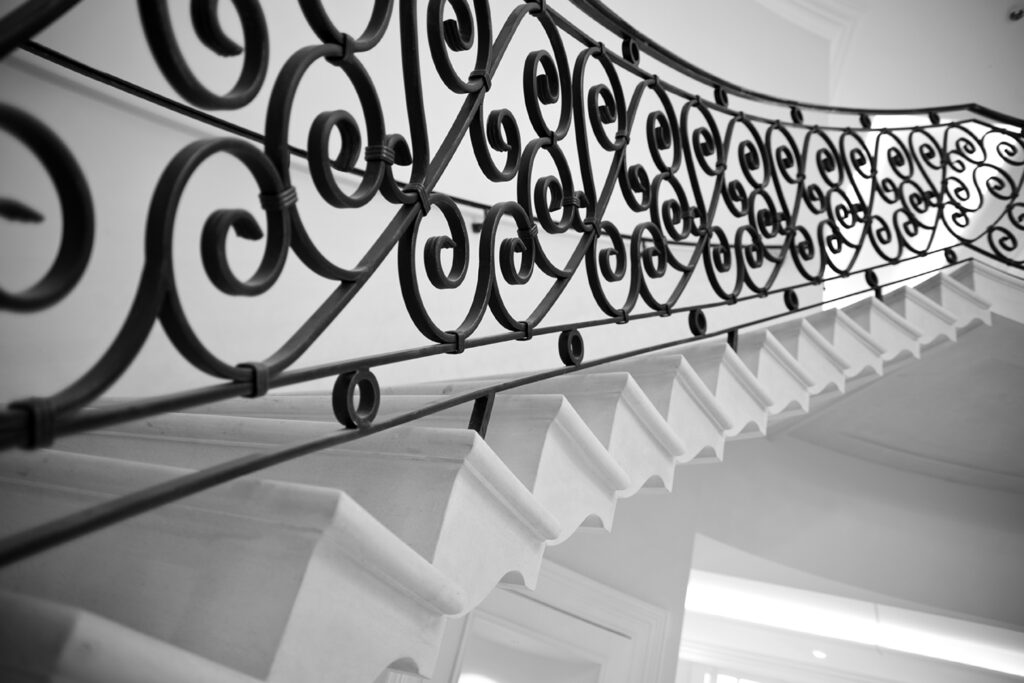
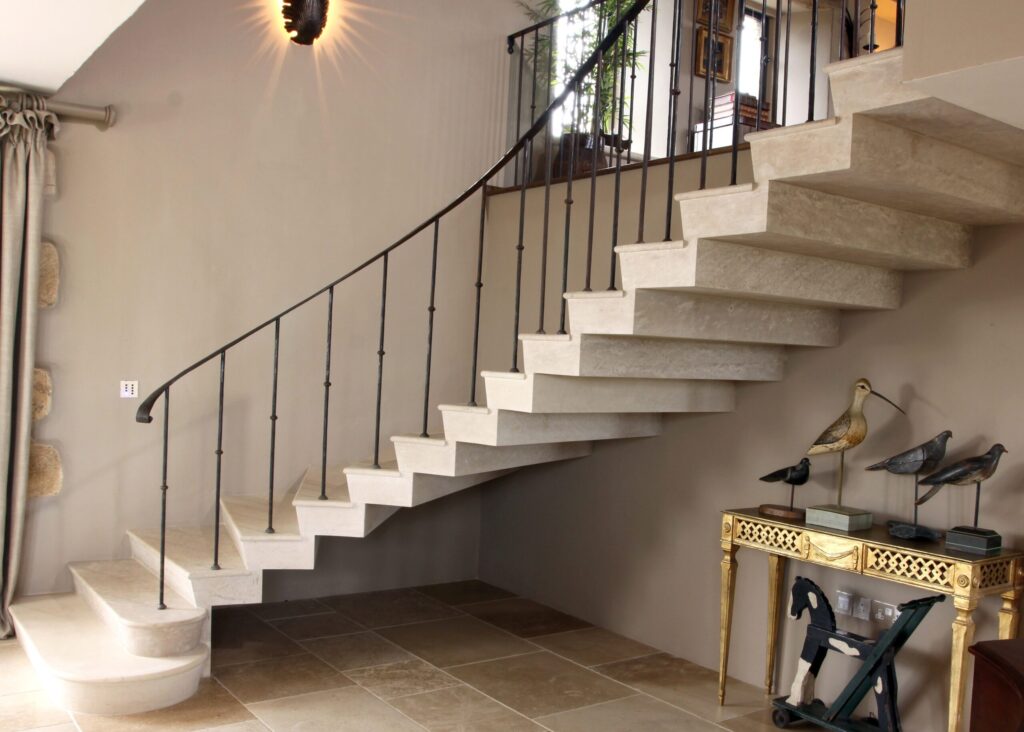
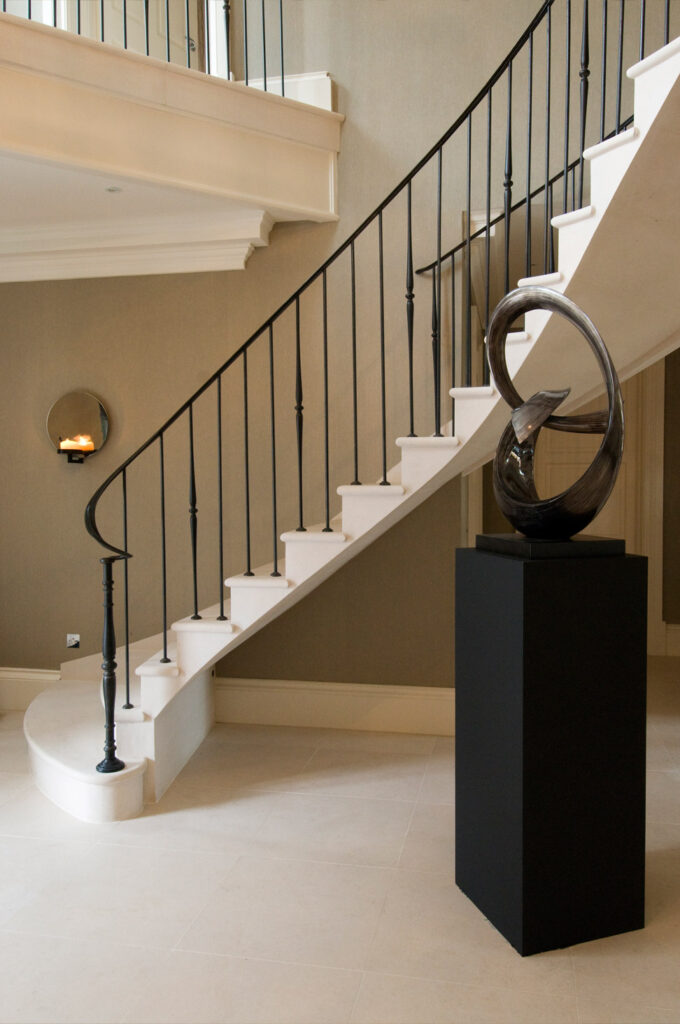
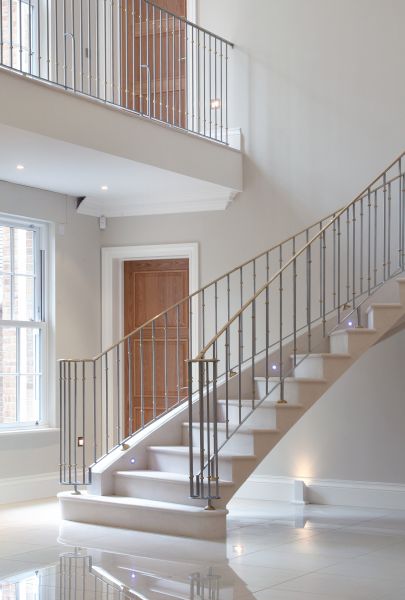
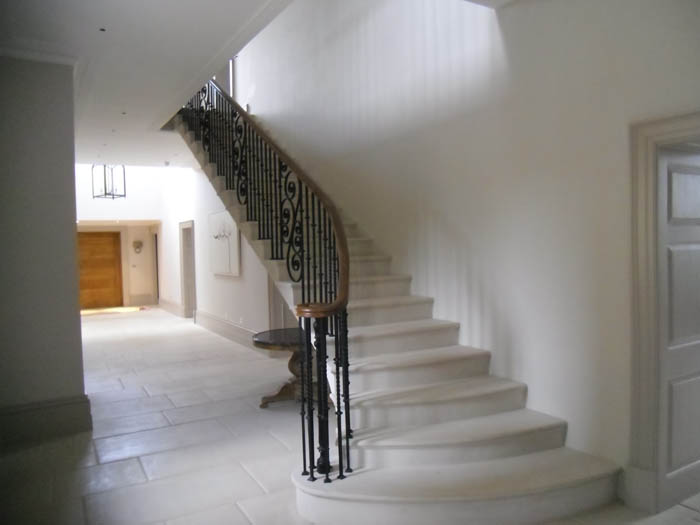
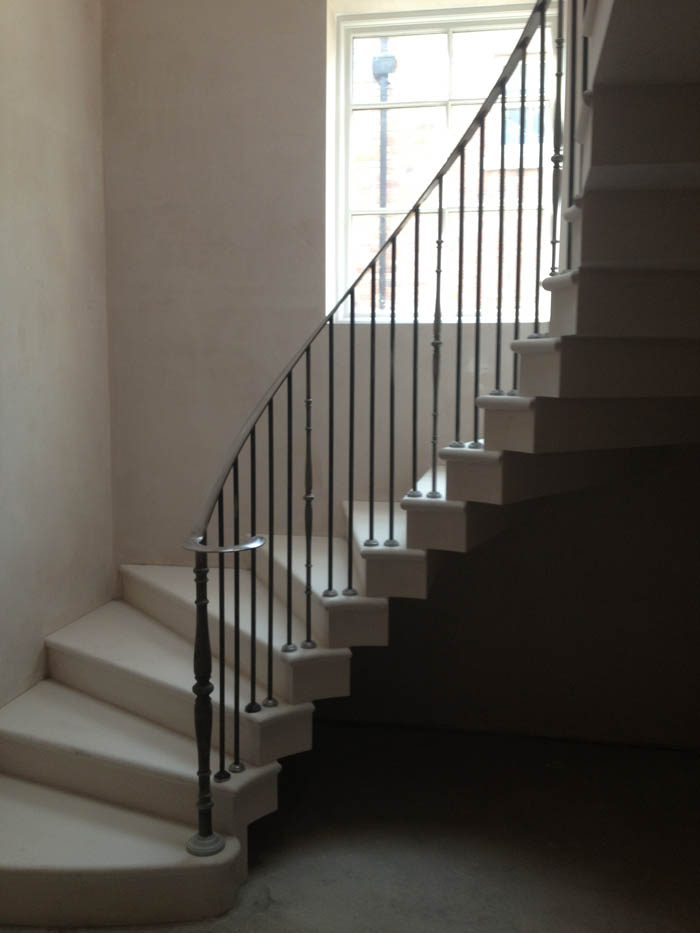
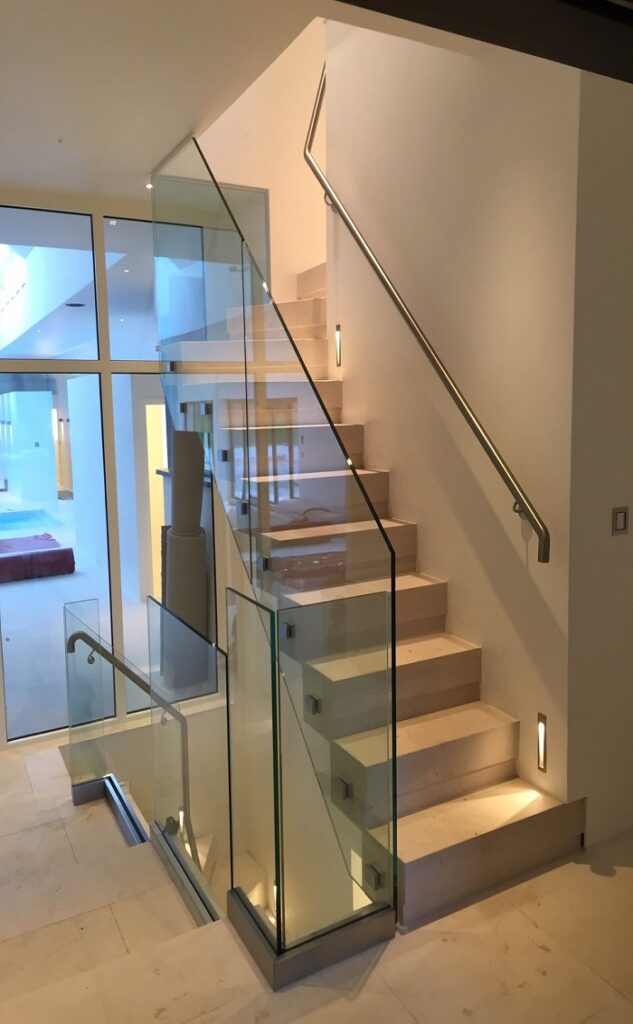
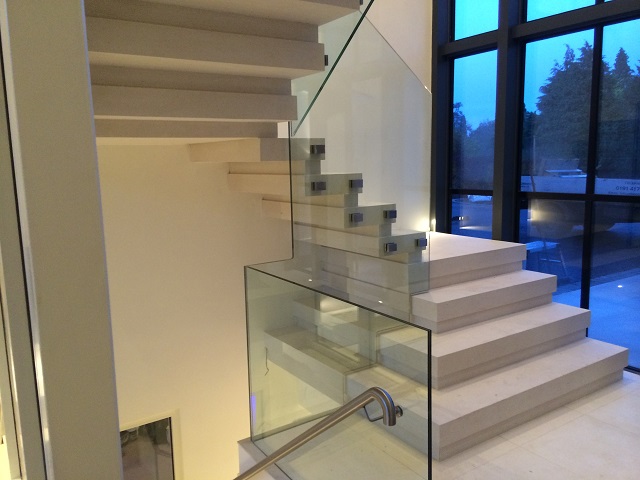
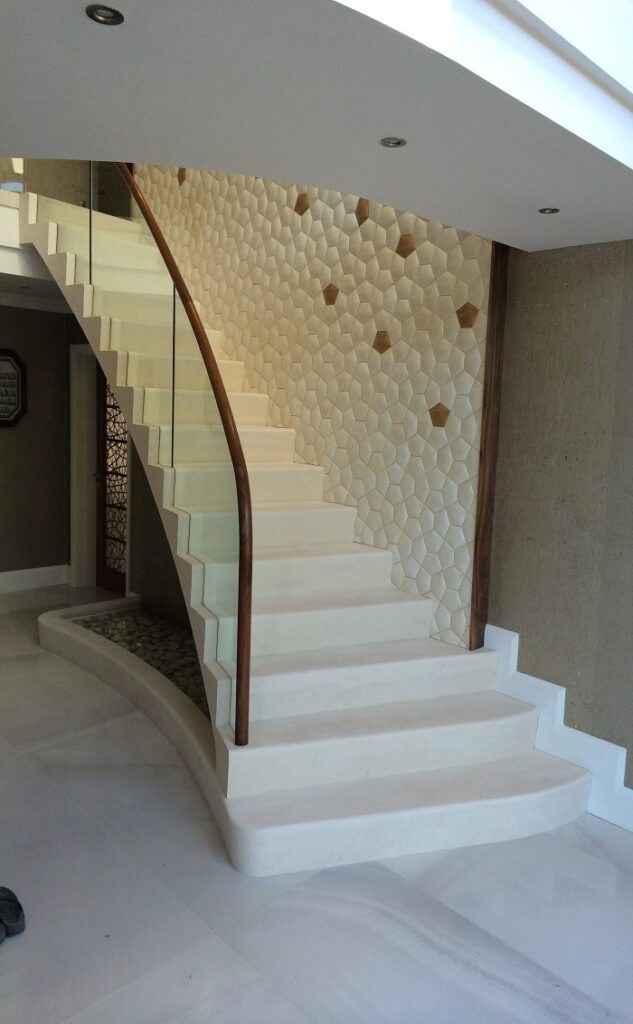
Staircase Stone Ideas: Stairways can be a difficult thing to design, but they really do add so much value to your home. They are an important part of any home, and if you want to make sure that you are getting the best possible look for your staircase, then you should consider some of these ideas.
Staircase Design
The first thing that people often think about when it comes to staircases is whether or not they will be open or closed. This is something that many people do not consider when they first start designing their home, but it is something that needs to be considered carefully because there are many different types of materials out there that have different looks depending on how they are used.
If you want something more elegant than just a plain stone wall with no decoration then adding some artwork on top might work well for you.
Another thing that people often forget about when it comes time to design their staircase is what kind of style they want for their house overall.
You may want something very modern looking or traditional looking depending on where your family lives currently and how long they have lived there already
How to Create the Perfect Staircase Stone Ideas
Adding a Stairway to Your Home or Apartment Will Make it Feel More Open and Breathtaking
Staircase Ideas for Small Spaces
Whether you’re building a new house or just redoing an old one, adding stairs is one of the most important things you can do.
If your home doesn’t have any, don’t feel bad—you aren’t alone! But if you decide to build some, here are some ideas for how to do it right.

Staircases are a great way to add some flair to your home.
They can be the focal point of your house, or they can be used to lead you from one level of your home to another.
Either way, they’re a great addition that makes your space more comfortable and welcoming.
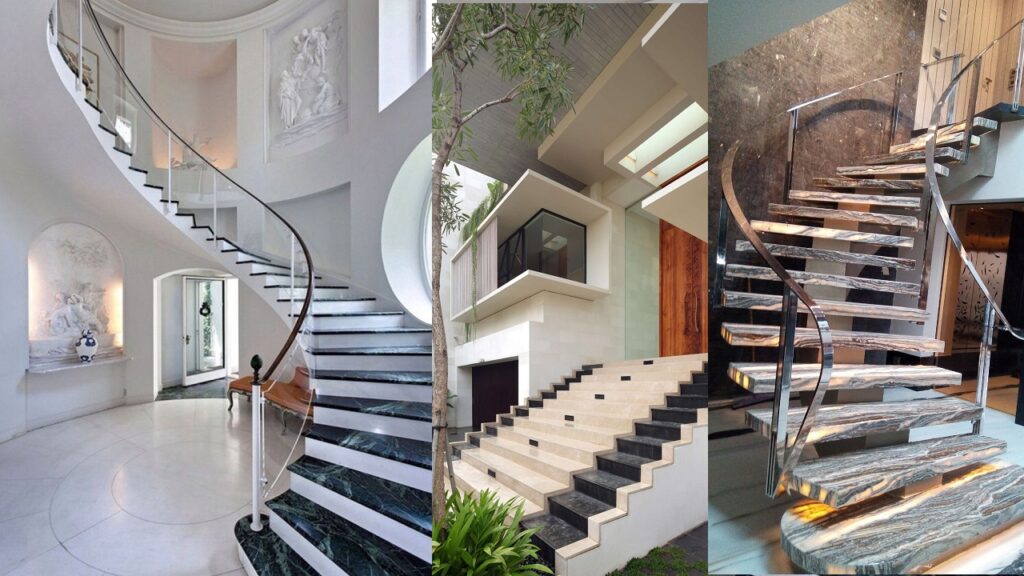
There are many different types of stone staircases on the market today, but there are still some that stand out as being particularly beautiful and elegant. These are the ones we’re going to look at in this article!
First up is marble: it’s a classic material that has been used for centuries in homes all over the world. Marble has been used in everything from flooring to countertops, but it also makes an excellent material for making stairs because of its strength and durability.
The colors range from dark gray to light brown depending on what type of marble you choose; however, all colors look stunning when combined with other materials such as wood or metal.
Next up is quartzite:
This is another stone material with a long history behind it. Quartzite comes in a variety of colors including reds, greens, yellows and blues which make it.
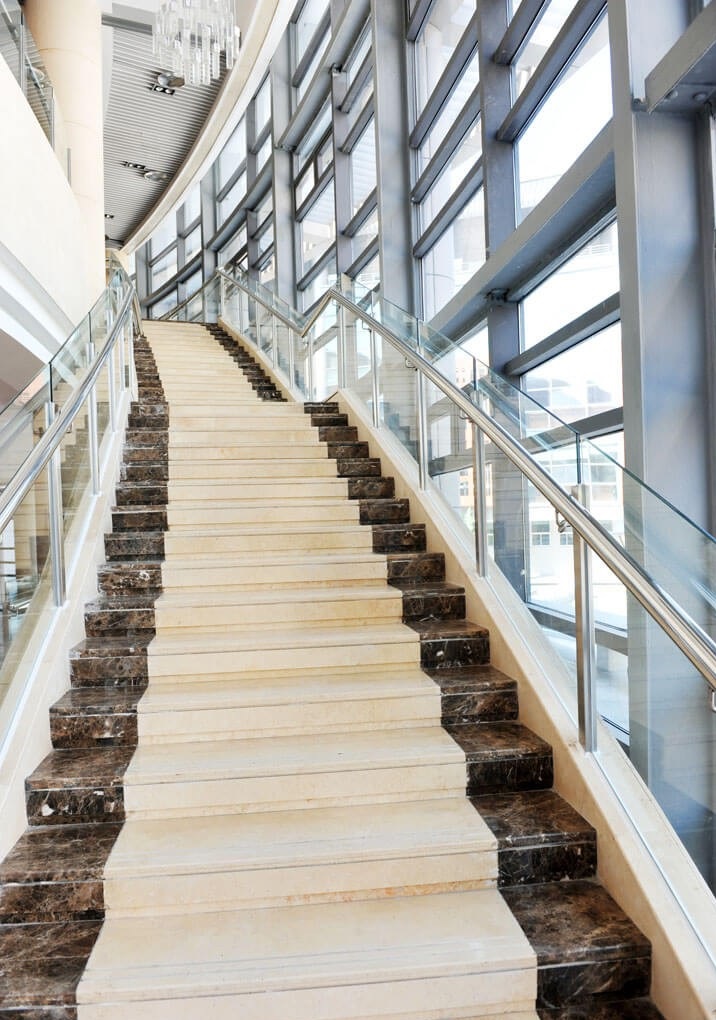


If you’re looking for the perfect way to add some character and style to your home, a staircase is a great place to start.
Staircases are a great way to create focal points in your house, which can come in handy when you have a lot of furniture surrounding it. They also serve as a good way to get from one level of your house to another, so if you live in an apartment or have kids who like climbing on furniture, stairs make a lot of sense.
You don’t have a lot of room in your house or don’t want to spend much money on new materials, you might also be wondering how to decorate a staircase with old pieces of wood or stone. Well, we’ve got some great ideas for you!
You can use old doors as a railing for your staircase. This is especially popular among homeowners who want something unique and different than what everyone else has done with their stairs.
It’s easy enough to find doors that fit perfectly into this space—you just need to know where they are! You can find wood trim at many stores that can be used as an accent on top of these older doors (or any other type).
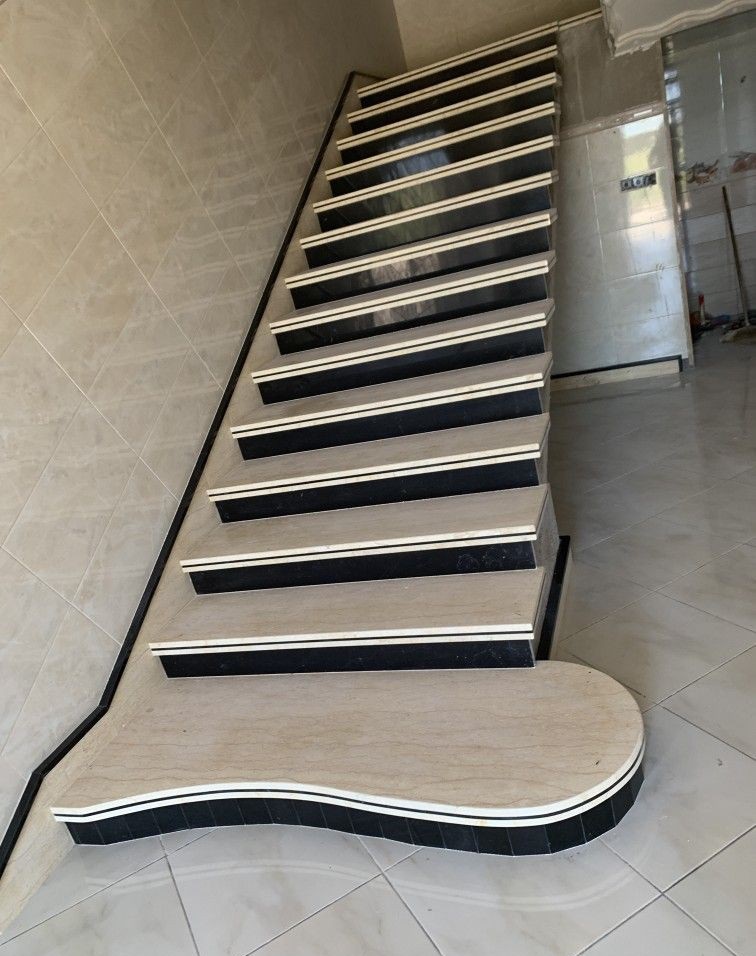
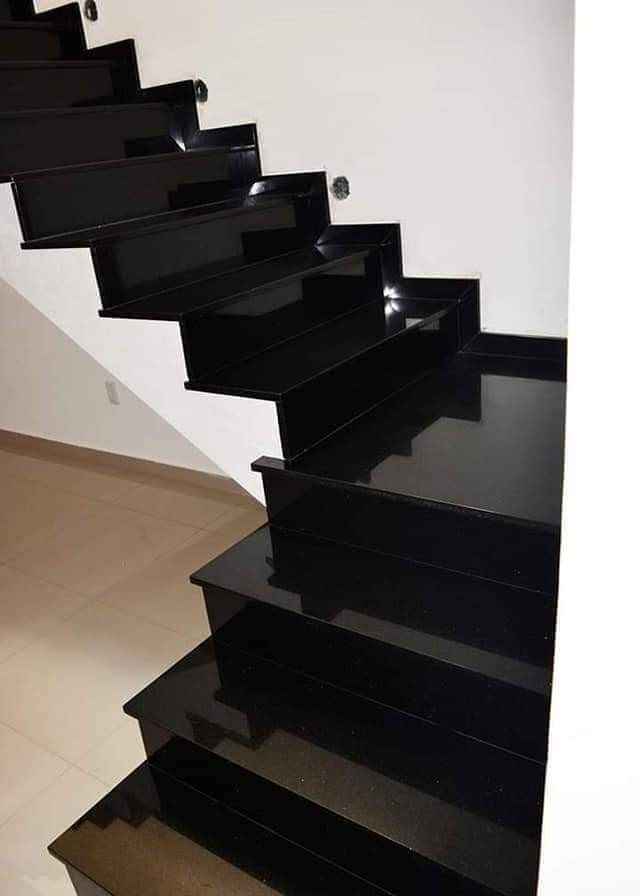

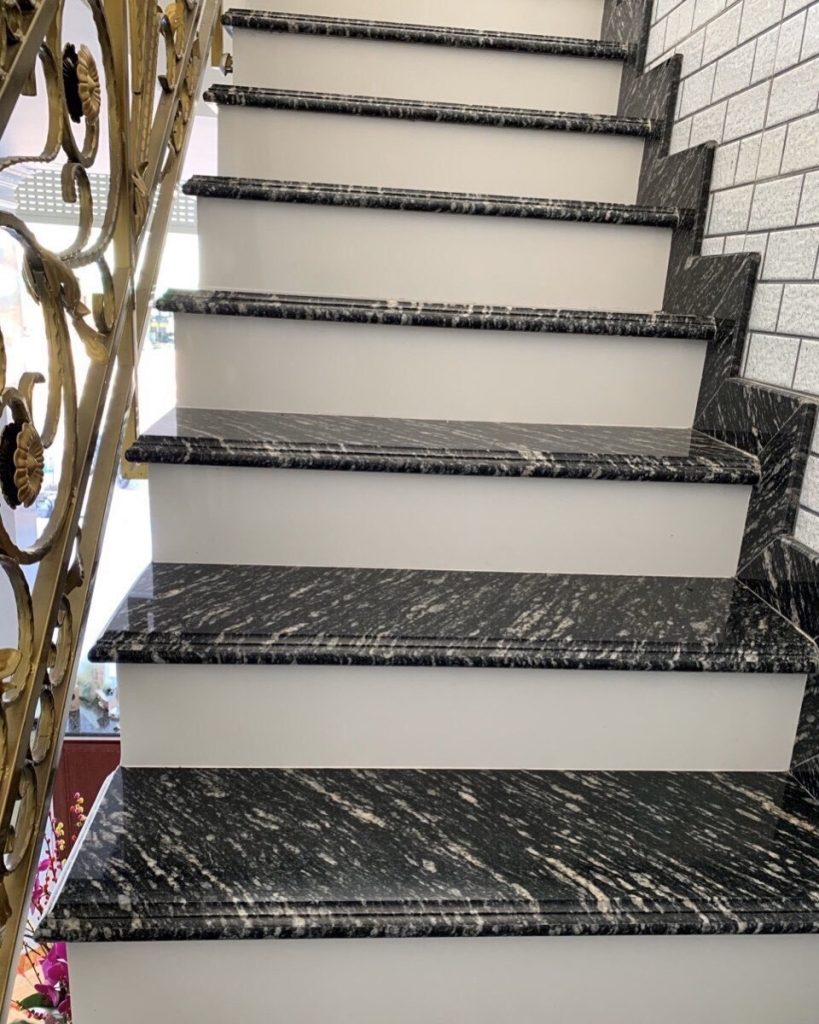
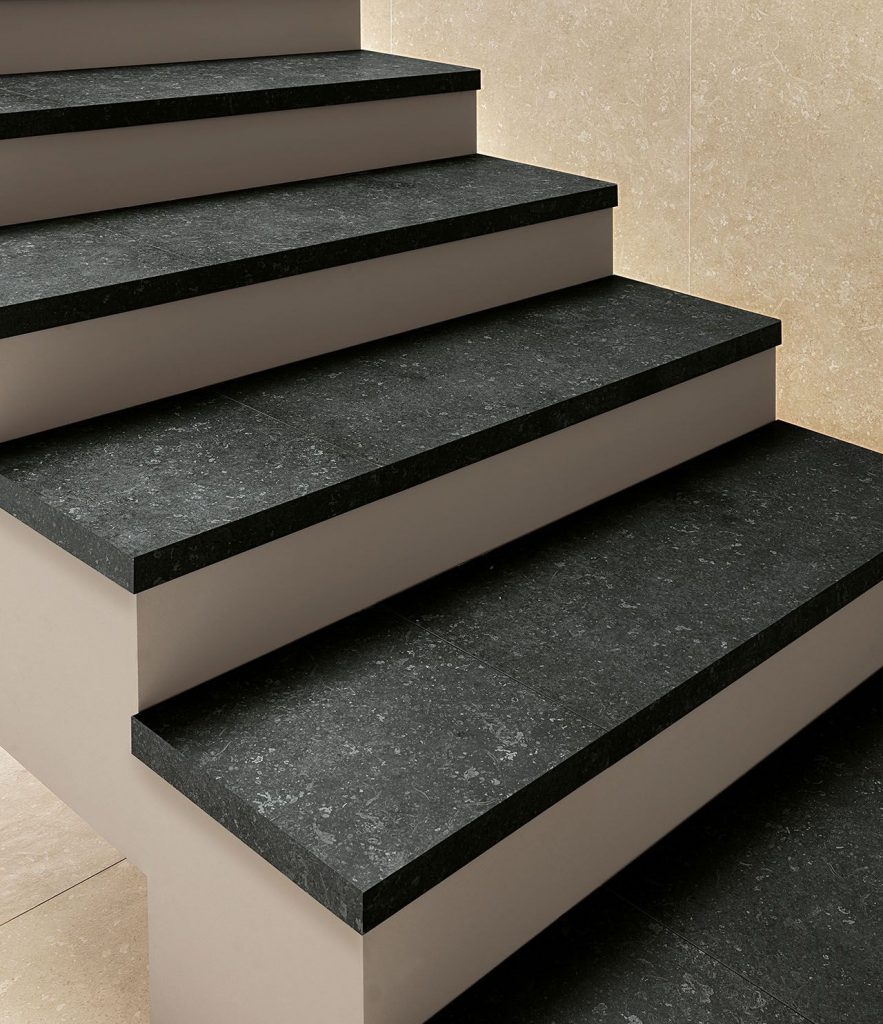
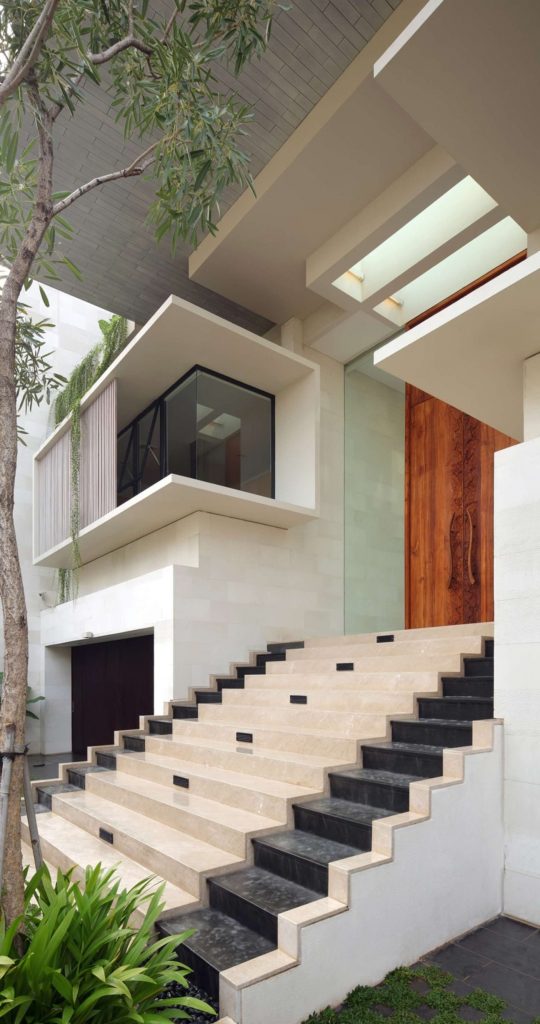
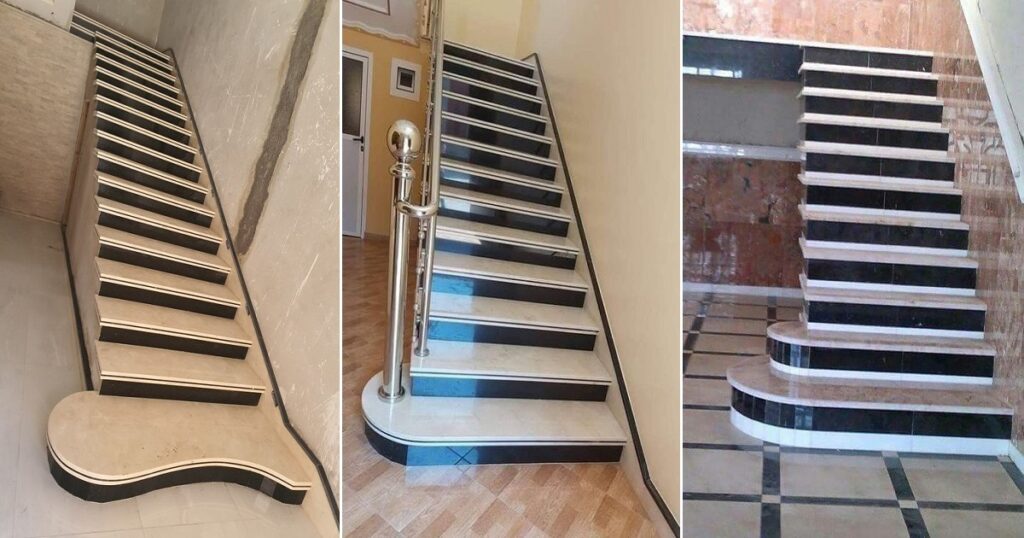
Stone staircases are an extremely popular choice of staircase design due its rich history and the amazing aesthetics the materials produce. Stone has long been regarded as one of the strongest and most beautiful natural building materials in the world, and many varieties are especially prized for their attractive colouration and texture. Despite being a relatively heavy material, it lends itself perfectly to the carefully planned and elegant stone staircase designs.
Creating stone staircases requires an in depth understanding of the way stone behaves, This knowledge allows us to work with the natural character of the astonishing stone stair designs to create designer stone staircases which are truly timeless, and enhance your interiors beautifully.


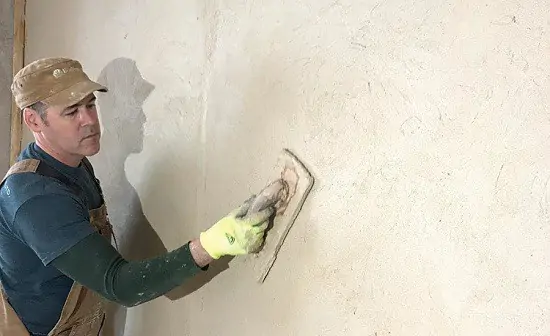
What Is Plaster And Plastering?
The process of applying plastic mortar on the surfaces of rough ceilings, walls, etc in order to obtain an even, smooth, and clean surface is known as plastering and the plastic mortar is called plaster. When plastering is done on external exposed surfaces, it is known as rendering. In this article, we will discuss different types of plastering used in construction.
Purpose Of Plastering
Plastering is done mainly for the following purposes:
- To protect the surface from harmful atmospheric effects such as rain, wind, sun, snow, etc.
- To create decorative effect as well as to improve the aesthetics.
- To hide defective and poor workmanship.
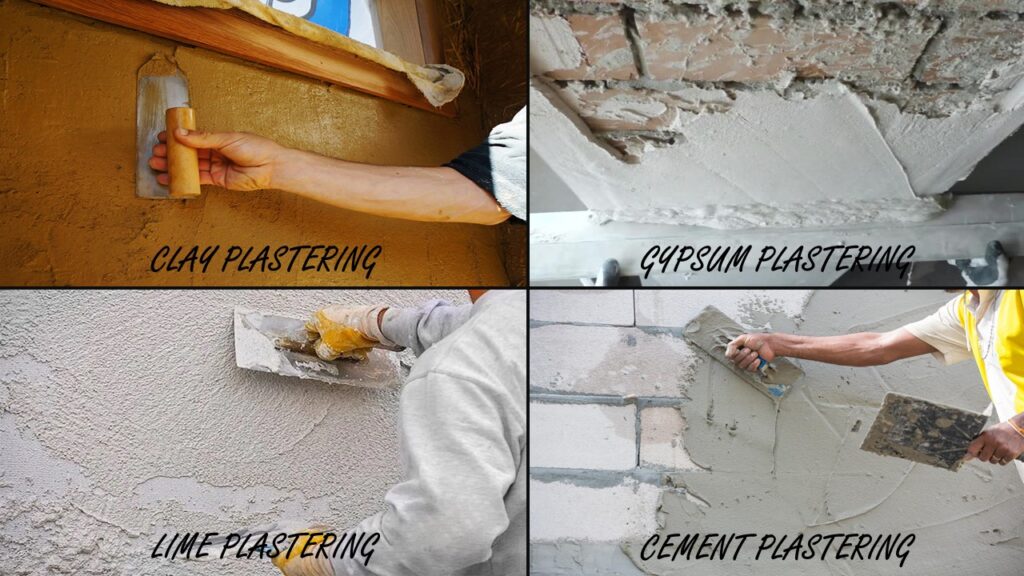
Types Of Plaster
Conventional types of plaster are as follows:
- Cement plaster
- Lime plaster
- Mud plaster
1. Cement Plaster
Cement plaster is the most common type of plaster in the construction industry. Cement plaster is a mixture of cement, sand, and suitable amount of water.
Proportions of cement and sand may vary according to the requirements of the plaster. But, the usual proportion are 1:3 and 1:4 which gives the best results.
Cement plaster is used on the interior walls and exterior walls, ceilings, and other building elements. For interior walls, a single coat of plaster is usually enough to achieve the desired surface.
For exterior walls, another coating is required depending on the thickness of the plaster and the nature of the surface. The thickness of cement usually ranges between 12 and 20 millimeters, depending upon the type of wall or ceiling surface.
The cement plastered surface requires proper curing with water for a minimum of 7 days. Improperly cured walls may develop cracks.

2. Lime Plaster
Lime plaster consists of lime, sand. and water. The proportion of lime and sand is equal. Sometimes, little amount of cement may also be added to improve the strength of the plaster. In lime plaster mostly fatty lime is used. Hydraulic lime results in blisters on the plastered surface.
Gulal, a type of fragrant gum may be added at a rate of about 1.6 kg/m3 of mortar. It gives good binding properties to the mortar. Chopped hemp is also be used at the rate of about 1kg/m3 of mortar.
It provides improved adhesive and tensile properties to the plaster. Types of plaster are now being replaced with cement plaster.
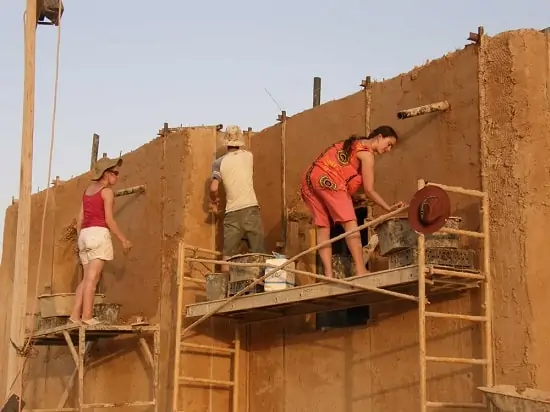
3. Mud Plaster
This is the cheapest type of plaster. It is made up of suitable proportions of clay and sand. The clay content should be free from grass, roots, organic matter, stone pebbles, etc.
Chopped straw, hay, or hemp is also used in the mixture at the rate of 30kg/m3 of earth content. Mud plaster is mostly used in villages and temporary constructions.
Special Types Of Plaster
Besides the above plastering materials, there are some special types of plasters. They are as follows:
1. Waterproof Plaster
As the name suggests, this type of plaster protects the masonry wall from ingress of moisture and thereby eliminating or reducing dampness of the wall.
The mortar for waterproof plaster is prepared by mixing cement, sand (1:2), and pulverized alum at the rate of about 12 kg/m3 of sand content.
Water to be used in the mix is not normal water but the water is prepared by dissolving 75gm of soft soap per liter of water.
2. Stucco Plaster
Stucco plaster is a type of decorative plaster that provides excellent finishing. This type of plaster is usually done in three coats with a thickness of about 25 mm. Each coat needs to be dry completely before applying the next coat. The first coat in stucco plaster is called scratch coat.

The second coat is called finer coat or brown coat and the final coat is known as a white coat or finishing coat. Stucco plaster can be used for internal as well as external walls.
3. Gypsum Plaster
Gypsum plaster is a factory-made product produced by partial or complete dehydration of mineral gypsum. It is available in powder form and in white color.
Dry gypsum powder is mixed with a suitable amount of water to form a ready paste that can be easily applied to the ceiling and wall surfaces.
The thickness of gypsum plaster is usually 6 mm- 20 mm. It dries very fast, so painting on the plastered surface can be started 72 hours after application.

It gives a very good smooth finish and level surface with excellent proper angled corners. This type of plaster can only be used in the interiors of the building, not suitable for external plastering. It can also be used to fabricate ceiling cornices and moldings.
It is fire resistant and a good thermal insulator. Another good advantage is there is no shrinkage during setting and hence it does not develop cracks.
4. Keen’s Cement
It is produced by calcinating alum with gypsum. It is the hardest and densest form of gypsum plaster. It is pure white in color and gives a very fine glass-like polish. This type of plaster is mostly used for ornamental works.
5. Martin’s Cement
Martin’s cement, another type of special plaster material is produced by calcinating peal as with gypsum. It also sets quickly and results in a hard and white surface.
6. Parian Cement
It is obtained by calcinating borax with gypsum. It is an alternative to keen’s cement and used for ornamental purposes.
7. Sirapite
This product is produced by slaking gypsum in petroleum. It is a good fire resisting plaster material.
8. Scagliola
It is obtained by dissolving keen’s cement and color pigments in glue. It gives marble like finishing, used for plasters, panels etc.
9. Acoustic Plaster
It is a gypsum product that is mostly used as a final coat. During final coat finishing small pores are left on the surface to absorb sound.
10. Barium Plaster
This type of plaster is made from barium sulphate. It is used as final coat in X-ray rooms.

11. Asbestos-marble plaster
It is prepared by mixing finely crushed marble, asbestos, and cement. It gives a beautiful marble-like finish on the surface.
12. Snow-crete and Color-crete cement
These are patented cement. They are mostly used on the exterior walls to create a very good appearance from the outside.
]]>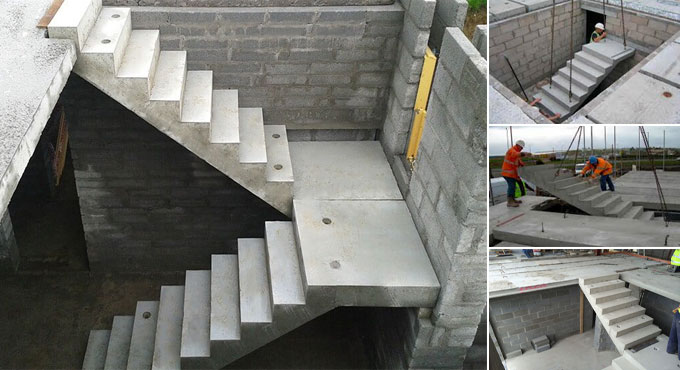
Stair is simply a structural member that gives vertical access from one floor to another. Stairs are placed in a house for safe and convenient access of occupants from one floor to other. Stair consists of small series units known as steps.
Stairs are made of concrete, stone, wood, steel or combination of any of these. They are either build/constructed on site or are prefabricated/precasted and placed on site. Here, we will focus on precast concrete stairs.
Precast concrete stair, made up of reinforced concrete is one of the best options to eliminate the trouble of adjusting the number of steps, rise, run and width of each stair flight.
They are available as:
- A single precast unit containing all the flights and landings
- Separate precast flights and landings
- Parts of the flights and landings are made in one unit
They provide safe, solid and instant vertical access during construction and a safe base for attractive finishes in the completed construction. Concrete stairs significantly reduce noise caused by people moving around a house. Concrete stairs and landing slabs, fitted along with concrete floors are provided with an appropriate handrail for safe vertical access to floors.
Common types of step units:
- Rectangular cantilever steps
- Spandril cantilever steps
- Sector shaped cantilever units (used for open riser spiral stairs)
Features of Concrete Stairs:
01. Speed and Ease of Installation:
As stairs are readily available, it saves construction time. They are to be brought and fixed. Once fixed perfectly they are ready to use.
02. Safety:
Concrete stairs provide safer access to different floors during construction than ladders or other temporary systems.
03. Surface Finish:
As these stairs/steps are mould in high-quality timber or steel, the open surface is troweled to give sleek finish.
04. Attractive:
Concrete gives resilient, solid, durable base for attractive finishes like timber, stone, tiles or any other finish to be added.
05. Size:
Off-site construction of precast stairs ensures dimensional tolerances (i.e. minor variations).
06. Fire Resistance:
As they are made of concrete, they resist fire.
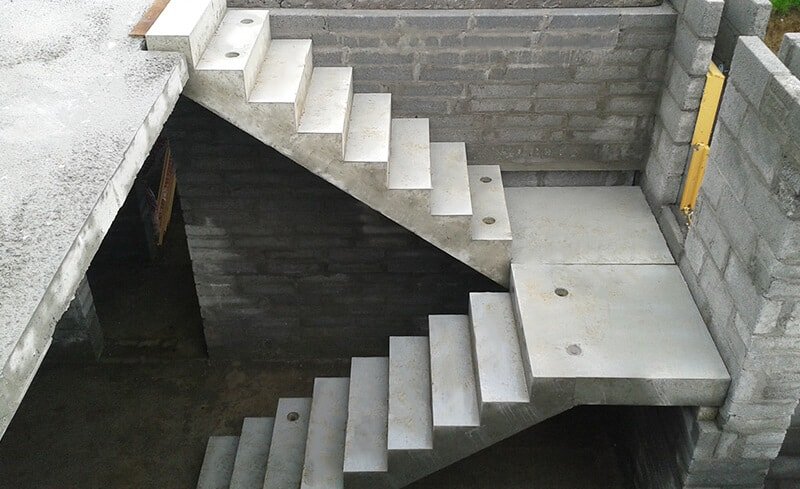
Benefits of Precast Concrete Stairs:
- The monolithic (as one unit) top and bottom landings eliminate the need of forming landings on-site.
- Advanced mechanical connection, speeds the installation process along with eliminating the need of propping (temporary supports).
- Precast stairs are designed and manufactured to any specific floor height and application.
- These are durable and maintenance free.
- Eliminates the need for temporary stairs during construction.
- Safety rails and handrail can be pre-installed prior to installation.
- Better quality control.
- Positioned and fixed by semiskilled labour.
Limitation:
Additional care is needed to achieve monolithic joints between precast stair elements and cast in situ structural elements (i.e. precast stairs should be positioned properly and match with other cast in situ structural elements.
]]>