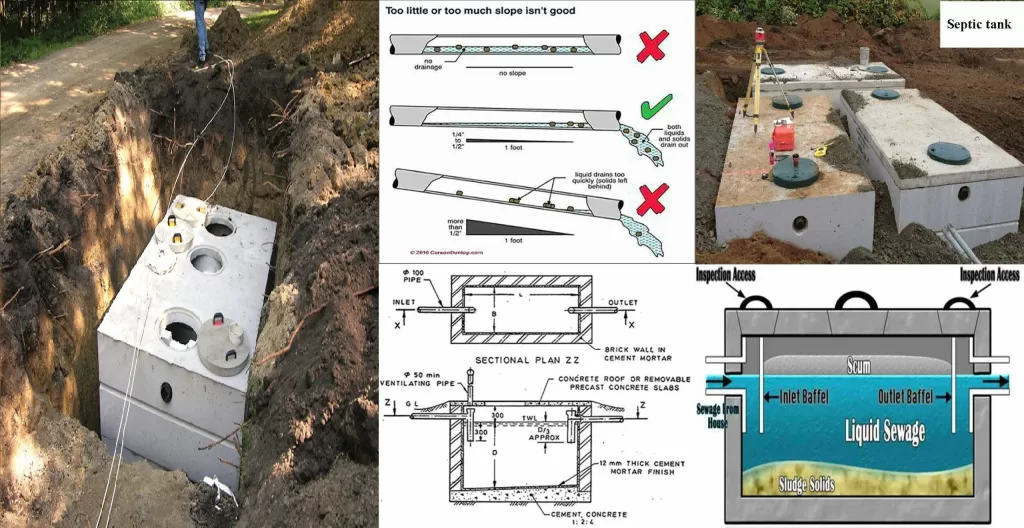
What is Septic tank?
A septic tank can be defined as primary sedimentation tank with large detention time (12 to 36hrs against a period of 2hrs in an ordinary sedimentation tank). In non-sewered rural and urban areas septic tanks are suitable for disposal of night soil. But sufficient water should be available as water is required for flow of the night soil from latrine to the septic tank and for proper functioning of the septic tank. The size of the septic tank is so designed that the sewage is retained in the tank for 24hrs during which certain biological decomposition by the action of anaerobic bacteria takes place which liquefies and breaks the night soil leaving small quantity of soil which is known as sludge and settles at the bottom of the tank and clear water known as effluent flows out of the tank. The effluent from the septic tank is usually disposed by absorption in the soil through soak pit, if no municipal drainage system is prevailing in the area. If municipal drainage line exists in the area, the effluent is discharged to the drain. It is to be noted that disinfection agent such as bleaching powder, phenol etc. should not be used in cleaning latrines as disinfectant entering the septic tank kills the bacteria growth as a result of which rate of biological decomposition is retarded.

Design of Septic Tank
Report this ad The capacity of septic tank depends on number of users and interval of sludge removal. Normally sludge should be removed every 2 years. The liquid capacity of tank is taken as 130 liters to 70 liters per head. For small number of users 130ltr per head is taken. A septic tank is usually provided with brick wall in which cement mortar [not less than 20cm (9 inch)] thick and the foundation floor is of cement concrete 1:2:4. Both inside and outside faces of the wall and top of the floor are plastered with minimum thickness of 12mm (one-half inch) thick cement mortar 1:3 mix. All inside corners of septic tank are rounded. Water proofing agent such as Impermo, Cem-seal or Accoproof etc. is added to the mortar at the rate of 2% of the cement weight. Water proofing agent is to be added in similar proportion in to the concrete also for making floor of the tank. For proper convenience in collection and removal of the sludge, the floor of septic tank is given a slope of 1:10 to 1:20 towards the inlet side. Which means that floor of the outlet side will be on the higher elevation than the floor at inlet side.
Dimensions of Septic Tank Components
i) Length, Width and Depth of Septic Tank
Width = 750mm(min) Length = 2 to 4 times width Depth = 1000 to 1300mm. (min below water level) + 300 to 450mm free board Maximum depth = 1800mm + 450 mm free board Capacity = 1 cubic meter (10 cubic feet) minimum
ii) Detention period
Detention period of 24hrs (mostly) considered in septic tank design. The rate of flow of effluent must be equal to the rate of flow of influent.
iii) Inlet and outlet pipes
An elbow or T pipe of 100mm diameter is submerged to a depth of 250-600mm below the liquid level. For outlet pipe an elbow or T type of 100mm diameter pipe is submerged to a depth of 200-500mm below the liquid level. Pipes may be of stone ware or asbestos.
iv) Baffle Walls of Septic Tank
For small tanks, RCC hanging type scum baffle walls are provided in septic tanks. Baffle walls are provided near the inlet. It is optional near the outlet. The inlet baffle wall is placed at a distance of L/5 from the wall, where L is the length of the wall. The baffle wall is generally extended 150mm above to scum level and 400-700mm below it. Scum being light, generally floats at the water level in the tank. Thickness of the wall varies from 50mm to 100mm. for large tanks lower portion are having holes for flow of sludge.
v) Roofing Slab of Septic Tank
The top of the septic tank is covered with a RCC slab of thickness of 75-100mm depending upon the size of the tank. Circular manholes of 500mm clear diameter are provided for inspection and desludging. In case of rectangular opening clear size is kept as 600X450mm.
vi) Ventilation Pipe
For outlet of foul gases and ventilation purpose cast iron or asbestos pipe of 50-100mm diameter is provided which should extend 2m (min) above ground level. Top of the ventilation pipe is provided with a mosquito proof wire mess or cowl.

Fig: Sectional plan ZZ shoes the typical layout of the septic tank. Section XX shows the Cross-Sectional detail of septic tank.
Example – Design of Septic Tank for 20 Users
Liquid capacity of the tank:
@120lts per user = 0.12 X 20 =2.4cum Take liquid depth as 1.3meter. Therefore Floor area of the tank = 24/1.3 = 1.85m2 Taking length as 2.5times the breath L X B=1.85 2.5B X B = 1.85 B = Sqrt(1.85/2.5) = 0.86 say 0.9m Therefore, the dimension of the tank is 22.5 X 0.9m
Suitable Sizes of Septic Tank Based on Number of Persons
Suitable sizes of septic tanks for use of 5, 10,15,20,50 persons are given in following table.
| No of users | Length L in m | Breath B in m | Liquid Depth in m | Liquid Capacity to be provided in m3 | Free Board in m | Sludge to be removed(m3) | Interval Cleaning |
| 5 | 1.5 | 0.75 | 1.0 1.05 | 1.12 1.18 | 0.3 0.3 | 0.36 0.72 | 1 year 2 year |
| 10 | 2.0 | 0.9 | 1.0 1.4 | 1.8 2.0 | 0.3 0.3 | 0.72 1.44 | 1 year 2 year |
| 15 | 2.0 | 0.9 | 1.3 2.0 | 2.3 3.6 | 0.3 0.3 | 1.08 2.16 | 1 year 2 year |
| 20 | 2.3 | 1.1 | 1.3 1.8 | 3.3 4.6 | 0.3 0.3 | 1.44 2.88 | 1 year 2 year |
| 50 | 4.0 | 1.4 | 1.3 2.0 | 7.3 11.2 | 0.3 0.3 | 3.60 7.20 | 1 year 2 year |
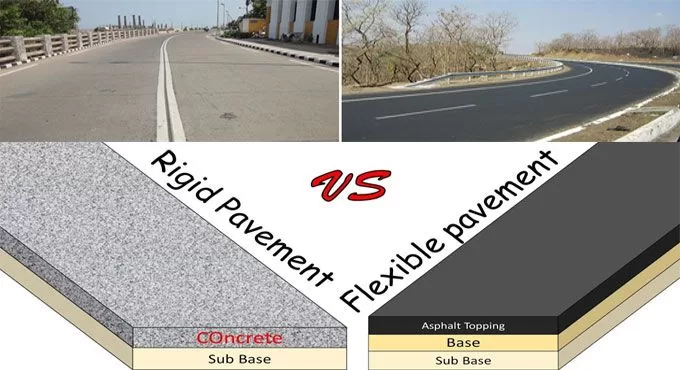
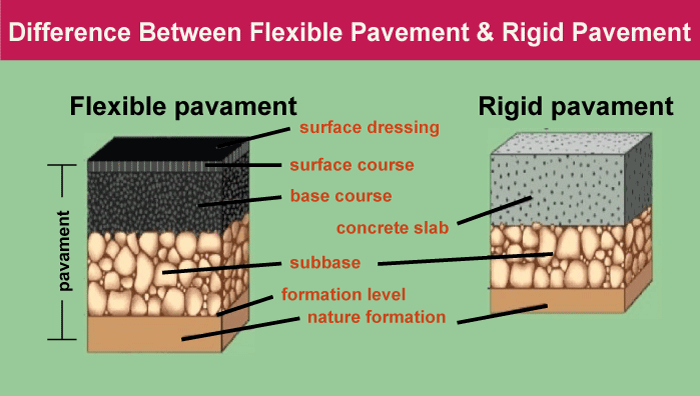
Flexible and rigid pavements are the two most common types of roadways constructed for transportation purposes. Flexible and rigid pavements both of these types of pavements are designed for specific and needful purposes. Each one of them has their own advantages and disadvantages.
In this article, we will explore the major differences that can be found between flexible and rigid pavements
Flexible Pavements
Flexible pavement is the most common type of pavement used for roadways and highways.
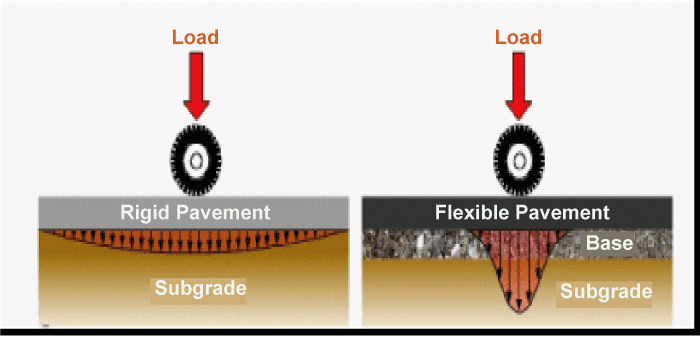
As the name suggests, these pavements are flexible in nature and can bend and deform under the weight of traffic found on a regular basis.
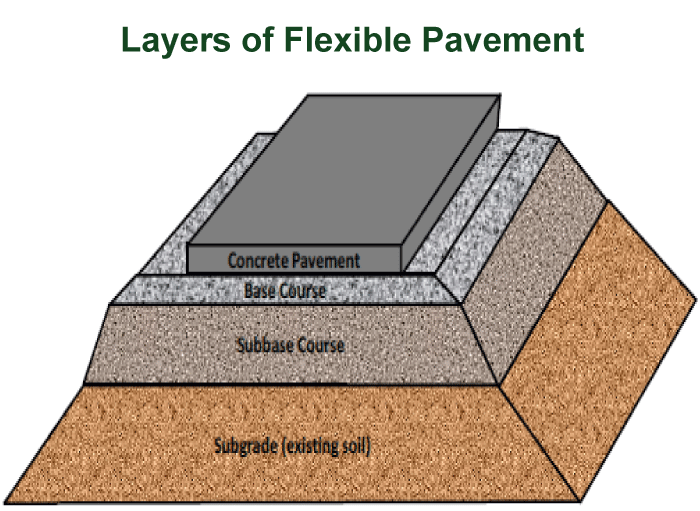
They are made up of several material layers, including the surface layer, base layer, sub-base layer, and sub-grade. Each layer is designed to provide a specific purpose and performs a specific function. And the overall pavement structure is designed to distribute the traffic load evenly across the layers to prevent any deconstruction.
Different Layers Used in The Flexible Pavement
- Number one is the surface layer. The surface layer of a flexible pavement is usually made up of concrete. It is designed to provide a smooth riding surface for every vehicle, whether it is a light or heavy vehicle.
- The second layer is the base layer, typically made up of crushed stone or gravel; this is specifically designed to provide support and stability to the surface layer.
- The third layer is the sub-base layer. This layer is typically made up of compacted soil or gravel and is designed to provide additional support to the base layer.
- The fourth layer is the sub grade layer, which is made up of natural soil or raw, and the pavement is built above this layer.
Advantages of Flexible Pavements
One of the major advantages of flexible pavement is that they are relatively easy and are budget friendly to construct.
- Flexible pavements can be built quickly and do not require a lot of heavy pieces of equipment.
- They also have a higher degree of flexibility, making them stand temperature changes and minor ground movements without breaking.
Disadvantages of Flexible Pavements
Flexible pavements have certain disadvantages as well, and among them are-
Flexible pavement is less durable than rigid pavement and requires more maintenance.
They usually tend to deteriorate more quickly in areas with heavy traffic or harsh weather conditions.
Rigid Pavements
Reject pavement is usually made up of a single layer of concrete that is designed specifically to provide a strong and rigid service for vehicles so that they can have a smooth journey. They support each and every type of vehicle, either it be a light one or a heavy one.
Rigid pavements are usually used for high-traffic areas like airports, industrial parks, and interstates. Rigid pavements are specifically designed to distribute a load of traffic across the entire surface of the pavement, which eventually leads to reducing the stress on individual section of the pavement.
Advantages Of Rigid Pavements
One of the major advantages that we can figure out in rigid pavements is that they are very durable, can last for a long time, and does not require much maintenance.
Rigid pavements can be seen as a very strong construction method, and can easily support heavy loads without deforming or leading to any deconstruction.
In addition to the advantages mentioned above, we can also see one of the major advantages that rigid pavements serve, which is that they are resistant to damage from temperature changes, moisture, and chemicals and stay strong even in the harsh weather conditions.
Disadvantages Of Rigid Pavements
We can see that rigid pavements are more expensive and time-consuming to construct than flexible pavements, requiring specialized equipment and well-knowledgeable labor.
Rigid pavement is less flexible as compared to the flexible pavement and can be prone to cracking in areas that have significant ground movement.
Factors To Consider While Choosing Flexible Pavements or Rigid Pavements
Whenever someone wants to construct a road highway or the airport runways, there are only 2 types of pavements available that are rigid and flexible pavements. Both types of pavements have their own advantages and disadvantages, and the decision to choose one over the other completely depends on the various factors that we will discuss further.
First, let us talk about who should go for flexible pavement.
Flexible pavement comprises multiple layers of aggregate material that can adjust to traffic movement. The soil present below this type of pavement is better-suitable for areas with low to moderate traffic volumes and areas with fluctuating temperatures.
Flexible pavement is also a cost-effective method, and the best solution for short to medium-length roads, driveways, and parking lots.
Here are some factors that will help you determine that whether you should go for flexible pavement or not for your project
1. Low To Moderate Traffic Volume
If your roadway or driveway does not experience high-level of traffic, then you should definitely go for flexible pavement. The primary reason behind this is that the asphalt surface can easily accommodate the weight of the vehicle and adjust to choose changes in the soil and temperature.
Additionally, the construction cost of flexible pavement is quite less as compared to rigid pavement, which makes it more cost-effective for constructors or architectures that have to go for smaller projects
2. Varied Weather Conditions
Flexible pavement is a better option for areas that experience fluctuate fluctuating temperatures and often have different weather conditions. The key reason behind this is the asphalt layer can expand and contract with temperature, which helps to prevent cracks and deconstruction. This is especially important in areas that face harsh winters with temperature swings that can cause significant damage to the rigid pavement
3. The Type of Soil
Flexible pavements are the best option for those areas that have less stable soil. The reason behind this is that the flexible pavement design allows the soil to move and adjust, reducing the risk of any cracks. This can be especially important in areas that have expansive soils, which can cause significant damage to the rigid pavements.
Now let us talk about Rigid Pavements
Rigid pavement is made up of a concrete slab that is reinforced with steel or other materials, that completely depends upon the requirement. Rigid pavement is better suited for areas that experience heavy traffic volumes and have a consistent weather condition. It is more durable and long lasting as compared to flexible pavement, which makes it a good option for high-traffic areas like airports, and highways.
Here are some factors that can help you determine if rigid pavement is the right choice for your project or you should consider another method of pavement
1. Heavy Traffic Volume
If you have a knowledge about the traffic that your area might face, if your road or highway experience heavy traffic volume, rigid pavement option is the best choice for you. The main reason behind this is that the concrete surface can withstand the weight of a heavy vehicle without leading to any breakage or cracks. Secondly, the smooth surface of the concrete provides a comfortable ride for drivers and reduces the risk of vehicle being teared.
2. Consistent Weather Conditions
Rigid pavement is a better option for areas that have consistent weather conditions, like areas with stable climate or those with limited temperature swings. The sole reason behind this is that the concrete that is used to make the rigid pavement is more suspect-able to damage that is caused by temperature changes
3. Longevity
It has been seen that rigid pavement is more durable and long-lasting as compared to flexible pavement. This is because the concrete slab can withstand heavy traffic volumes and does not require much maintenance. Because of this, it is a good option for areas that require long-lasting pavement solutions, such as airports, ports, and highways.
Overall, we can say that the decision to choose flexible or rigid pavement completely depends upon the requirement of the client and also on the factors like traffic volume, weather conditions, soil type, and length of the project. For smaller projects that have low to moderate traffic volumes fluctuating temperatures, and an unsuitable soil for these the flexible pavement is the best option.
Whereas for larger projects with heavy traffic volumes, consistent weather conditions, and the need for durability and longevity, rigid pavement option is the best option. Ultimately, the choice between flexible and rigid pavement will depend on the specific needs of your project. It is important to consider your budget and other conditions as well while going for rigid or flexible pavement
| Criteria | Flexible pavement | Rigid pavement |
|---|---|---|
| Material used | Flexible pavements are made up of asphalt and aggregate materials. | Rigid pavements are made up of concrete that is in forced with steel or other hard material. |
| Traffic volume | Flexible payment are best suited for areas That have low to moderate traffic volume. | Rigid pavement are best suited for areas that have heavy traffic volume. |
| Weather conditions | Flexible pavement are best suited for areas that have varied weather conditions or face fluctuating temperatures. | Rigid pavements are better suited for areas that have consistent weather conditions. |
| Soil type | Flexible pavement can last long on less stable soil. | Rigid pavements can last long on in stables soil. |
| Durability | Flexible pavement are less durable and require more maintenance. | Rigid payment are more durable and required less maintenance. |
| Construction cost | Construction cost Flexible pavement have lower initial construction cost. | Rigid pavement have higher initial construction cost. |
| Longevity | Flexible pavement have shorter life span | Rigid pavement have a good longer life span. |
| Comfort | Flexible pavement is known for providing a comfortable right for the drivers. | Rigid pavement provides a comfortable right for the drivers. |
| Smoothness | Flexible pavement have a lighter suffer surface. | Rigid pavement have a smooth surface. |
| Expansion and contraction | Flexible pavement can adjust to the changes in the temperature and soil movement. | Rigid pavement or less flexible and more suspect-able to damage from temperature changes. |
Difference Between Flexible and Rigid Pavements
1. Material Used
In case of flexible pavements, they are composed of layers of asphalt and aggregate materials. This design allows the pavement to adjust to the movement of traffic and changes in the underlying soil full on the other hand, rigid pavement consists of a concrete slab that is reinforced with steel or other strong materials. This design provides a more durable surface that is less suspectable to cracks or any other form of deconstruction.
2. Traffic Volume
One of the vital factor that you have to consider while deciding between flexible pavement and rigid pavement is the traffic volume flexible pavement are well suited for areas that have low to moderate traffic volumes.
The key reason behind this is that the material that is used to make the flexible pavement that is asphalt, this surface can accommodate the weight of vehicles and adjust to changes in the soil and in the temperature as well.
On the other hand, in rigid pavement, the construction is made up of concrete surface, which is eventually better suited for areas that have heavy traffic volume. The main reason behind this is that the concrete surface can withstand the weight of heavy vehicles without leading to any cracks or any other form of deconstruction
3. Weather Conditions
Another major factor that you have to consider while choosing between flexible and rigid pavement is the weather. In case of flexible pavements, they are better suited for areas that face fluctuating temperatures and have vulnerable changing weather conditions.
The reason behind this is that the asphalt layer can expand and contract with the changing weather conditions, which eventually helps to prevent cracks or any other form of deconstruction. This is vital in areas with harsh winters with temperature swings that can cause a sufficient amount of damage.
On the other hand, rigid pavements are better suited for areas with consistent weather conditions, such as areas with stable climate or those with limited temperature swings, for example, Bengaluru. This is because concrete is less flexible than asphalt and is more suspectable to damage from temperature changes
4. Soil Type
Another major factor that you have to consider while choosing between flexible and rigid pavement is the type of soil that is present in the area. Flexible pavements are better suited for areas that have less stable soil.
The reason behind this is that the flexible design of the pavement allows the soil to move and adjust according to the traffic, which eventually reduces the risk of damage or cracking. This can be especially important in areas that have expansive soils, which can cause significant damage to rigid pavements.
5. Durability
Durability is another important consideration that you have to look while you are selecting between flexible and rigid pavements. Rigid pavements are generally more durable and long lasting as comparative to flexible pavements, and the reason behind this is the concrete slab that can withstand heavy traffic volumes and does not require much maintenance.
On the other hand, flexible pavements require maintenance and have a shorter lifespan. This makes them a good option for smaller projects that have low traffic volumes and shorter life spans.
6. Construction Cost
Construction cost is one of the major factors that you have to look at while selecting between flexible and rigid pavements, but you also have to consider the purpose of your project.
Generally, flexible pavements are less expensive to construct than rigid pavements, and the reason behind this is that the material used to make the flexible pavement is less expensive than the material used to make rigid pavement. Secondly, flexible pavements are easier to install, which can also reduce labor costs.
However, it is vital to note that the long-term cost of ownership for rigid pavements is often lower due to their long-lasting life span.
7. Longevity
The life span of a pavement is an important consideration when you are deciding between flexible and rigid pavements. Rigid pavements generally have a longer life span compared to flexible pavements. The reason behind this is the concrete slab that can withstand heavy traffic volumes and does not require as much maintenance as flexible pavements. Secondly, it is important to note that digit pavements can be more easily repaired as compared to flexible pavements, which can extend their life span even further.
8. Comfort
The comfort of drivers and passengers is one of the most vital factors you must consider while selecting between flexible and rigid pavements; as usual, pavements generally provide a smoother, more comfortable ride compared to flexible pavements, the drivers prefer to go for rigid pavements. The sole reason behind the smoothness of rigid pavements is the concrete surface that leads to smoother and less prone to bumps and dips areas.
Conclusion
To summarize the above discussion of differences between flexible and rigid pavements, the decision to choose between the 2 is only sometimes straightforward and requires careful consideration of various factors. The choice of a pavement depends on various factors, including traffic volume, weather conditions, soil type, durability, construction cost, and longevity. Both types of payments offer different types of benefits and have unique characteristics that make them well-suited for specific conditions and projects.
To compose our discussion on flexible pavements, they are made up of asphalt and aggregate materials, making them well-suited for areas with low to moderate traffic volumes. They can adjust to the movement of traffic and changes in the underlining soil, making them an ideal choice for areas with less stable soil. Secondly, they are better suited to fluctuating temperatures and changing weather conditions, making them an overwhelming choice for areas with harsh winters.
On the other hand, rigid payment is made from concrete slabs reinforced with steel or other hard materials, making them a better choice for areas that face heavy traffic volumes and have consistent weather conditions. Rigid pavements have been seen that they are more durable and have a long life span as compared to flexible pavements. Secondly, they can provide passengers and drivers with a smoother and more comfortable ride.
Overall, the choice between flexible and rigid pavement is not a one size fits all solution. Each project must be evaluated individually, considering the unique needs and requirements of the area. It is crucial to thoroughly understand the benefits and drawbacks of both types of payments. The project holder needs to make an informed decision to avoid any circumstances.
If you want to go for construction, it is essential to work with a qualified pavement contractor with extensive experience in both types of pavement. Through a well-educated contractor, you can get health to evaluate the specific needs of a project. They will also recommend the most appropriate type of pavement that will make your project last long.
]]>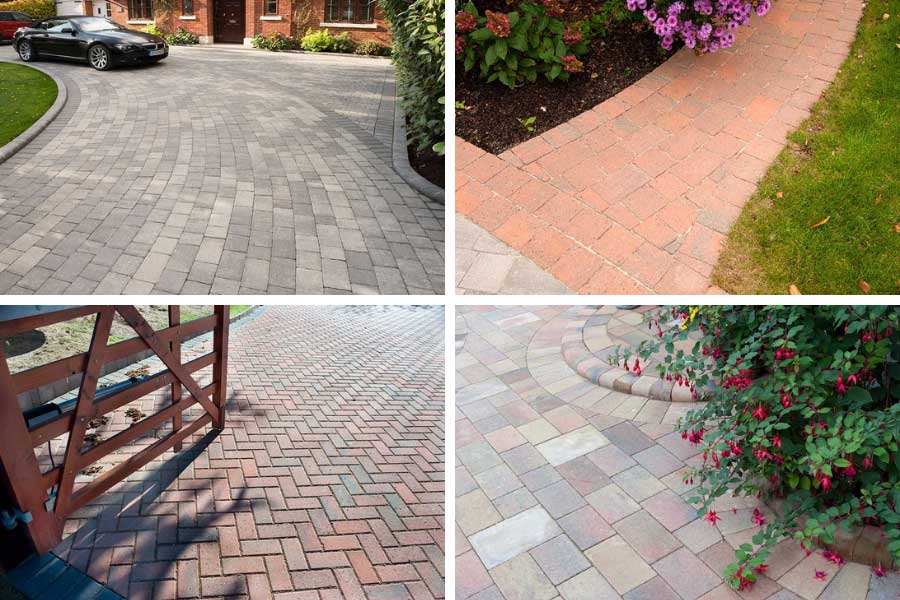
Pavers are widely used in driveways, patio, and many other outdoor places. This article will discuss different types of pavers used in homes.
What Are Pavers?
Pavers are blocks used to pave the driveways, patio, walkways, pool decks, etc. It is a flexible paving system that provides an alternative to concrete flooring for the outdoor parts of the house.
The pavers are a popular choice worldwide due to the ease of installation, replacement, maintenance, and cost-effectiveness.
The pavers are available in many textures and shades. So you can choose from various colors. The colored pavers add more beauty to the house.

The main differentiating factor for pavers is their construction material. You can choose the paver material based on the availability in the local market, aesthetics, and cost-efficiency.
Different Types Of Pavers Based on Material
Following nine types of material are commonly used across the US and Europe as paver blocks.
- Concrete
- Brick
- Flagstone
- Marble
- Travertine
- Porcelain
- Cobblestone
- Rubber
- Plastic
1. Concrete Paver
Concrete is the most commonly used when it comes to outdoor flooring. However, it comes with many problems like cracking under heavy load, cracks due to heat, curing period after construction, etc. We can avoid all of these problems using concrete blocks.
Concrete blocks are available in various shapes and sizes. It is made of molded cement concrete, and it is easy to install as they have a shape that easily interlocks with the adjacent blocks.
Due to its durability, the concrete paver is a prevalent flooring choice for driveways and roadways. It is cheaper than clay brick, and there is a wide range of colors, sizes, textures, and thicknesses.
Also, the manufacturer can customize the color your way for bulk orders by adding the color imparting metallic oxides. However, the artificial colors may fade after prolonged use.

2. Brick Paver
A rectangular red brick is an eco-friendly choice for walkways and fireplaces with low traffic. The red bricks are made of clay burnt in a kiln and use no artificial material; hence they are environment friendly. Also, bricks are among the oldest paving materials and have been extensively used worldwide.
The shape is generally rectangular, but custom shapes are also available on-demand for specific projects. The brick paver is easy to install as it is placed adjacent to other pavers, and it has no interlocking design.
Also, it can be used from both sides. The color of the brick is due to iron oxide that imparts red color to the brick, and it is a permanent color and doesn’t fade with time.

3. Flagstone Paver
Flagstone is one of the most popular types of rock pavers. It is a naturally occurring sedimentary rock. Flagstone is used as a thin tile; therefore, it is not ideal for high-traffic areas because it can break under the load. It is suitable only for walkways, gardens, and patios.
The non-slip surface of the flagstone paver is another feature that makes it an ideal choice for outdoor paving. The aesthetics of the flagstone are outstanding. The flagstone pavers are placed in a non-uniform pattern giving it a classic and rich appeal.
The varied colors and textures available for the stone provide an excellent experience in choosing the perfect shape as per the house’s theme. However, hues of red and grey are the most common shades.
Due to the thin slab of the stone, it is necessary to keep the heavy loads off the paving. Also, it needs proper maintenance for durability.

4. Marble Paver
Marble is a metamorphic rock occurring from limestone under extreme heat and pressure. It is one of the most beautiful rocks and is available in white, grey, and other shades. It is used as a thin slab; therefore, it is not suitable for traffic.
Marble pavers come with a regal polish that enhances their surface. They are durable and provide great aesthetics to the house. Also, they increase the selling value of the house.
One of the drawbacks of the marble paver is that it gets very hot under the sunlight and gets stains on it when it comes into contact with acidic chemicals.

5. Travertine Paver
Travertine is a sedimentary rock that is durable and lasts a decade. The shape and texture of a travertine paver are very natural and provide an excellent finish to the surface.
One of the most desirable aspects of using a travertine paver is that it can withstand the weathering effect without cleaning. Also, it retains the original color and is ideal for the pool decks as it absorbs the water.

6. Porcelain Paver
Porcelain is a clay product produced by heating the clay to a very high temperature. It has a shiny surface that makes it look appealing. It is durable to last decades and also hard enough to resist scratches.
It is an excellent option to use in walkways, patios, and driveways. The porcelain pavers are also available in wooden, stone, and many other textures, making them a viable alternative to the natural rock pavers. Further, the porcelain pavers have thickness ranges one can choose from.
Porcelain pavers are typically much less absorbent than other bricks or travertine; therefore, they are unsuitable for wet areas like pool decks.
The cost-effectiveness of a porcelain paver is too high than any other type of paving material. Maintenance of a porcelain paver is lesser as it doesn’t chip, break, or crack easily.

7. Cobblestone Paver
Cobblestone has been a popular choice for old times. The main reason was that it is very strong, highly durable, and needs significantly less maintenance.
It was used to pave the roads. Granite, sandstone, basalt, or limestone are most commonly used as cobblestone material.
They can withstand extreme temperature conditions without facing much damage, thus an ideal choice for the fireplace too. The cobblestone’s designs, patterns, colors, and texture are abundantly available.

8. Rubber Paver
Rubber pavers are slip-resistant pavers. The material used in the rubber paver is eco-friendly, durable, cost-effective, and hard.
This non-slip paver is made of eco-friendly and tear-resistant raw materials. This type of paver is a good choice for parking areas, walkways, and driveways.
The rubber paver is lesser absorbent than concrete, brick, or flagstone. Rubber paver has many advantages, but one of the problems is that under sunlight, it has a thermal expansion that can disturb its installed arrangement.

9. Plastic Paver
Plastic pavers are made from old recycled plastic. The plastic paver is a world-saving idea that is customizable and serves the requirements of a good paver. The surface of the plastic paver is hard enough to resist scratches.
Different colors can be added to the paver, and different shapes can be achieved using dyes. However, more research is underway to make the plastic paver as durable as the stone paver.

Different Types Of Pavers Based On Shape
The pavers are available in various shapes and sizes: square, rectangle, hexagonal, octagonal, and H-shaped. The homeowner has a wide variety in choosing the paver based on the different shapes.
There are four basic types of pavers-
- Type A: has vertical faces and doesn’t interlock.
- Type B: has alternate plain and corrugated shape that helps interlocking
- Type C: all faces are corrugated and interlocked in all directions.
- Type D: L or X-shaped pavers that interlock in any direction.

Different Types Of Pavers Based On Installation
Interlocking Paver: Pavers that hold each other in place.
Slab Paver: Pavers don’t lock each other in place and don’t allow any relative movement.
Uses
Pavers are mostly used outdoors, including
- Driveways
- Patios
- Walkways
- Pool decks
- Fire pits
- Planters.
So, these were different types of pavers. I hope now have enough knowledge about it.
]]>
It is extremely important to figure out the safe bearing capacity of the soil at the construction site. If this is not done properly, the structure may settle, and the building may get damaged, or even collapse. For this reason, we perform various tests to find out the safe bearing capacity of the soil. Today, let us see how we can do this.
The safe bearing capacity of soil is defined as the maximum load per unit area that the soil can bear without any displacement or settlement. This is measured in terms of kilograms per square centimeter. If the load exceeds this mark, the soil will start to displace or break. This will lead to structure settlement, which can end up in destructive results.
Formula:
Safe bearing capacity of soil = (ultimate bearing capacity)/(Cross-section area x Factor of safety)
Explanation: The ultimate bearing capacity of the soil is the point at which the soil starts to displace under load.
Any soil can take up to a certain amount of load only, after which it starts to settle or displace.
The cross-section area is the area of soil on site on which the tests are being performed. It can be a square meter in general practice.
The factor of safety indicates how safe the soil capacity results must be before considering a certain type of construction. Naturally, it depends upon the type of building being constructed. It is kept at 2 for general civil constructions and 3 for high-rise or heavy constructions.
Testing Procedures for Soil Bearing Capacity: There are quite a few methods to determine the bearing capacity of the soil at the construction site. Among them, the Drop Weight Method is the easiest and it is a tried and tested true test.
How to perform the Drop Weight Test:
1. Dig up a pit down to the foundation depth.
2. Find a heavy perfectly cube-shaped object. Stone blocks work best. Measure its precise weight.
3. Lift the cube up to a predetermined height directly over the pit. This must be precise as well.
4. Drop the cube in the pit, and then carefully lift it out without disturbing the impression made by the block.
5. Measure the depth of the impression made by the block.
6. Repeat the above process several times and take the average value.
Example:
Weight of the block: 1.2 kg
Height of drop: 120cm
Depth of impression: 1.6cm
Cross section: 20 sq.cm.
Factor of safety: 2
Therefore, ultimate bearing capacity = (1.2 x 120)/1.6 = 90
And, safe bearing capacity of soil = 90/(20 x 2) = 2.25 kg/cm2.
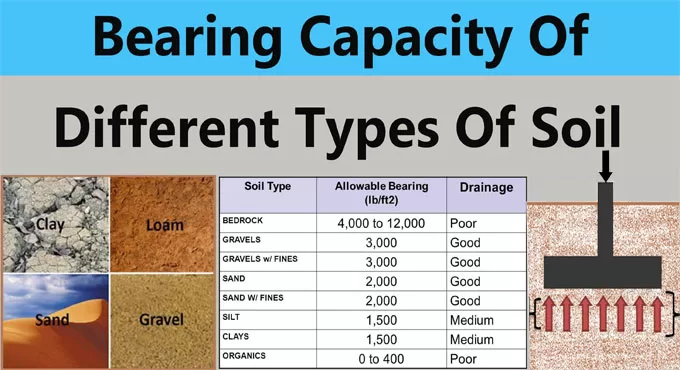
Safe Bearing Capacity (SBC) values for different types soils: These values represent probabilities only. You can use the data below for making a preliminary design and estimation. However, you still have to carry out the actual tests at site to know the real value and adjust the design accordingly.
Soft, wet or muddy clay: 0.5 kg/cm2
Black cotton soil: 1.5 kg/cm2
Loose gravel: 2.5 kg/cm2
Compacted clay: 4.5 kg/cm2
Soft rocks: 4.5 kg/cm2
Compacted gravel: 4.5 kg/cm2
Hard rocks: 33.0 kg/cm2
Coarse sand: 4.4 kg/cm2
Medium sand: 2.45 kg/cm2
Fine sand: 4.45 kg/cm2
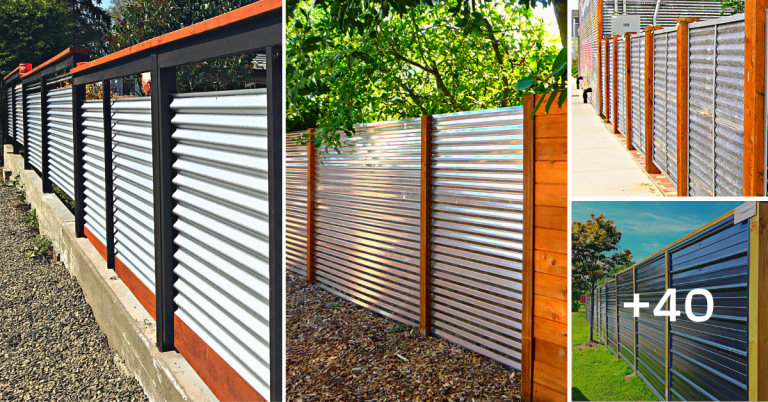
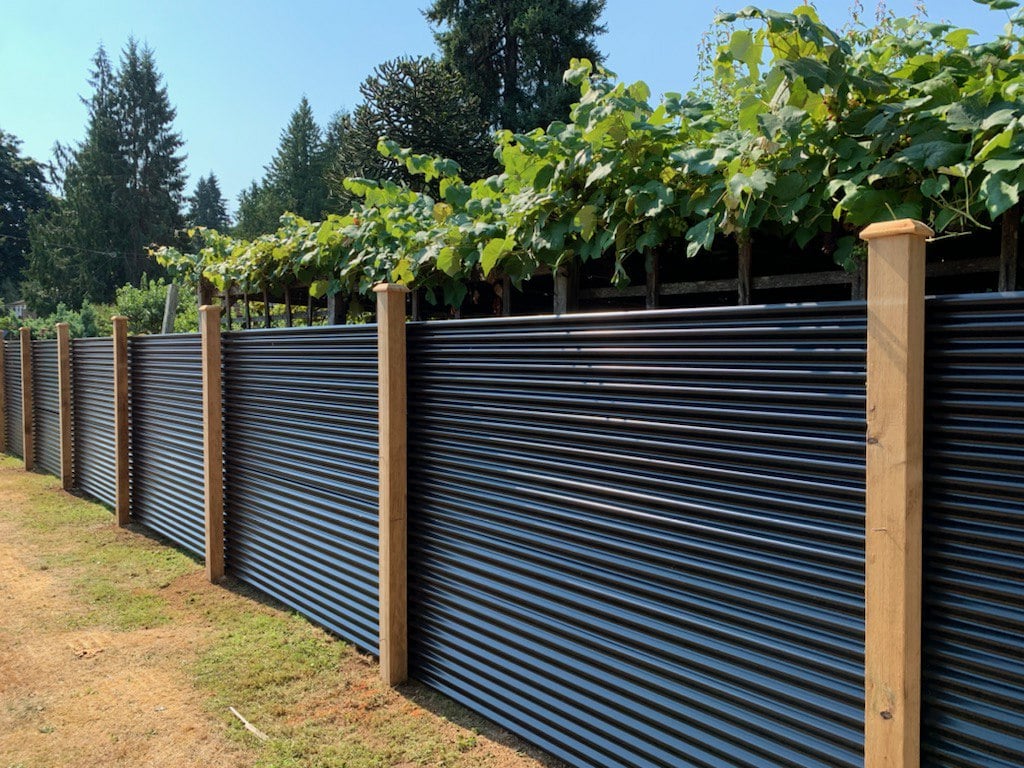
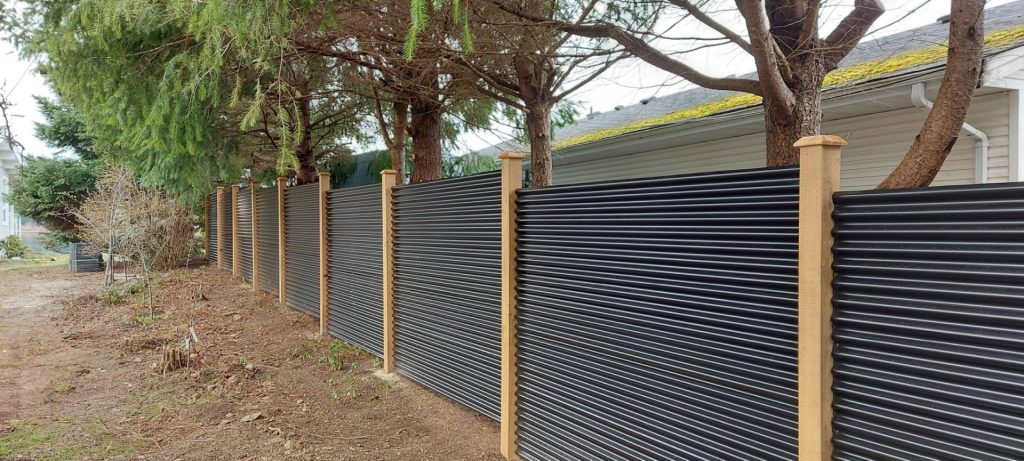
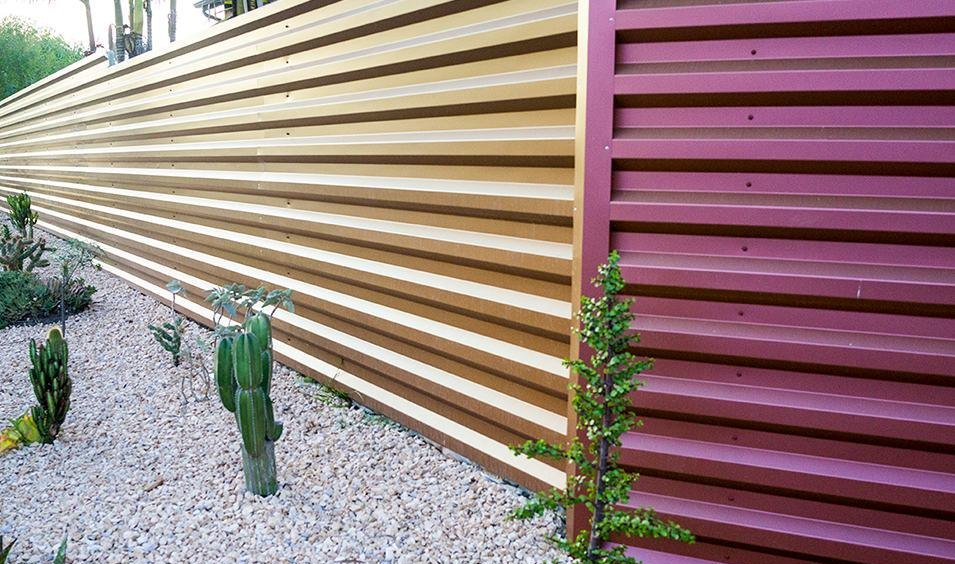
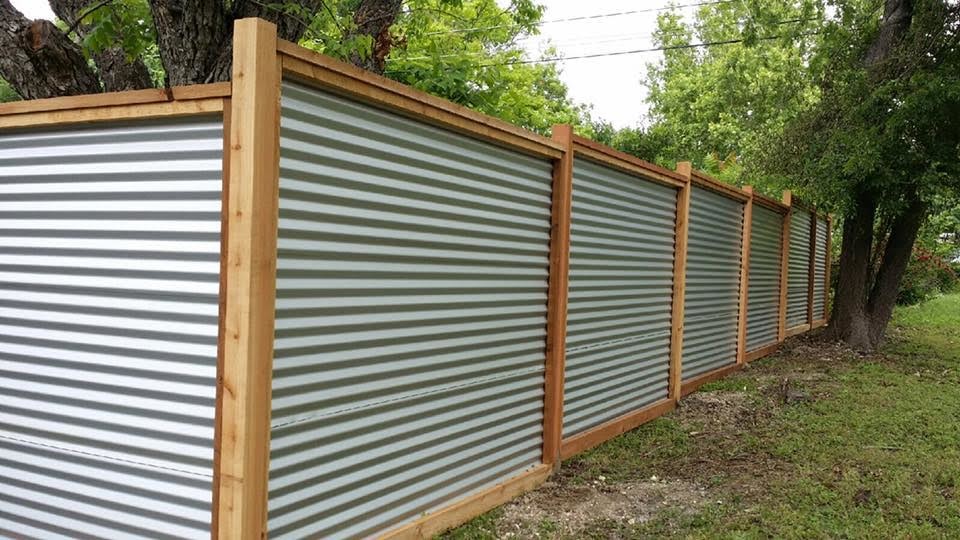
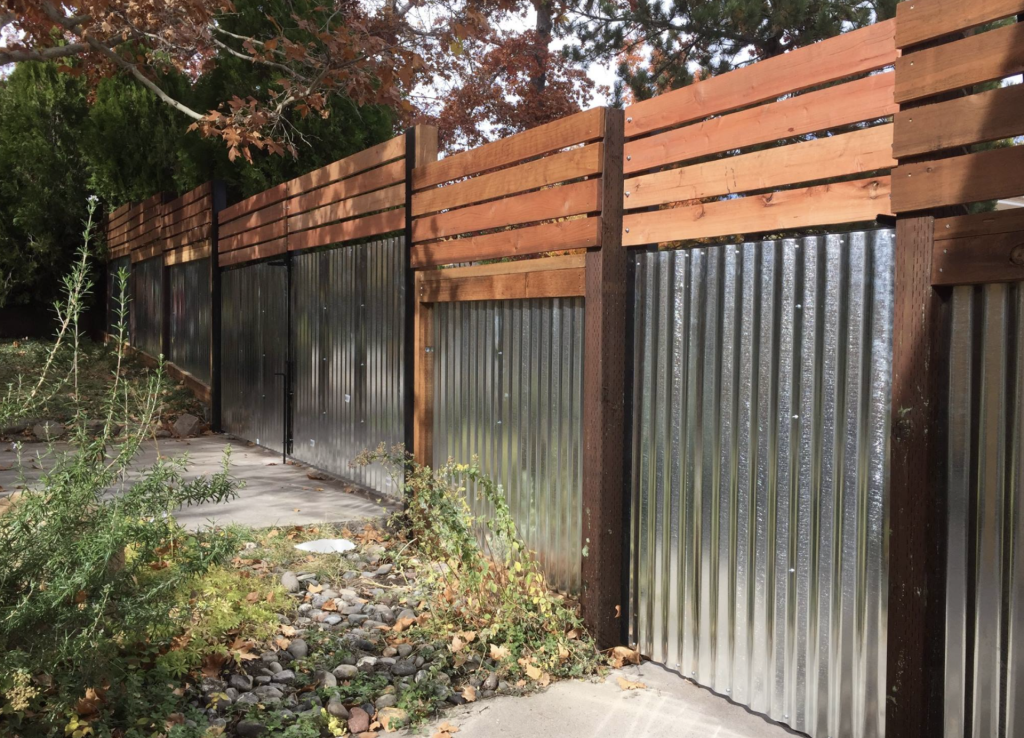
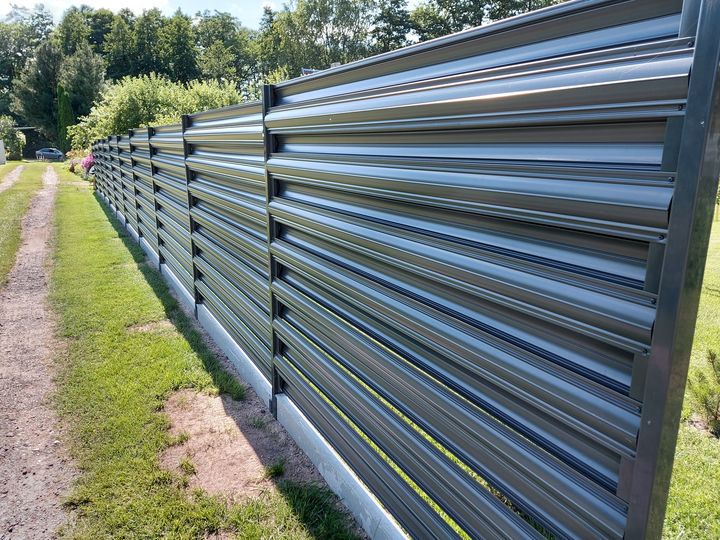
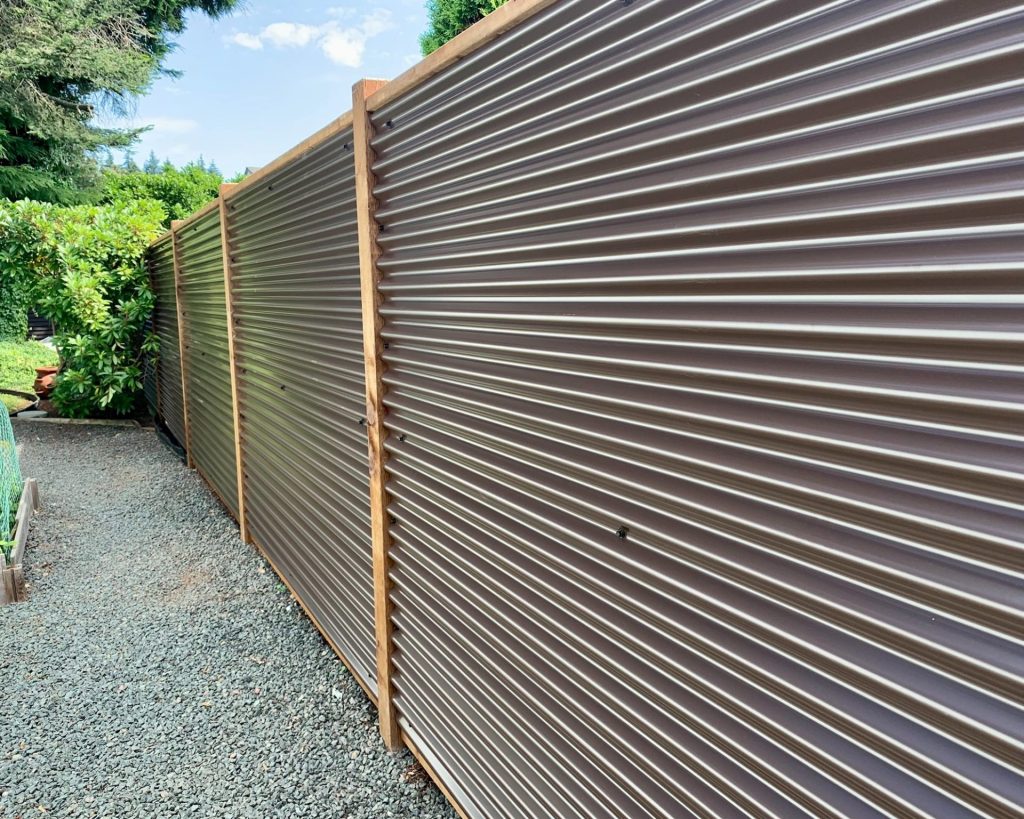
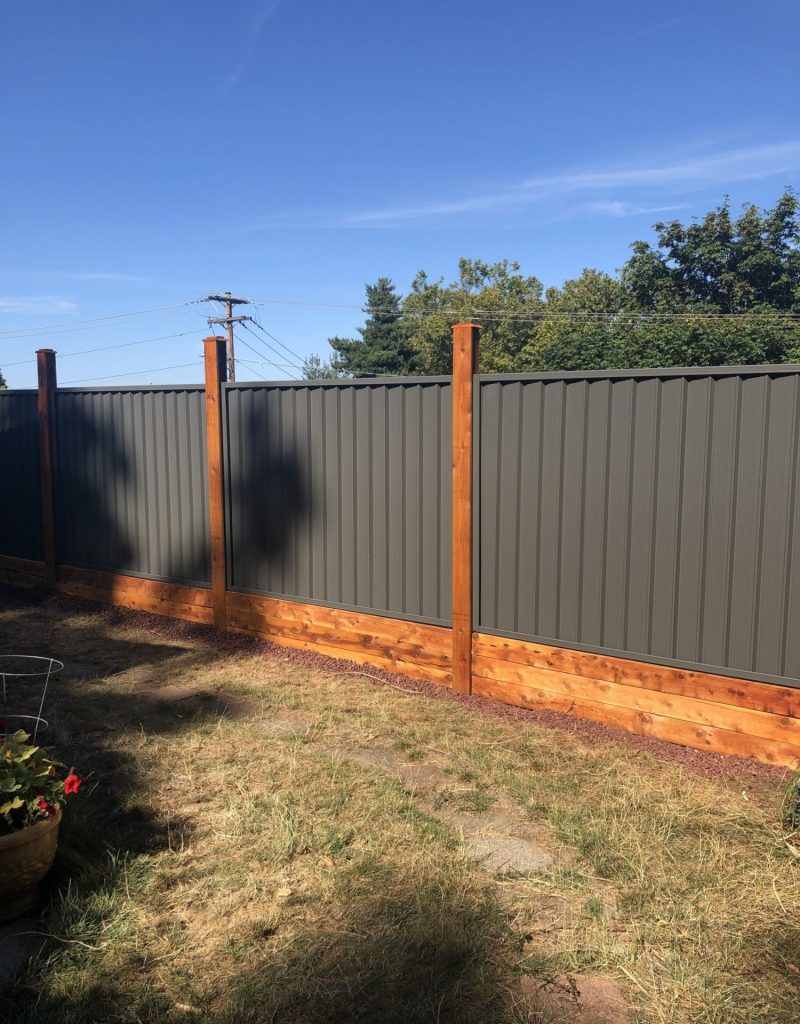
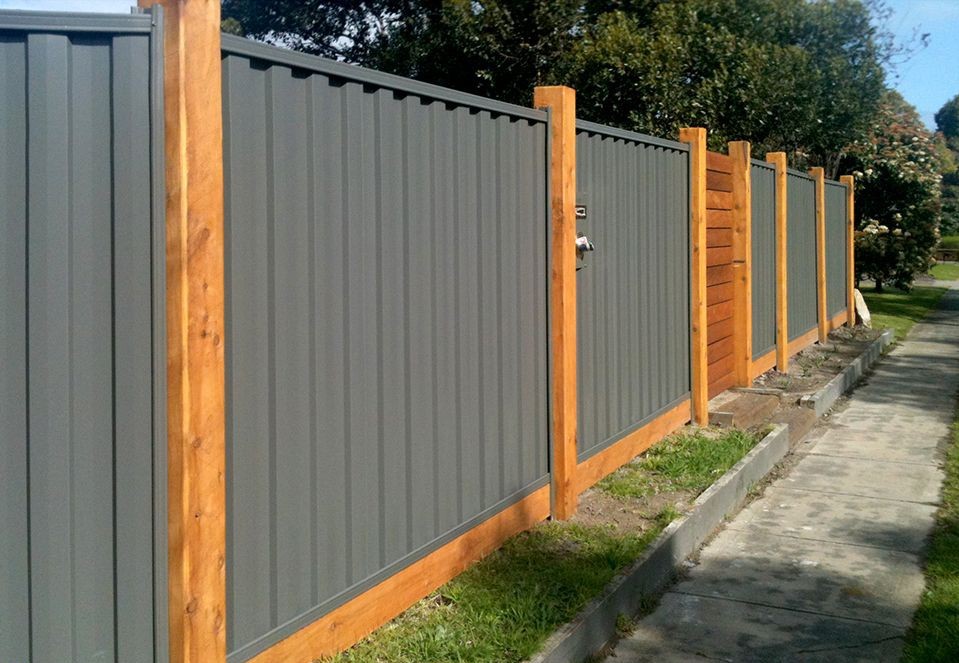
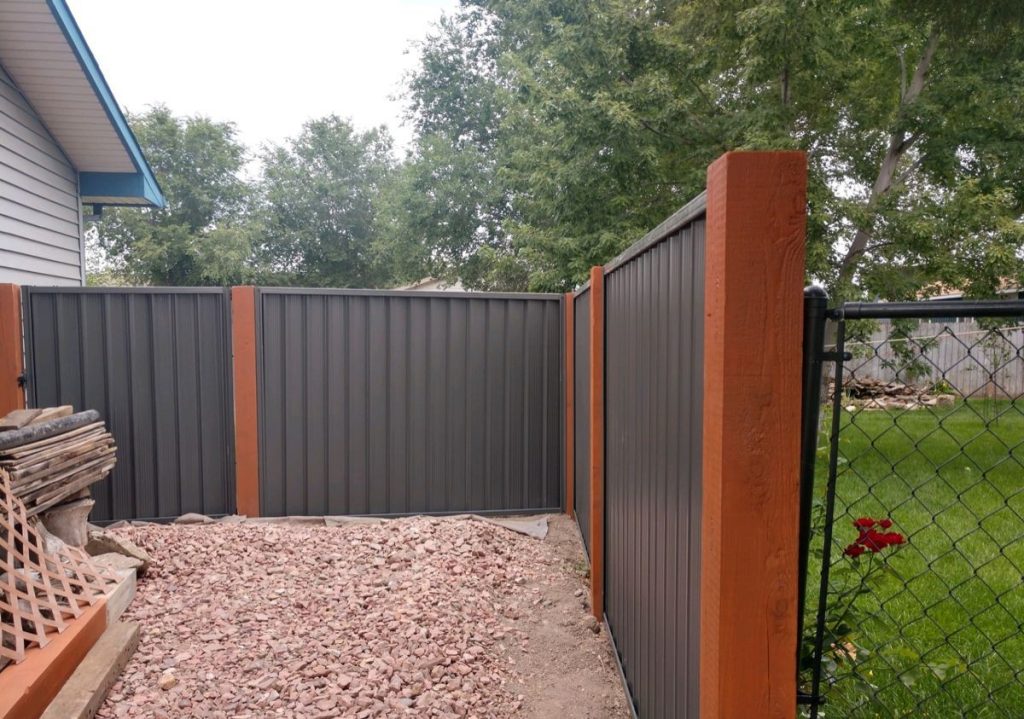
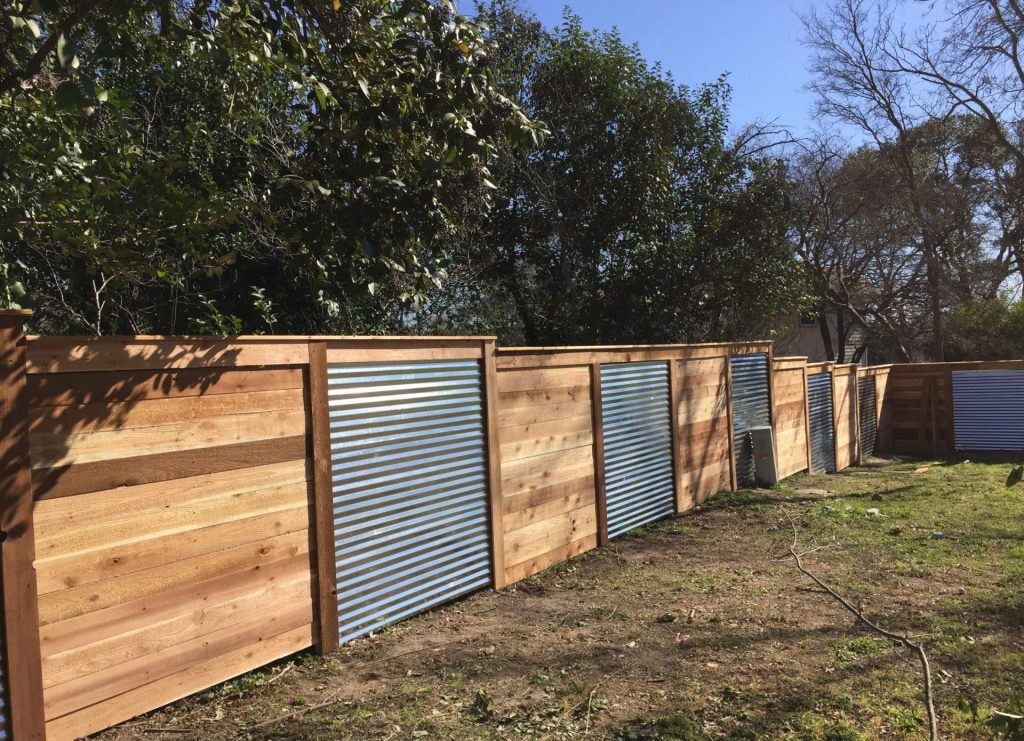
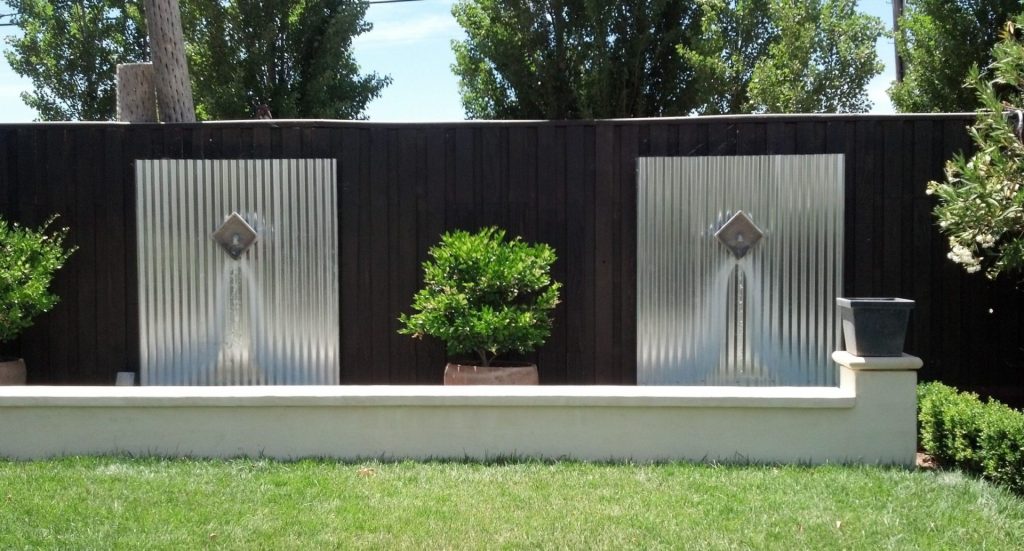
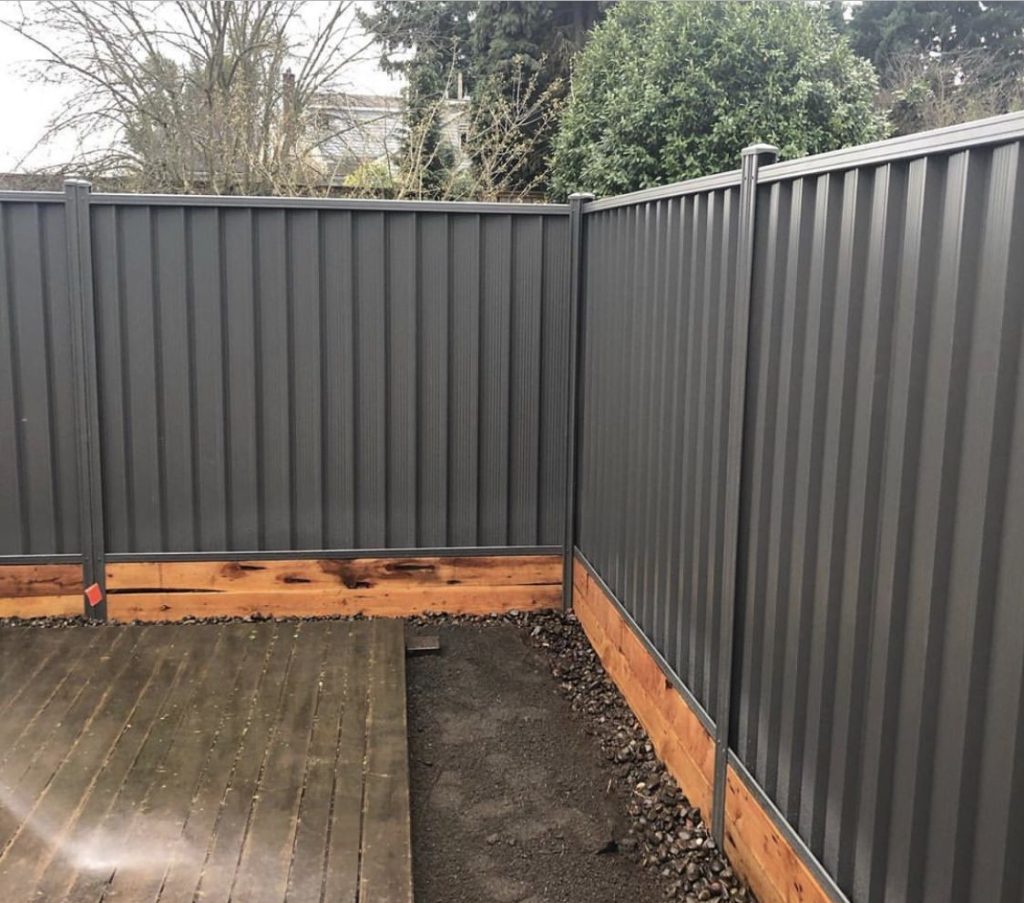
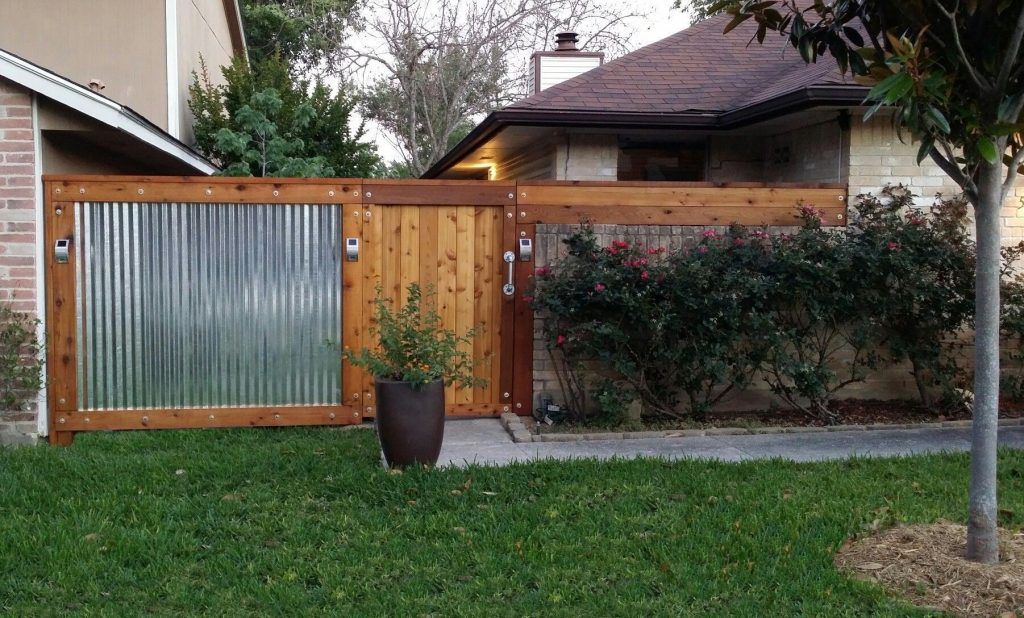
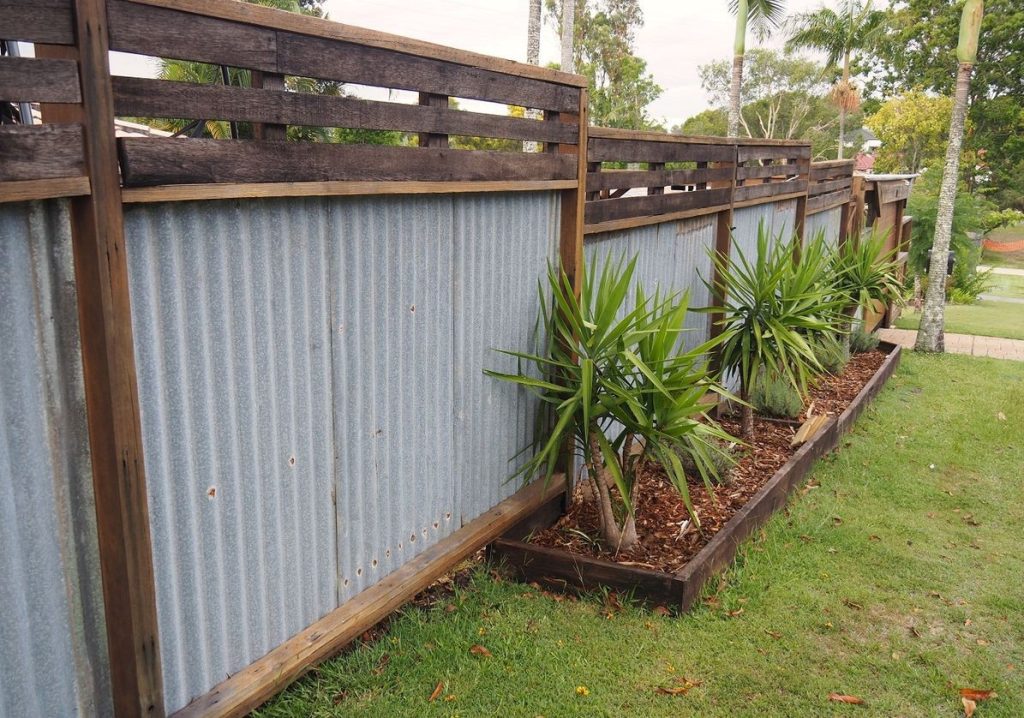
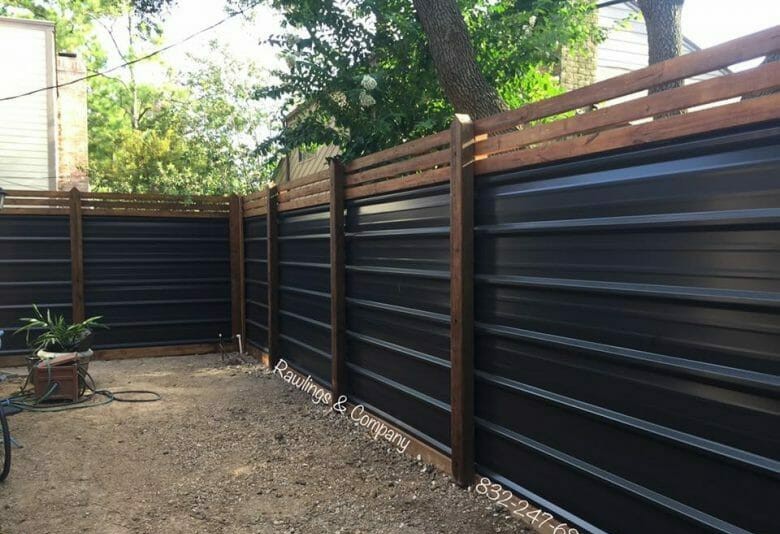
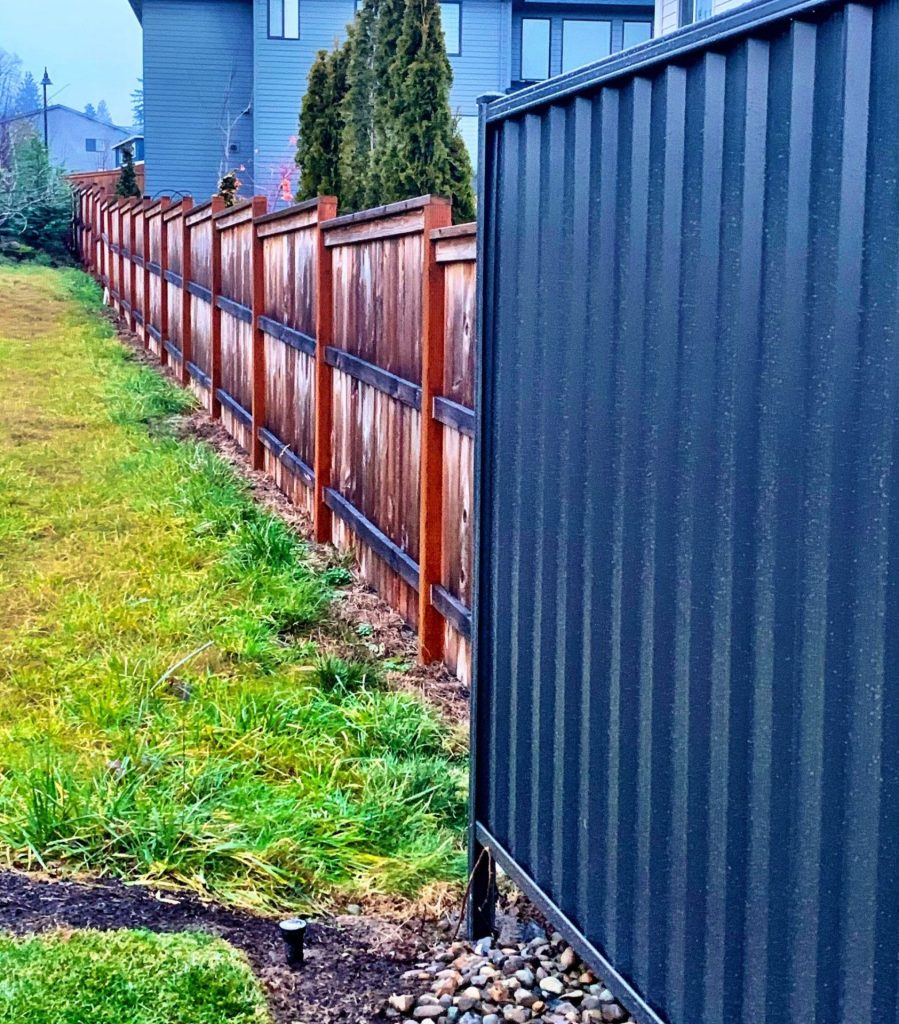
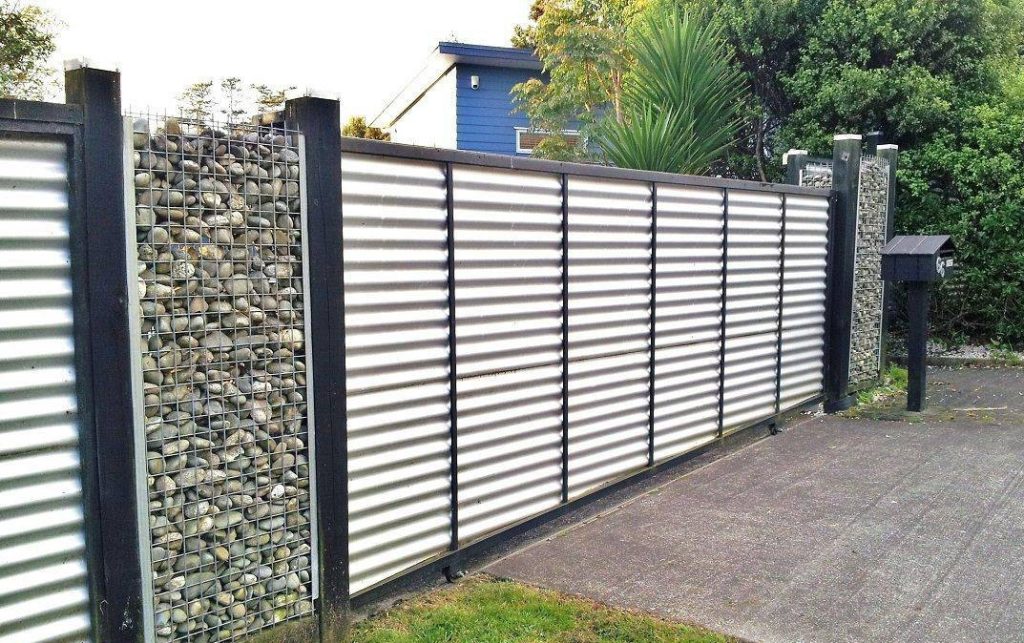
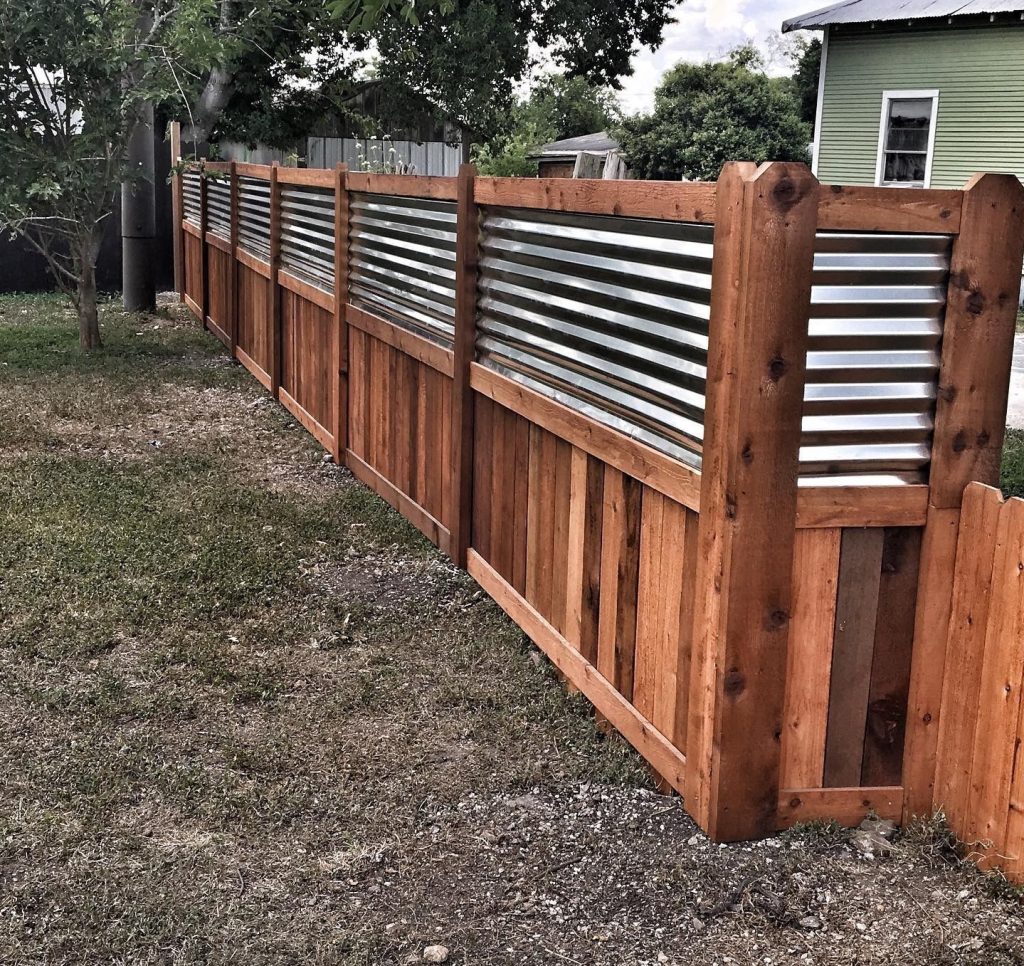
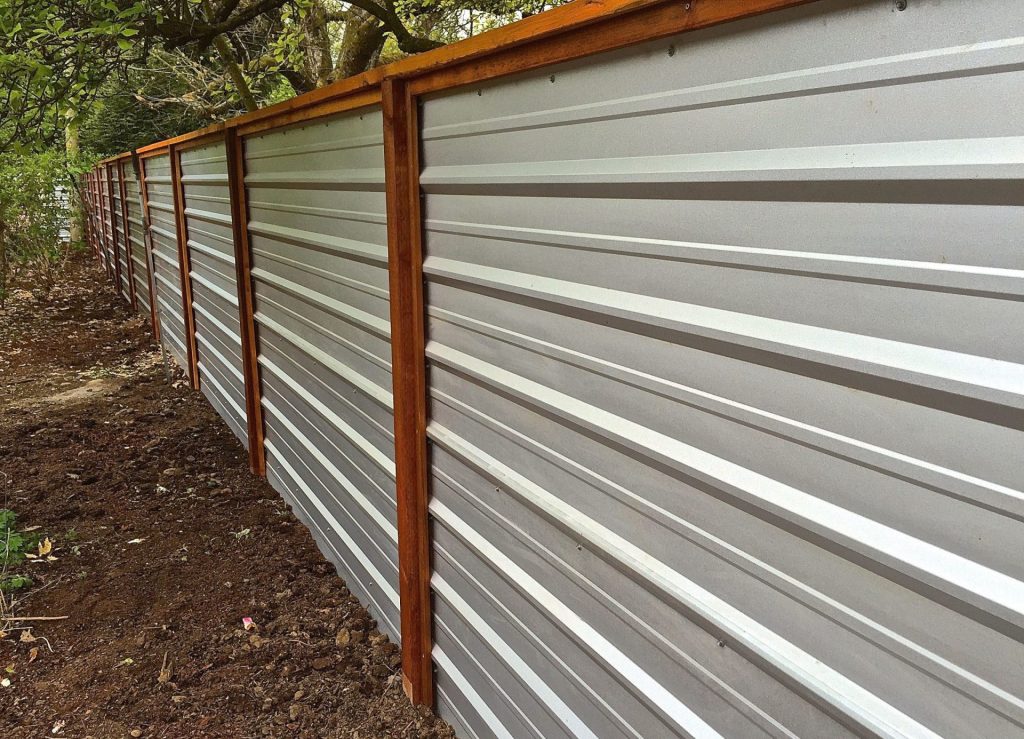
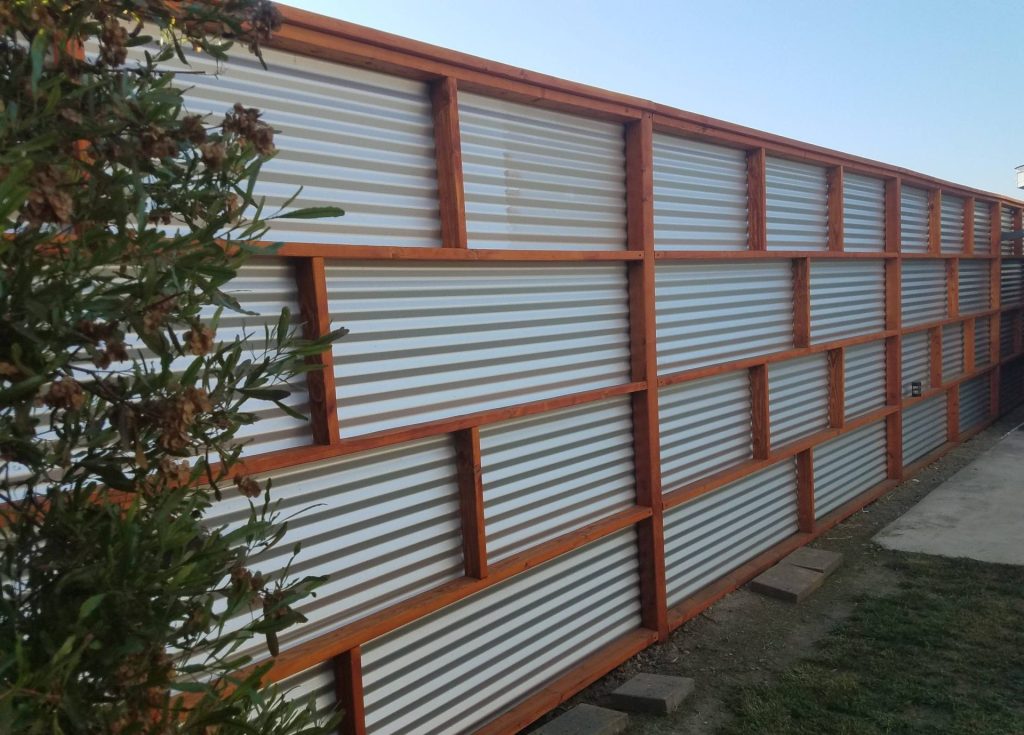
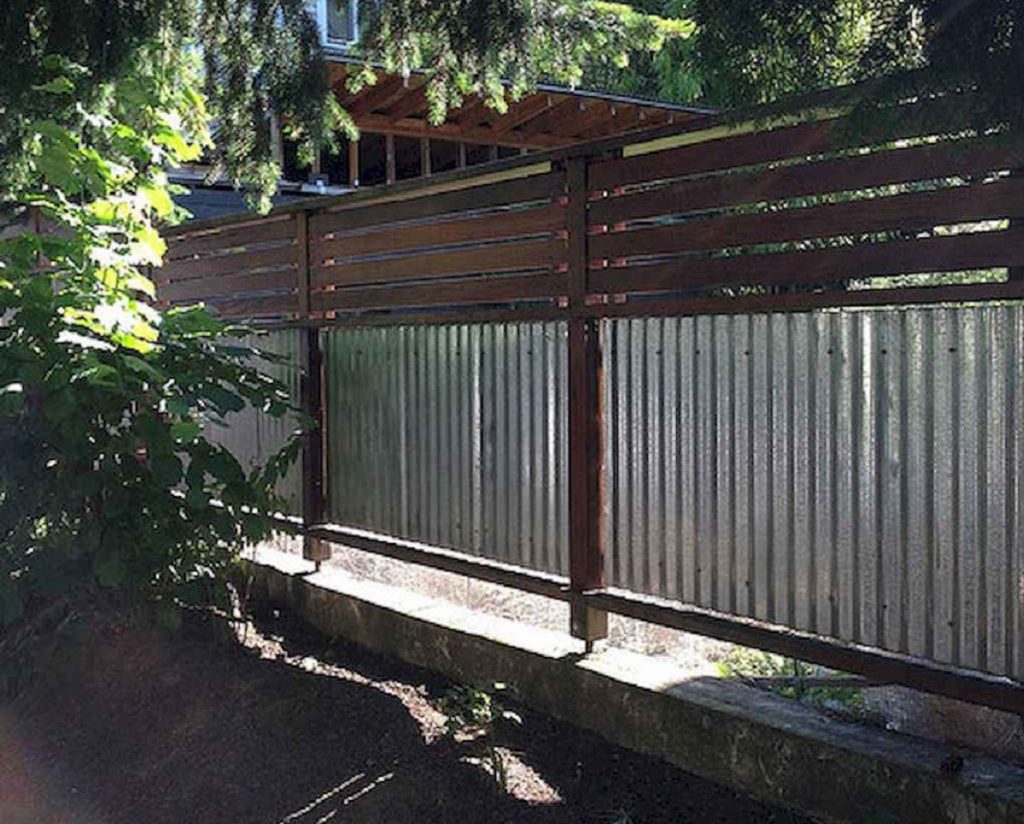
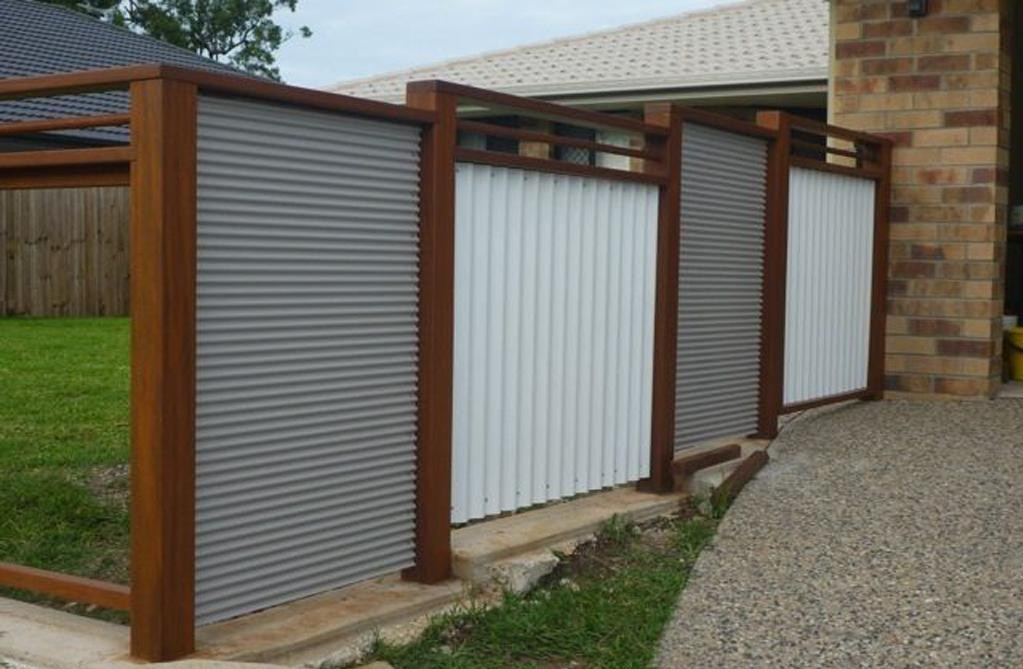
Adding decorative corrugated accents to the landscape of your home or office can be a fun and inexpensive way to update an outdoor space. With a large selection of colors and finishes, corrugated metal can complement almost any design.

You can use corrugated metal in a bright color to frame your patio or bare metal next to brightly colored walls to offset the color.
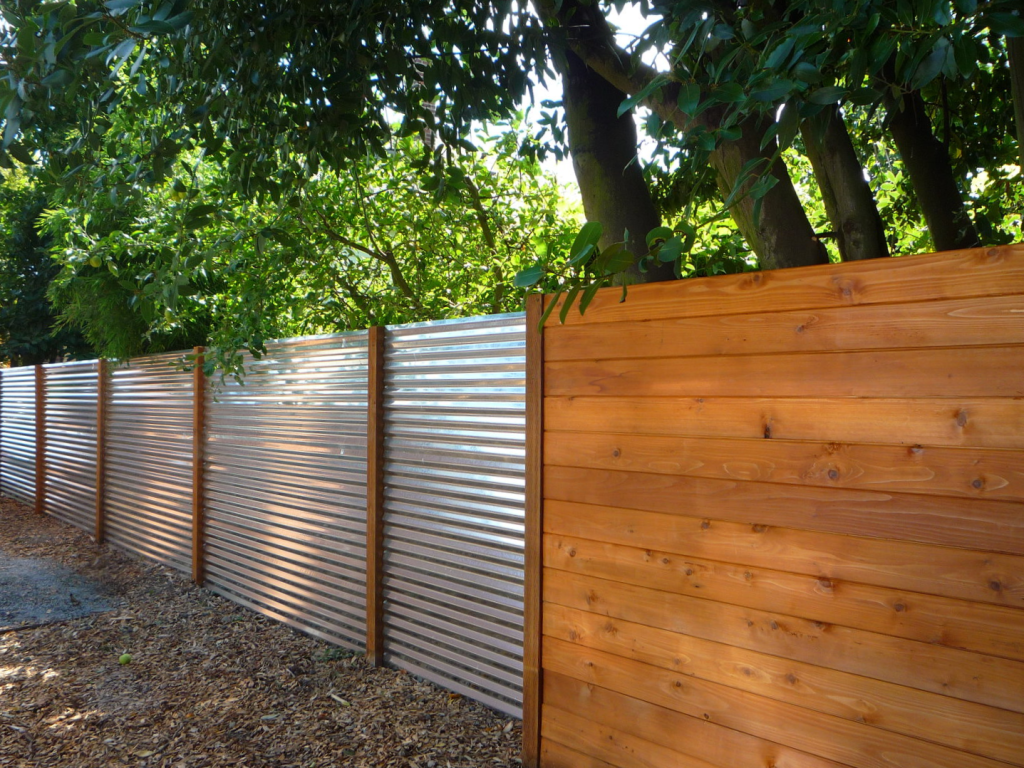
For those of you with small critters, running a piece of corrugated along the bottom of the fence may help Spot from escaping again. The possibilities are almost endless with how to use decorative fencing.

Corrugated panels are a great way to protect your property and livestock from harsh weather and high winds.
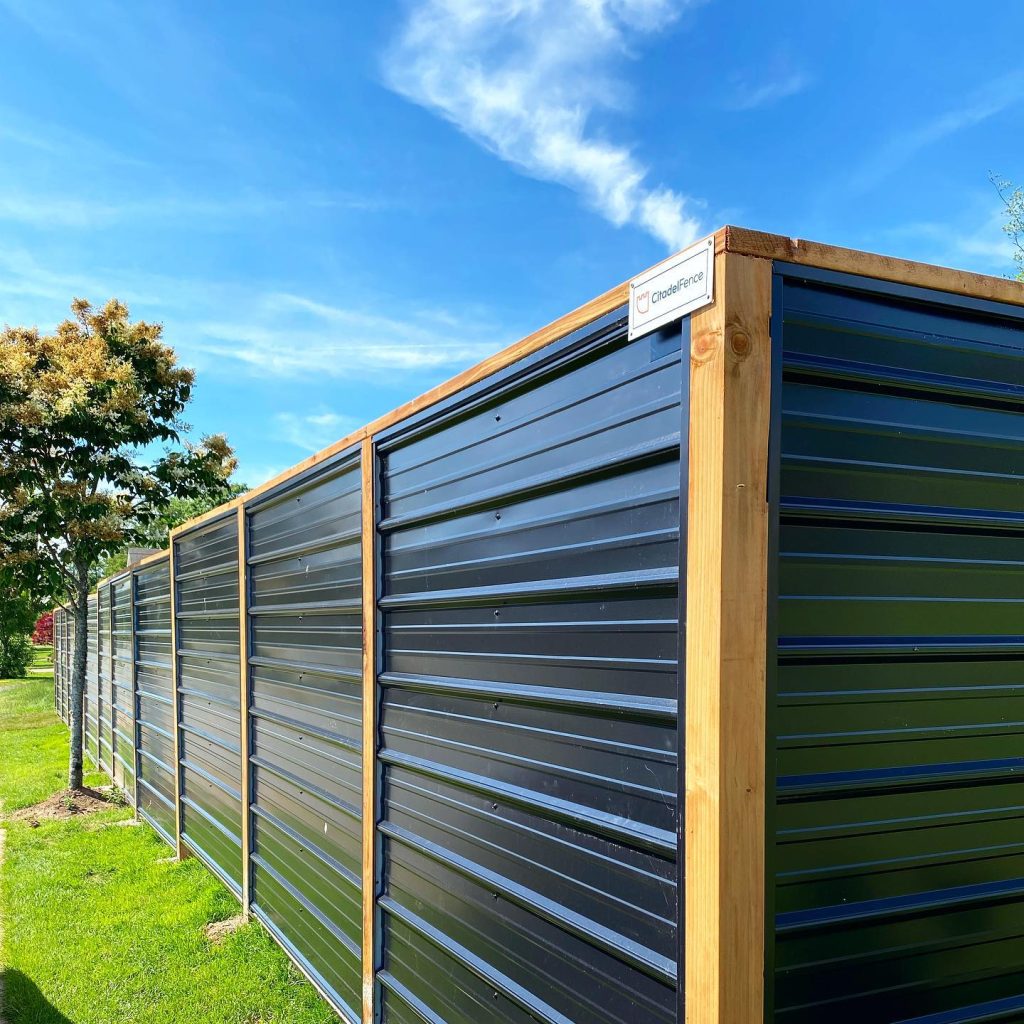
If your focus is preventing snow accumulation and drift, aligning your panels vertically with smaller gaps between panels will work best.

A horizontal layout is recommended if you want to cut down wind. With simple installations and easy maintenance, metal fencing is a top choice for wind and snow break fencing.

For privacy fencing for residential needs, steel fencing can provide a combination of durability and style. Let us help you find the best fit for your needs and design!


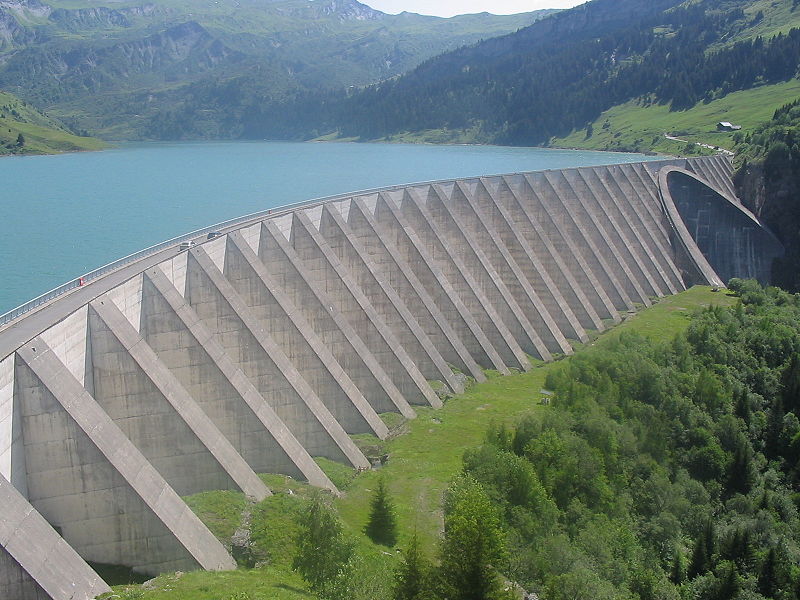
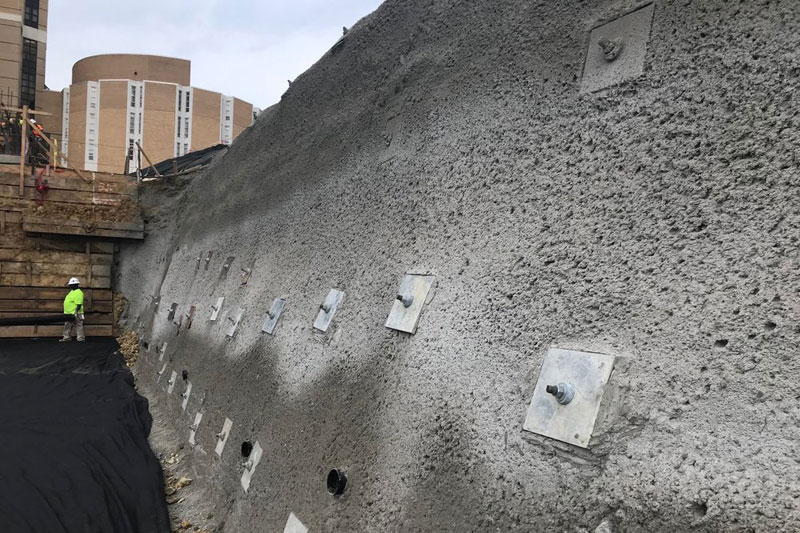
A retaining wall is a structure designed and constructed to resist the lateral pressure of soil, when there is a desired change in ground elevation that exceeds the angle of repose of the soil. Retaining walls are used for supporting soil laterally so that it can be retained at different levels on the two sides. Retaining walls are structures designed to restrain soil to a slope that it would not naturally keep to (typically a steep, near-vertical or vertical slope). They are used to bound soils between two different elevations often in areas of terrain possessing undesirable slopes or in areas where the landscape needs to be shaped severely and engineered for more specific purposes like hillside farming or roadway overpasses.
Retaining wall design consideration
Retaining walls are vertical or near-vertical structures designed to retain material on one side, preventing it from collapsing or slipping or preventing erosion. They provide support to terrain where the soil’s angle of repose is exceeded and it would otherwise collapse into a more natural form. The principal characteristic of a retaining wall is being able to withstand the pressure exerted by the retained material, which is usually soil.
The most important consideration in proper design and installation of retaining walls is to recognize and counteract the tendency of the retained material to move downslope due to gravity. This creates lateral earth pressure behind the wall which depends on the angle of internal friction (phi) and the cohesive strength (c) of the retained material, as well as the direction and magnitude of movement the retaining structure undergoes.
Lateral earth pressures are zero at the top of the wall and – in homogenous ground – increase proportionally to a maximum value at the lowest depth. Earth pressures will push the wall forward or overturn it if not properly addressed. Also, any groundwater behind the wall that is not dissipated by a drainage system causes hydrostatic pressure on the wall. The total pressure or thrust may be assumed to act at one-third from the lowest depth for lengthwise stretches of uniform height.
It is important to have proper drainage behind the wall in order to limit the pressure to the wall’s design value. Drainage materials will reduce or eliminate the hydrostatic pressure and improve the stability of the material behind the wall. Drystone retaining walls are normally self-draining. As an example, the International Building Code requires retaining walls to be designed to ensure stability against overturning, sliding, excessive foundation pressure and water uplift; and that they be designed for a safety factor of 1.5 against lateral sliding and overturning.
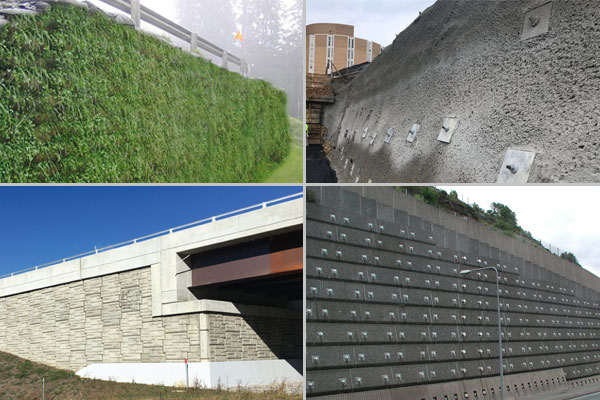
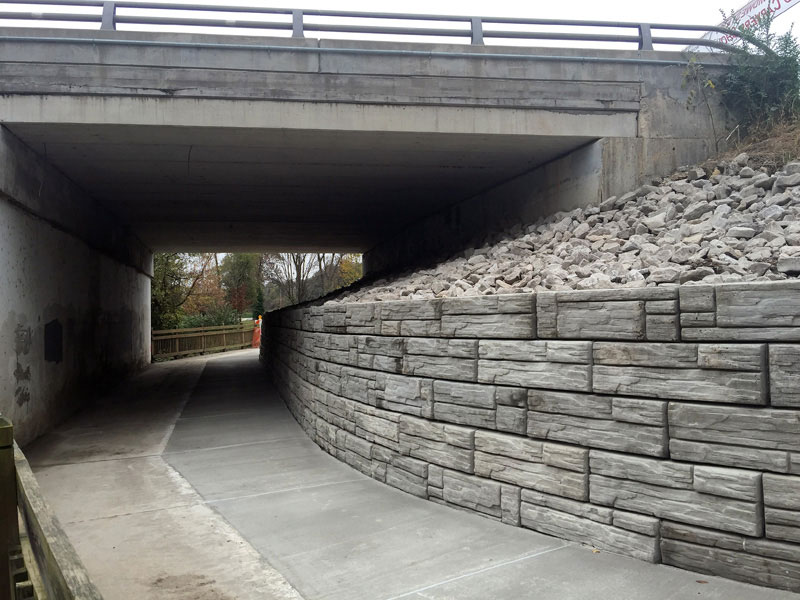
Types of retaining walls
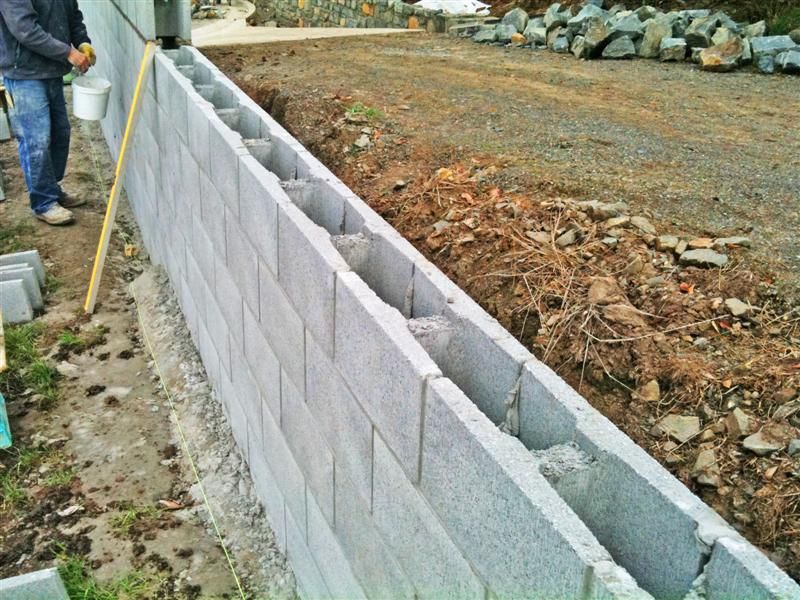
There are several types of retaining walls, some of the popular ones are discussed below.
Gravity wall
Gravity walls depend on their mass (stone, concrete or other heavy material) to resist pressure from behind and may have a ‘batter’ setback to improve stability by leaning back toward the retained soil. For short landscaping walls, they are often made from mortarless stone or segment concrete units (masonry units). Dry-stacked gravity walls are somewhat flexible and do not require a rigid footing. Today, taller retaining walls are increasingly built as composite gravity walls such as: geosynthetics such as geocell cellular confinement earth retention or with precast facing; gabions (stacked steel wire baskets filled with rocks); crib walls (cells built up log cabin style from precast concrete or timber and filled with granular material).
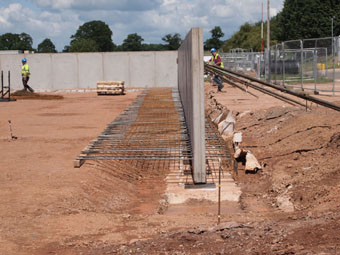
Reinforced Retaining Wall
Reinforced concrete and reinforced masonry walls on spread foundations are gravity structures in which the stability against overturning is provided by the weight of the wall and reinforcement bars in the wall. The following are the main types of wall:
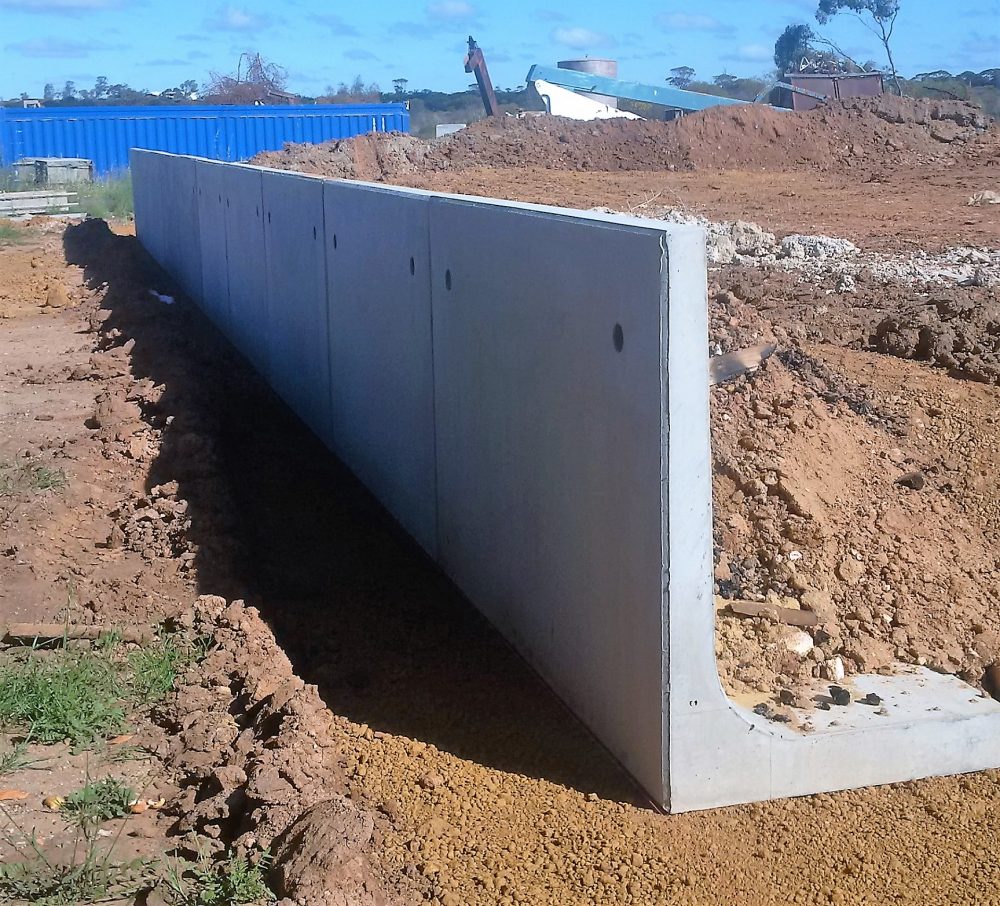
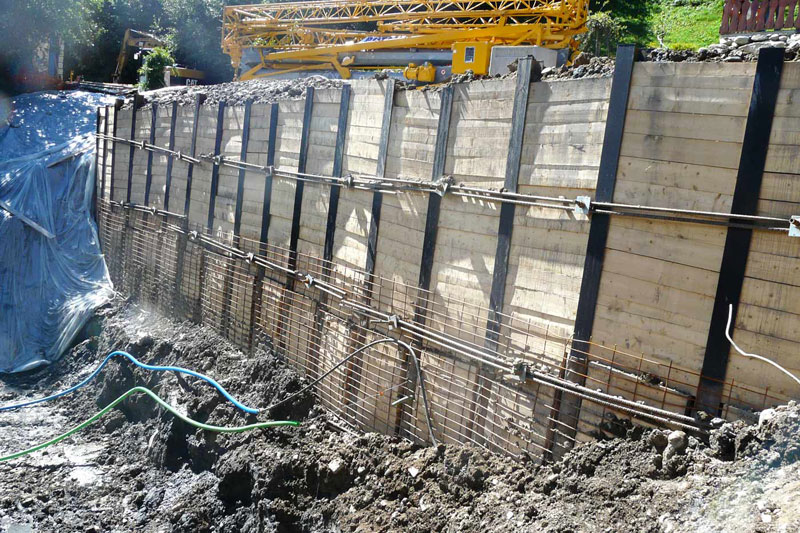
Concrete Cantilever retaining wall
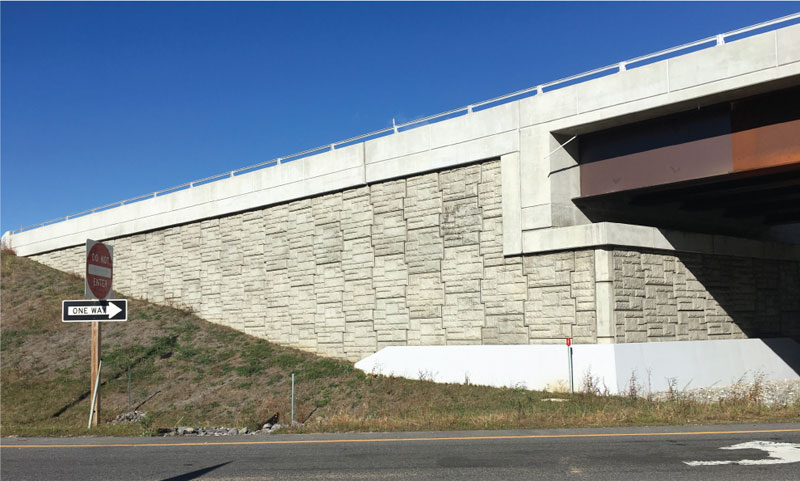
A cantilever retaining wall is one that consists of a wall which is connected to foundation. A cantilevered wall holds back a significant amount of soil, so it must be well engineered. They are the most common type used as retaining walls. The Cantilevered wall rests on a slab foundation. This slab foundation is also loaded by back-fill and thus the weight of the back-fill and surcharge also stabilizes the wall against overturning and sliding.
Counter-fort / Buttressed retaining wall
Counterfort walls are cantilever walls strengthened with counter forts monolithic with the back of the wall slab and base slab. The counter-forts act as tension stiffeners and connect the wall slab and the base to reduce the bending and shearing stresses. To reduce the bending moments in vertical walls of great height, counterforts are used, spaced at distances from each other equal to or slightly larger than one-half of the height Counter forts are used for high walls with heights greater than 8 to 12 m.
Cantilevered wall
Cantilevered retaining walls are made from an internal stem of steel-reinforced, cast-in-place concrete or mortared masonry (often in the shape of an inverted T). These walls cantilever loads (like a beam) to a large, structural footing, converting horizontal pressures from behind the wall to vertical pressures on the ground below. Sometimes cantilevered walls are buttressed on the front, or include a counterfort on the back, to improve their strength resisting high loads. Buttresses are short wing walls at right angles to the main trend of the wall. These walls require rigid concrete footings below seasonal frost depth. This type of wall uses much less material than a traditional gravity wall.

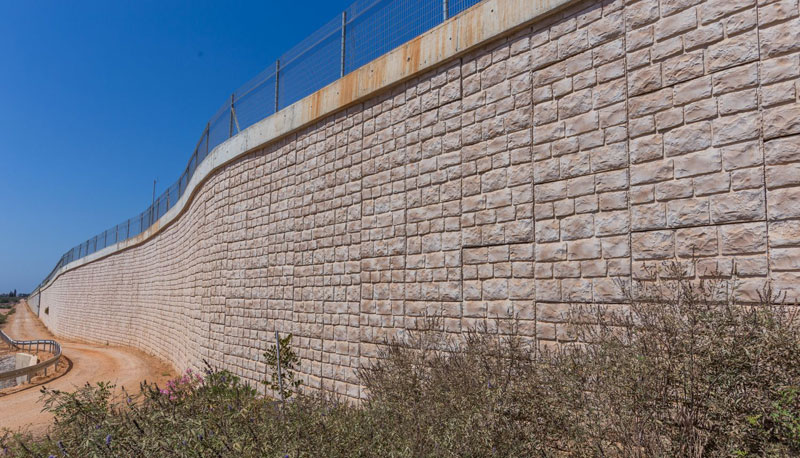
Reinforced Soil Retaining Wall
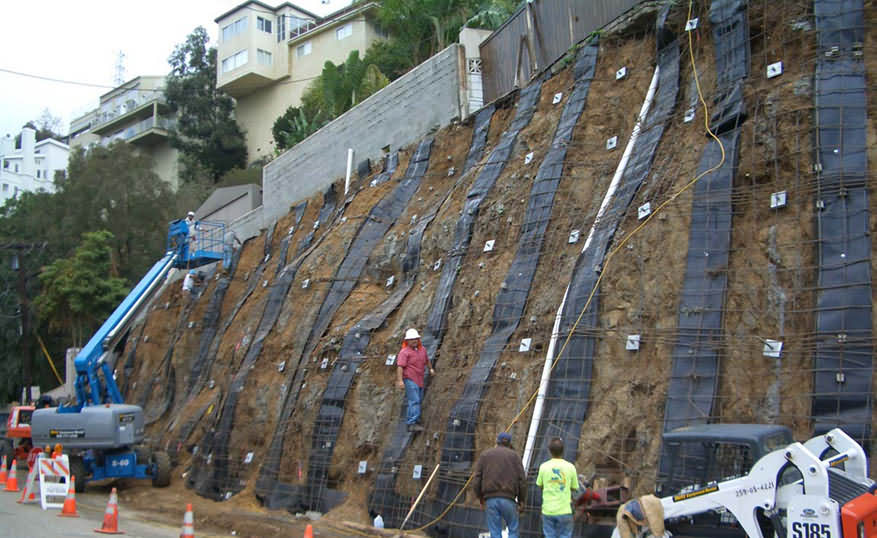
Mechanically stabilized earth walls are those structures which are made using steel or GeoTextiles soil reinforcements which are placed in layers within a controlled granular fill. Reinforced soils can also be used as retaining walls, if they are built as an integral part of the design and to act as an alternative to the use of reinforced concrete or other solutions on the grounds of economy or as a result of the ground conditions.
Soil nailed wall
Constructing a soil nailed wall involves reinforcing the soil as work progresses in the area being excavated by the introduction of bars which essentially work in tension, called Passive Bars. These are usually parallel to one another and slightly inclined downward. These bars can also work partially in bending and in shear. The skin friction between the soil and the nails puts the nails in tension.
Anchored wall
An anchored retaining wall can be constructed in any of the aforementioned styles but also includes additional strength using cables or other stays anchored in the rock or soil behind it. Usually driven into the material with boring, anchors are then expanded at the end of the cable, either by mechanical means or often by injecting pressurized concrete, which expands to form a bulb in the soil. Technically complex, this method is very useful where high loads are expected, or where the wall itself has to be slender and would otherwise be too weak.

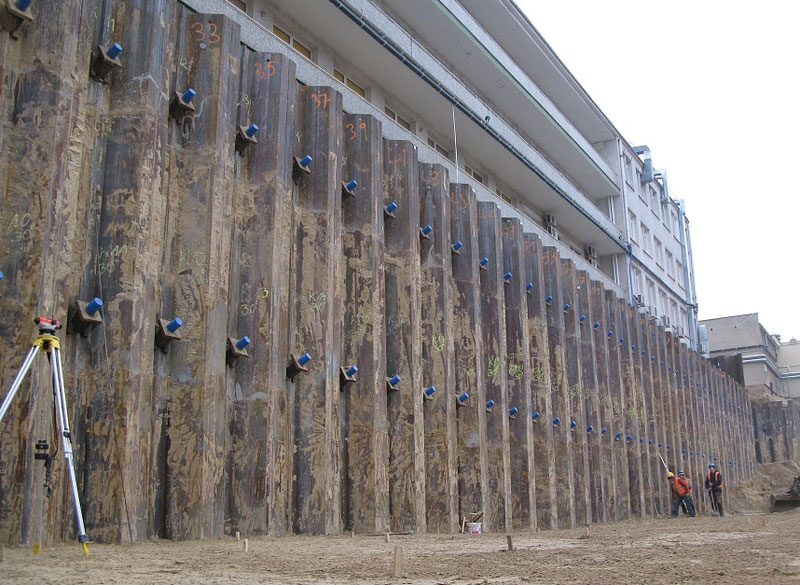
Sheet Piled wall
Piling is earth retention and excavation support technique that retains soil, victimization sheet sections with interlocking edges. Pile acts as a temporary certificate wall that has been driven into a slope or excavation to support the soft soils collapse from higher ground to lower ground. It provides high resistance to driving stresses and helps to lightweight. Sheet piles will be reused on many comes and long service life above or below water with modest protection. Simple to adapt the pile length by either attachment or bolting and joints square measure less apt to deform throughout driving.
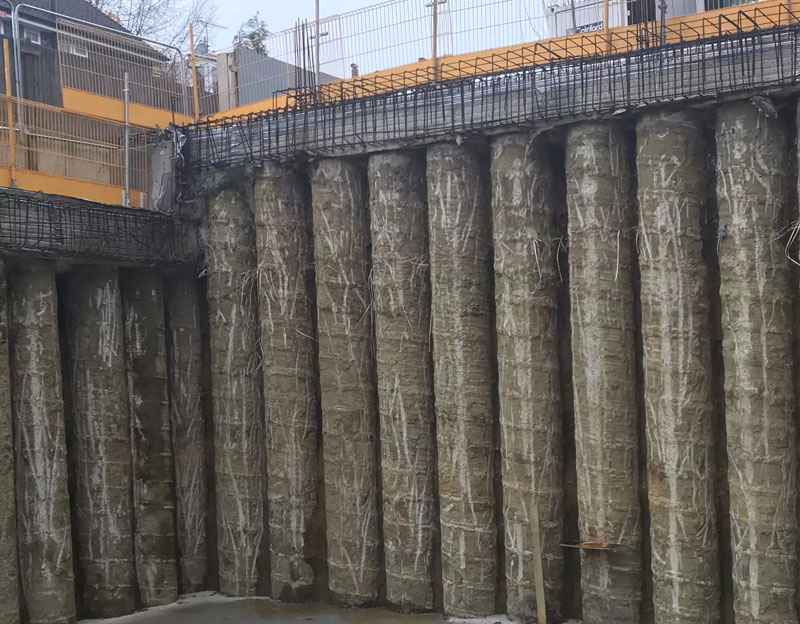
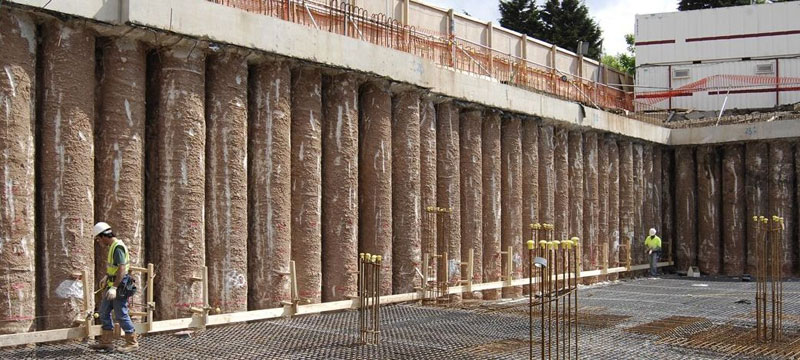
Pile wall (secant piles, tangent piles)
These walls square measure shaped by the intersection of individual concrete piles. These piles square measure designed by victimization lubricator and augering. The secant piles overlap by concerning three inches. Another is that the tangent pile walls, wherever the piles do not have any overlap. These piles square measure made flush with one another. The important advantage of secant and tangent walls is that the exaggerated alignment flexibility. The walls conjointly might have exaggerated stiffness, and therefore the construction method is a smaller amount abuzz. Among the disadvantages square measure that waterproofing is troublesome to get at the joints, their higher price, which vertical tolerances square measure arduous to attain for the deeper piles.
Berliner wall (soldier pile)
This kind of wall was proverbial to Roman military engineers and was used for deep excavations. It is a comparatively cheap system, simple and quick to construct. it is primarily restricted to temporary construction, and can’t be employed in high formation conditions while not in-depth dewatering and expense. it is not as stiff as different styles of retentive walls.
Soil nailing wall
Soil nailing may be a technique that will not reinforce and strengthen existing ground. It consists of putting in closely spaced bars into a slope or excavation as construction income from the highest down. Soil nailing is an efficient and economical methodology of constructing a wall for excavation support, support of hill cuts, bridge abutments, and high ways in which. This method is effective in cohesive soil, broken rock, sedimentary rock or fixed face conditions. This kind of wall to Stabilization of railroad and road cut slopes and excavation retentive structures in urban areas for high-rise building and underground facilities. It is conjointly useful in tunnel portals in steep and unstable stratified slopes. The development and retrofitting of bridge abutments with advanced boundaries involving wall support underneath heaped-up foundations.
Bored pile wall
Bored pile retaining walls are built by assembling a sequence of bored piles, proceeded by excavating away the excess soil. Depending on the project, the bored pile retaining wall may include a series of earth anchors, reinforcing beams, soil improvement operations and shotcrete reinforcement layer. This construction technique tends to be employed in scenarios where sheet piling is a valid construction solution, but where the vibration or noise levels generated by a pile driver are not acceptable.
Mechanical stabilisation wall
Mechanically stabilised earth (MSE) walls are walls that can tolerate some differential movement. The wall face is infilled with granular soil whilst retaining the backfill soil. The advantage of MSE walls is the ease of construction, as they do not require formwork or curing. The use of soil nailing in MSE walls, involves introducing slender steel reinforcing bars to the soil, placed parallel to one another on a slight incline and grouted into place. Anchored earth walls
Crib wall
Where timber, steel or concrete cages or boxes are interlocking, this may be described as a crib wall.
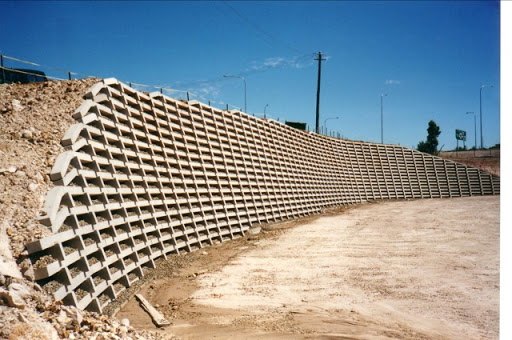
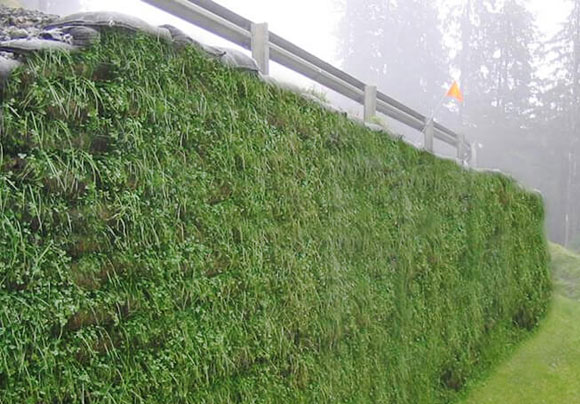
Green retaining walls
Green retaining walls can be used to retain more gentle slopes. A geocellular structure such as a series of ‘honeycomb’ cells can be embedded into the surface of the slope to stabilise it, and the individual cells can then be planted.
Barrette retaining wall
A barrette retaining wall is constructed from reinforced concrete columns of a rectangular plan form with the long axis in the direction of retention.
Conclusion
The main uses of retaining walls are to help prevent soil erosion, create usable beds out of steep terrain and to provide decorative or functional landscaping features. They may be independent structures, or may be part of a wider construction work, such as a building. Planning permission is required if the wall is to be over 1-metre high and next to a road or pathway; or over 2-metres high elsewhere. Independent, freestanding retaining walls may not require building regulation approval; however, any structures must be structurally sound and well maintained.
Image Source: vikonprecast.com.au, reconwalls.com, islandblock.com.au,equipment4all.blogspot.com, aarsleff.co.uk, martellopiling.com, acro-btp.fr, oil-nailing.com, volkergroundengineering.co.uk, reinforcedearth.com, retainingsolutions.com.au, igmbag.com, acp-concrete.co.uk,pinnacledesignbuild.com, designingbuildings.co.uk, structville.com, sobindustry.shikunbinui.com
]]>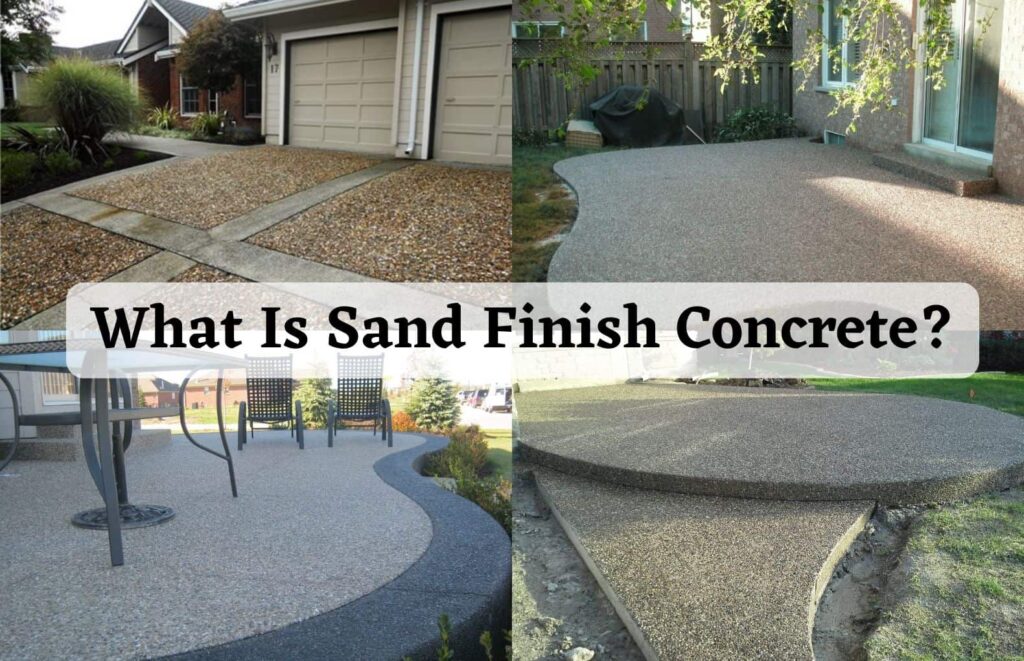
What Is a Sand Finish Concrete?
Similar to concrete with a standard finish, concrete with a sand finish has a more polished appearance. Mix 1 part cement with 2 parts sand and 3 parts gravel to create sand-finished concrete. Water is gradually added after all of the dry ingredients have been completely combined.
Because of its sand-textured look and resemblance to the hard sand found on beaches and seashores, sand-finish concrete is also known as “sand-washed finish concrete.“
In this article, we will try to understand what is sand finished concrete and what are its types.
What Functions Does the Sand Finish Concrete Serve?
The texture of sand-finished concrete is outstanding. It is less abrasive, gritty, and slippery all at once, therefore it is more frequently used in the backyard and by the pool.
In addition, sand finish concrete is available in many other designs and patterns, such as squares, checkerboards, diamonds, and many others. Sand-washed concrete is very pliable and adaptable. Additionally, it makes your home smoother and cleaner, which enhances its appeal.
Types Of Concrete Finishes
Sand finish concrete includes the following concrete types:
- Smooth Trowel Concrete Finish
- Stamped Concrete Finish
- Normal Concrete Finish
- Broom Concrete Finish or Scratched Concrete Finish
- Salt Finish Concrete
- Aggregate Appearance Concrete Finish
- Terrazzo Concrete Finish
- Rosette Concrete Finish or Swirl Concrete Finish
- Sandblasted Concrete Finish
- Colour Finish Concrete
1. Smooth Trowel Concrete Finish
The concrete surface is coated with either cement paste slurry or cement dust, which is then continually pressed and dragged to maintain a smooth appearance all around it.
They are typically used in locations like pathways, verandas, restrooms, and other areas with easy water drainage and low water permeability. Additionally, this type of concrete has a very smooth and lustrous texture.
2. Stamped Concrete Finish
In this stamped concrete finish, the top layer of the concrete is softly pressed with a variety of plates and rubber pads, leaving the stamp on it after a few hours to resemble tiles, blocks, and paving stone.
3. Normal Sand Finish Concrete
This type of concrete is frequently tamped and vibrated with wooden tampers before being placed over the formwork and on the ground. It results in a naturally finished concrete surface that is neither very smooth nor very rough.
4. Scratched or Broom Concrete Finish
In this type of finish concrete, the first setting of the stage of concrete is scratched with the help of a broom, wire brush, and trowel. They consequently impart a very harsh and rough texture to the surface. The broom is typically used to prevent slick pathway surfaces in homes and on highways. It is made of bamboo wood that has been coarsely cut. It also creates a solid bond between the base surface for mortar application and the tiles.
5. Salt Finish Concrete
This kind of concrete finish is made by first evenly distributing wet, fresh concrete over the surface, followed by inserting crystals made of big lumps and slats inside the concrete surface. These ingrained salts are eliminated from the concrete using water jetting so that it can harden. The salts create a depression over the implanted region as a result, giving the concrete a rougher, more natural texture.
6. Aggregate Appearance Sand Finish Concrete
This kind of concrete has a finish similar to terrazzo, except it uses aggregates rather than marble chips. The aggregate is first deeply implanted over the concrete surface using a power float.
Other options for giving the concrete surface a shiny, glossy appearance include chemical treatments or paint. Granite, basalt, quartz, and other stones with aesthetically attractive textures are typically used.
7. Terrazzo Concrete Finish
At this type of concrete, grey or white cement blended with variously coloured marble chips replaces the coarse aggregate in a ratio of 1:1.25 or 1:2. After placement and hardening, concrete chips are exposed by grinding, and the surface is then polished with a more suitable chemical procedure or paint to produce a shiny and glossy finish.
8. Rosette Concrete Finish or Swirl Concrete Finish
Any form of finished concrete has a level and smooth surface, however semi-circular arc intersections cause the surface of this kind of concrete to undulate. This concrete surface was given an undulating appearance by using the right technique to press down on the recently slumping concrete with a trowel.
9. Sandblasted Concrete Finish
This method is used to sandblast the surface after the concrete has dried, using a pressurized blast of mix and air. so that the texture of the concrete is rough.
10. Color Concrete Finish
In this type of concrete, colour tinting is applied either during the curing process or by spraying the concrete’s top surface, which is subsequently smoothed with a trowel. There are powder variations of every pigment colour.
To give the concrete surface a colourful, artistic feel and various hues to make it more appealing, use concrete stains and concrete dyes. Colors have been added, but it’s still concrete.
How Can Concrete Get A Sand Finish?
It is easy to get concrete with a sand wash finish for patios and pool decks. Cement and common sand cannot be combined to create a washed-finished surface in a mortar. Finishes can be made with concrete sand. In contrast, mortar sand is utilised to add texture to surfaces by combining it with water and cement.
A sort of sand wash that is generally recovered from the earth’s interior and stone grits is concrete sand. The sand is cleaned after extraction to remove salt, clay, dust, and other impurities.
For concrete with a sand wash finish, M20 grade proportion suggests (1:1.5) or M-grade concrete, which is stronger. Use a trowel to gradually add water after completely combining all of the dry ingredients to create concrete of the M20 grade. After that, use high water pressure to thoroughly wash the concrete to get rid of the cement paste on top.
]]>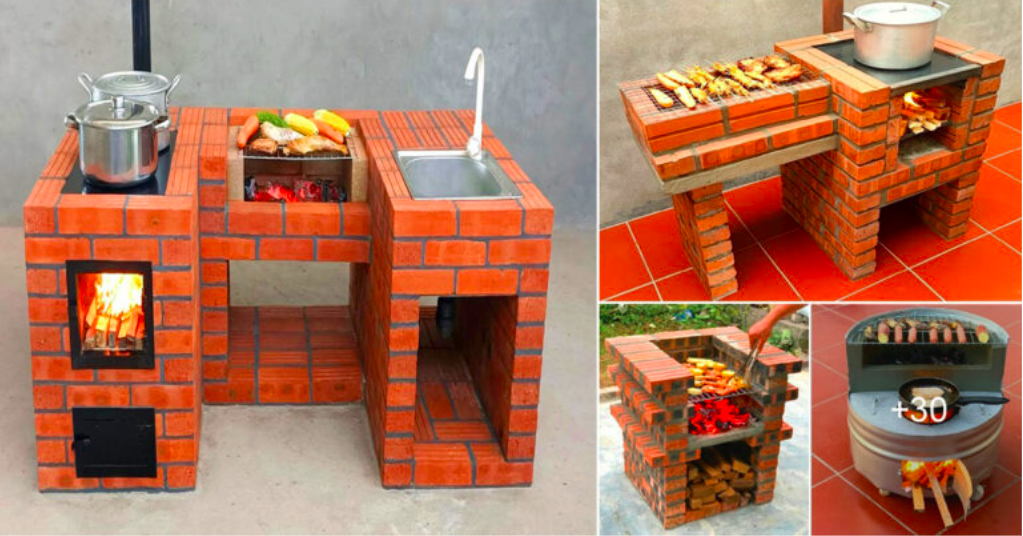
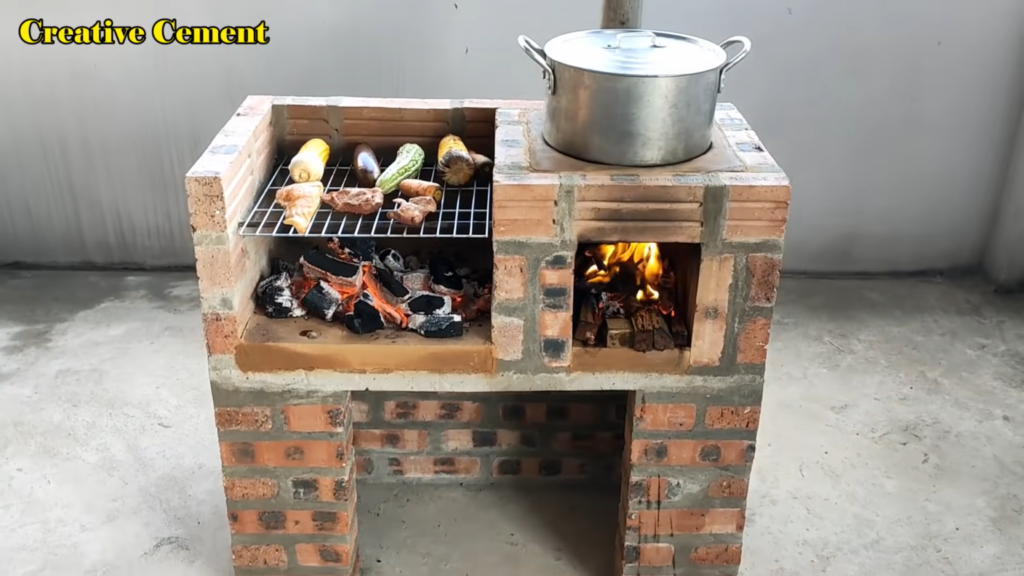
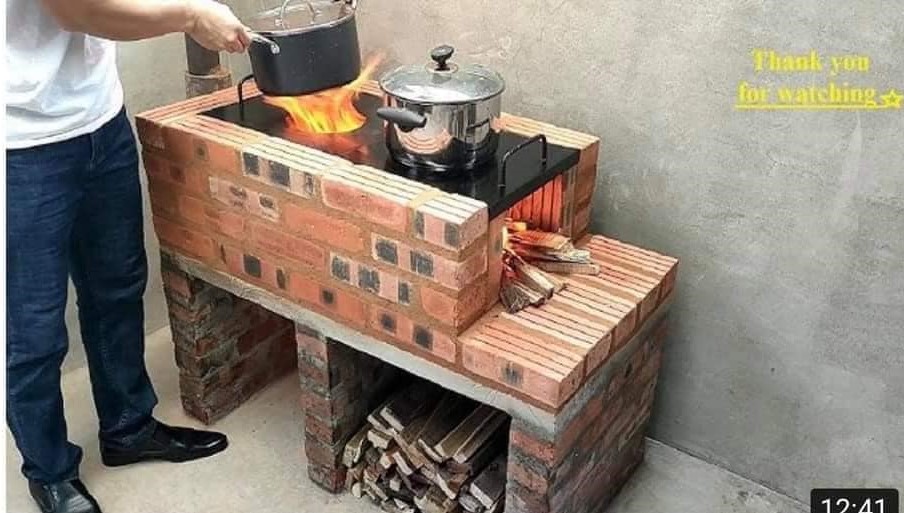
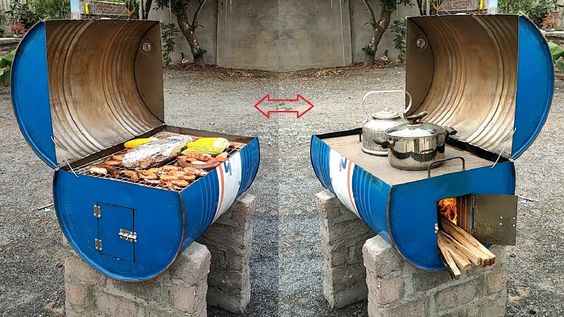
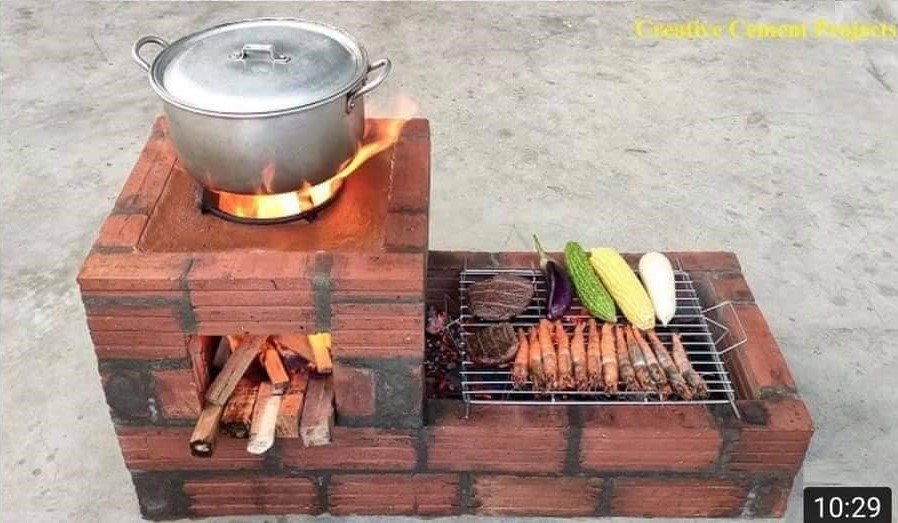
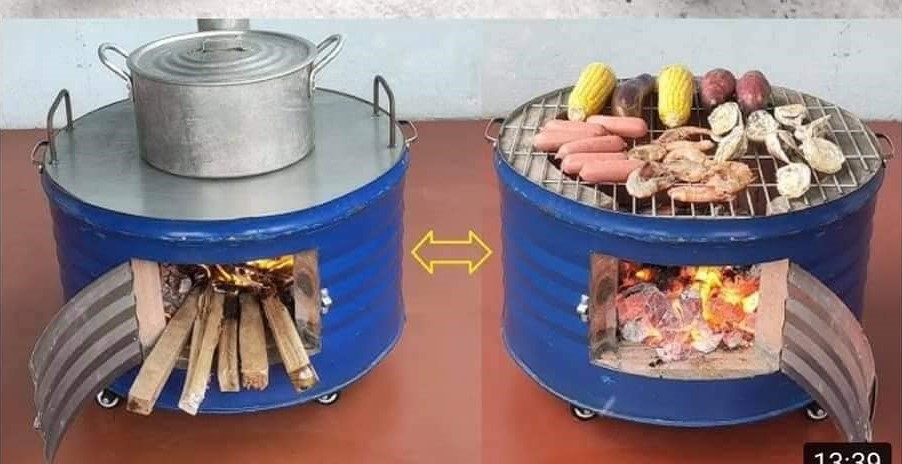
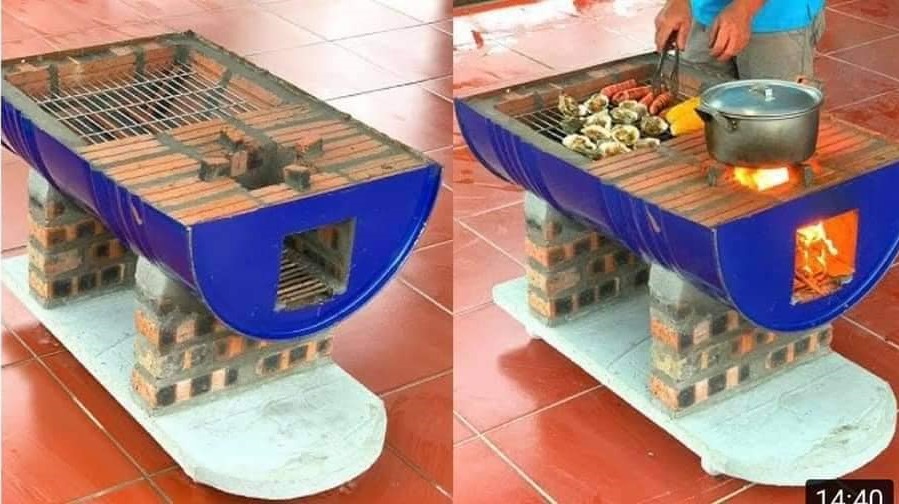
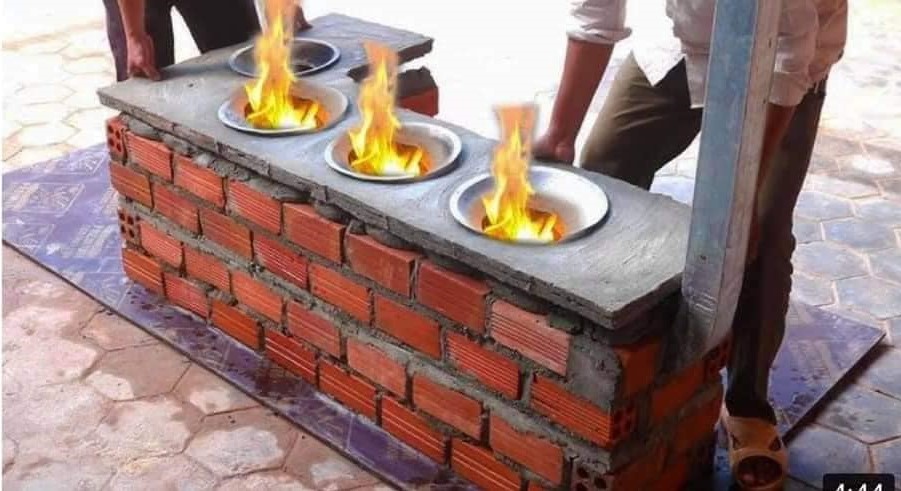
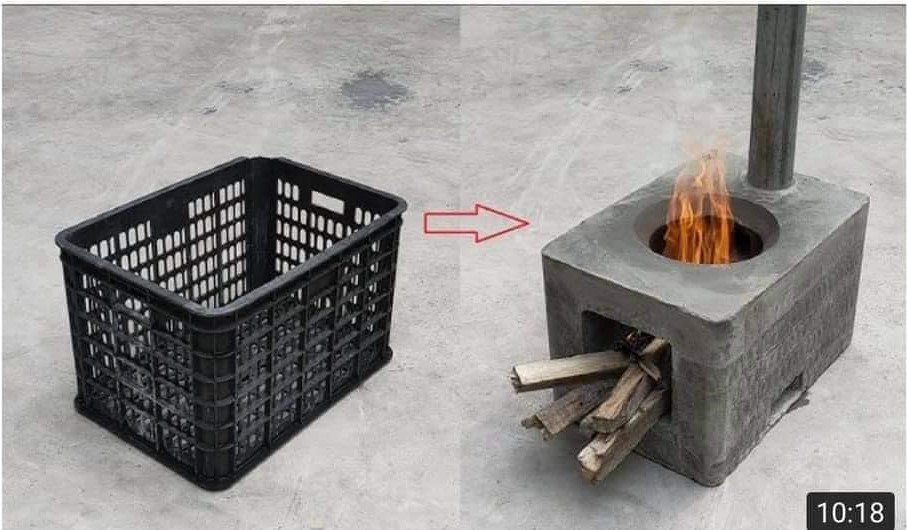
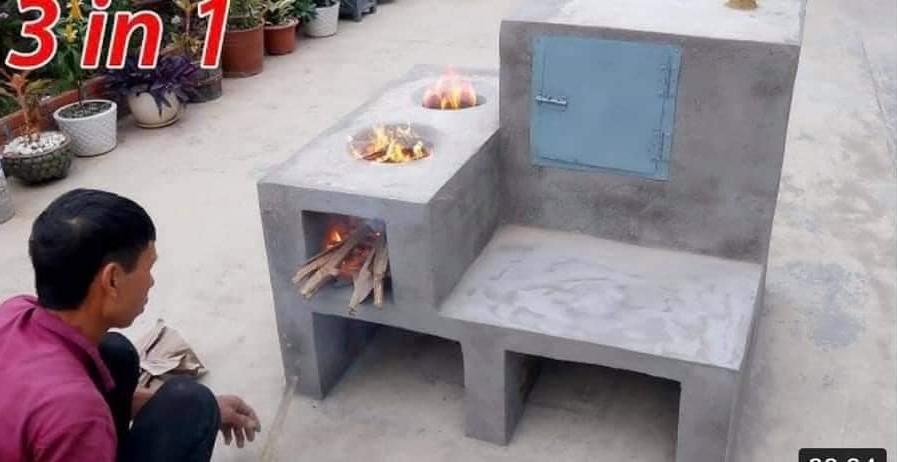
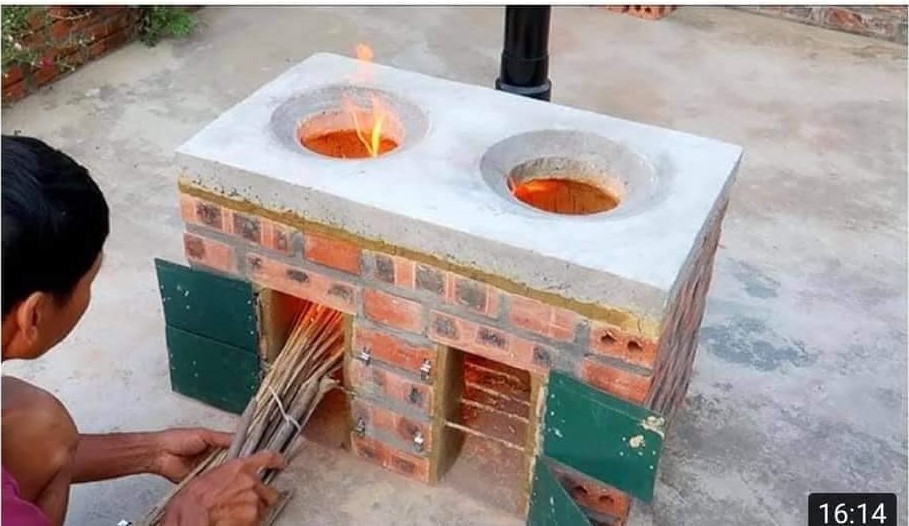
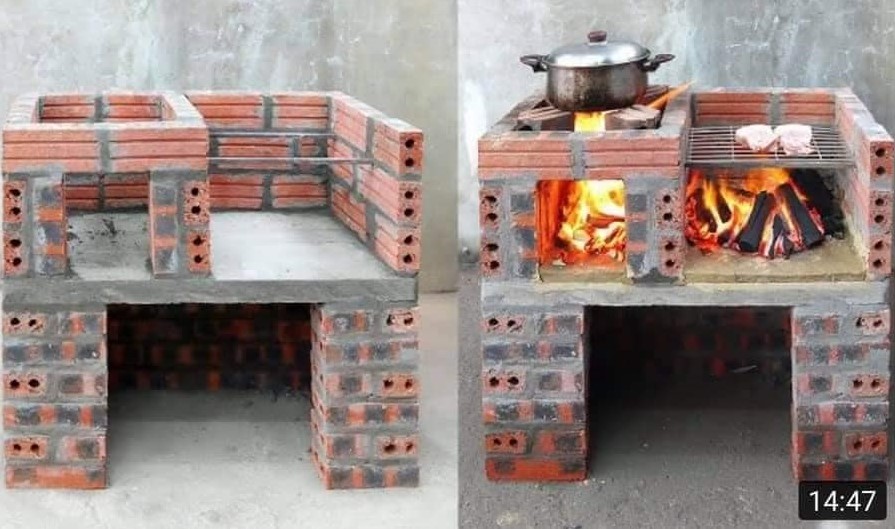
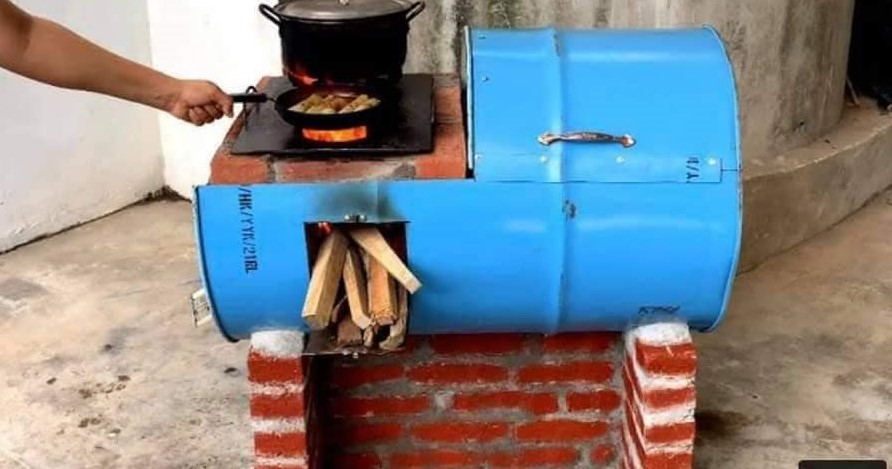
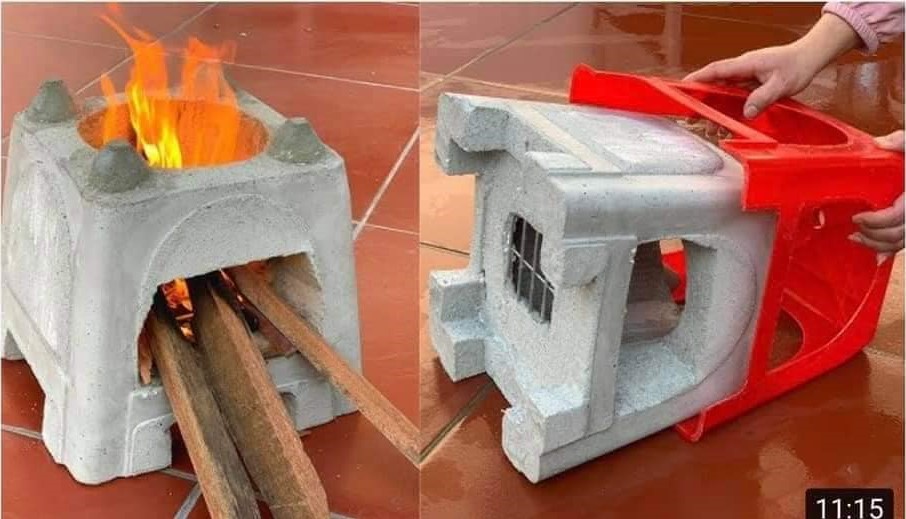
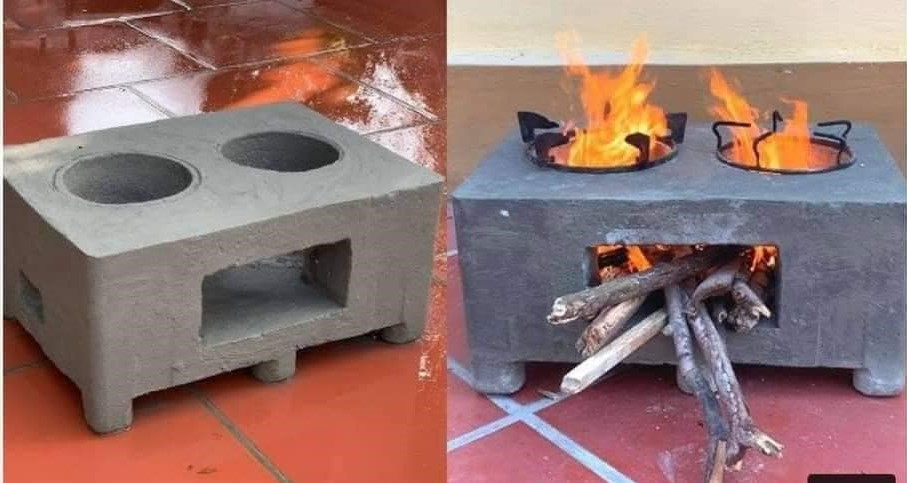
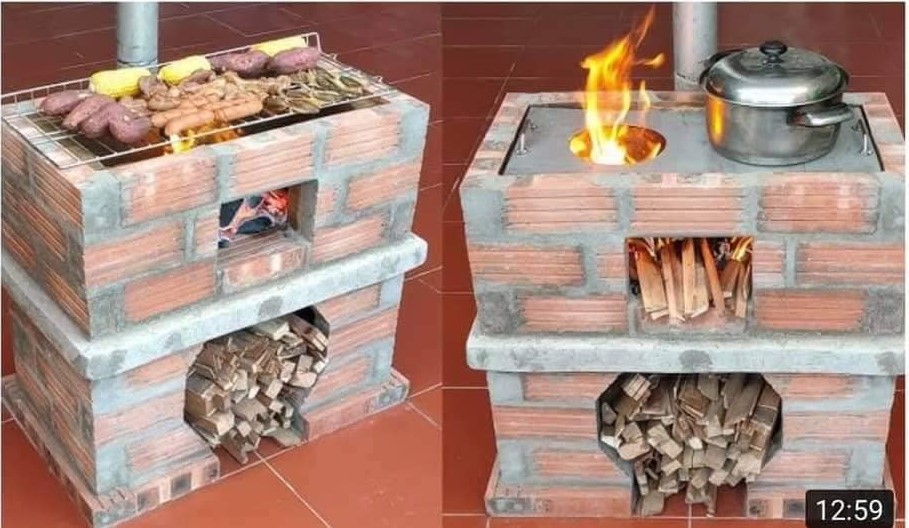
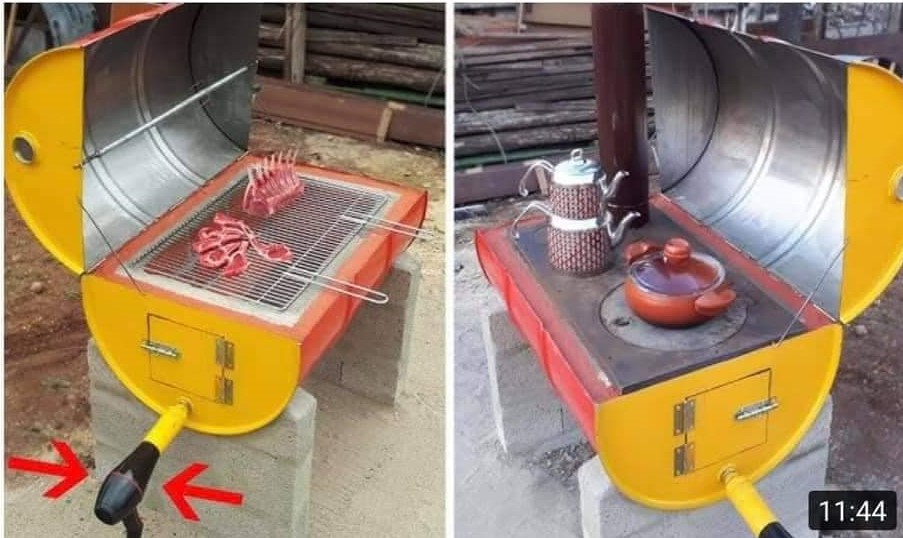
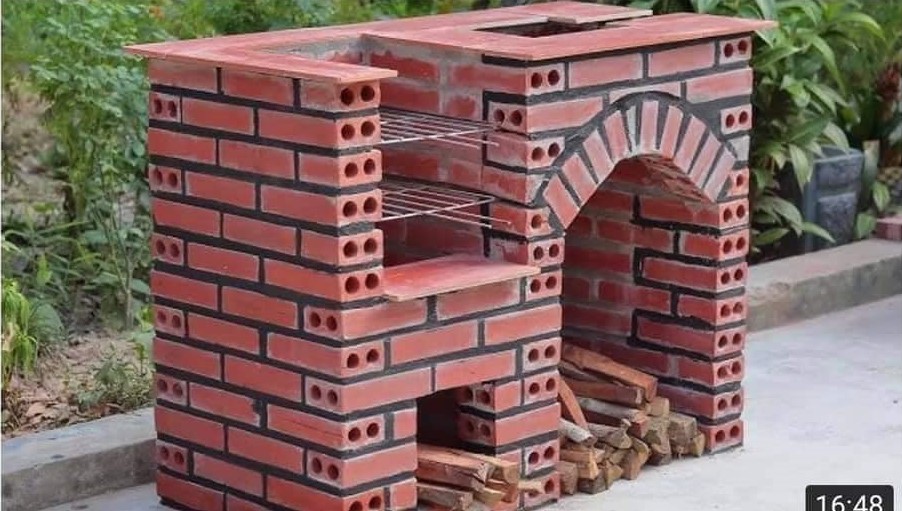
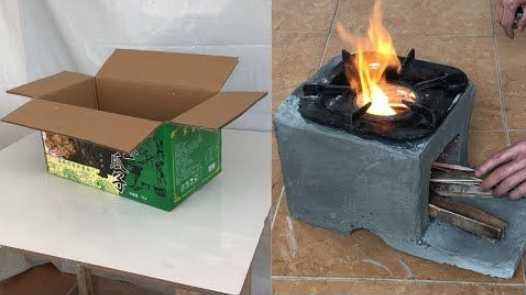
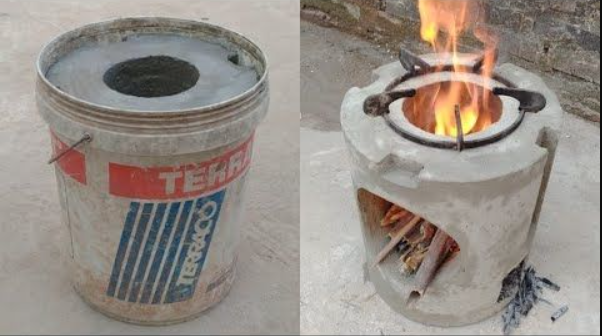
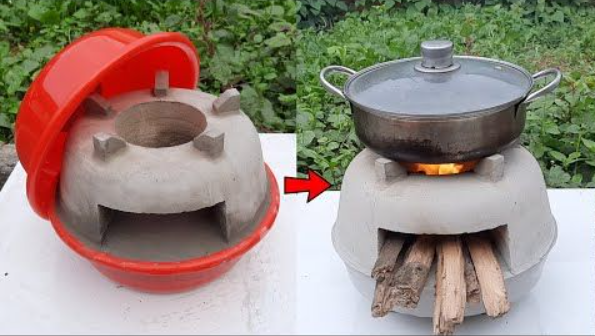
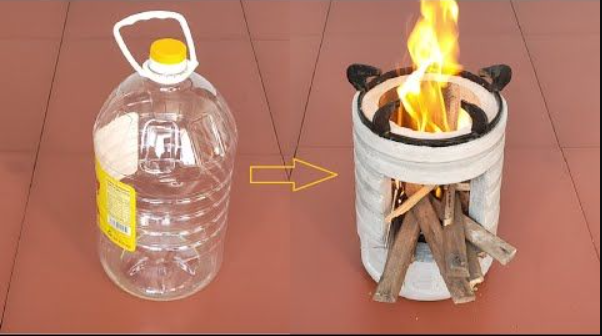
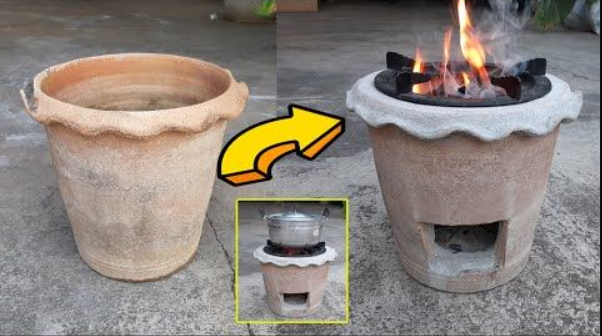
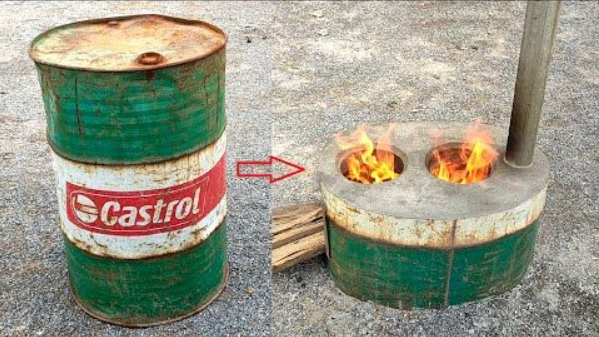
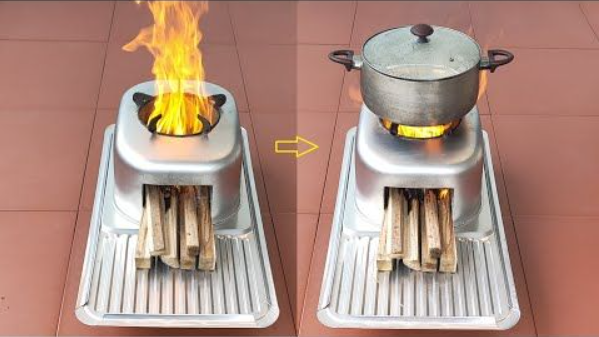
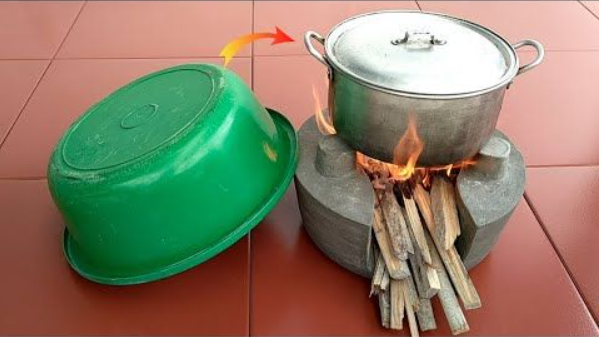
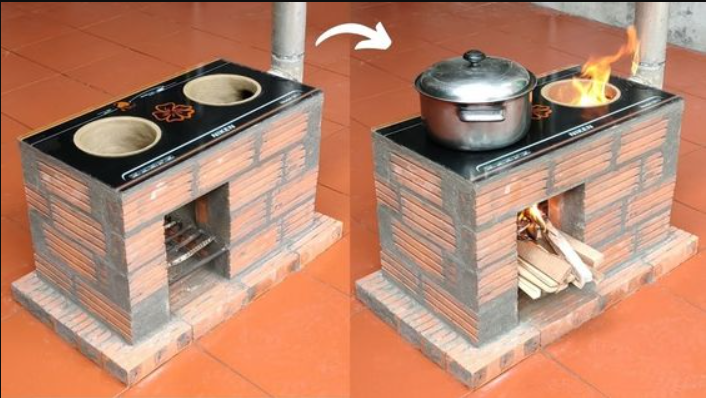
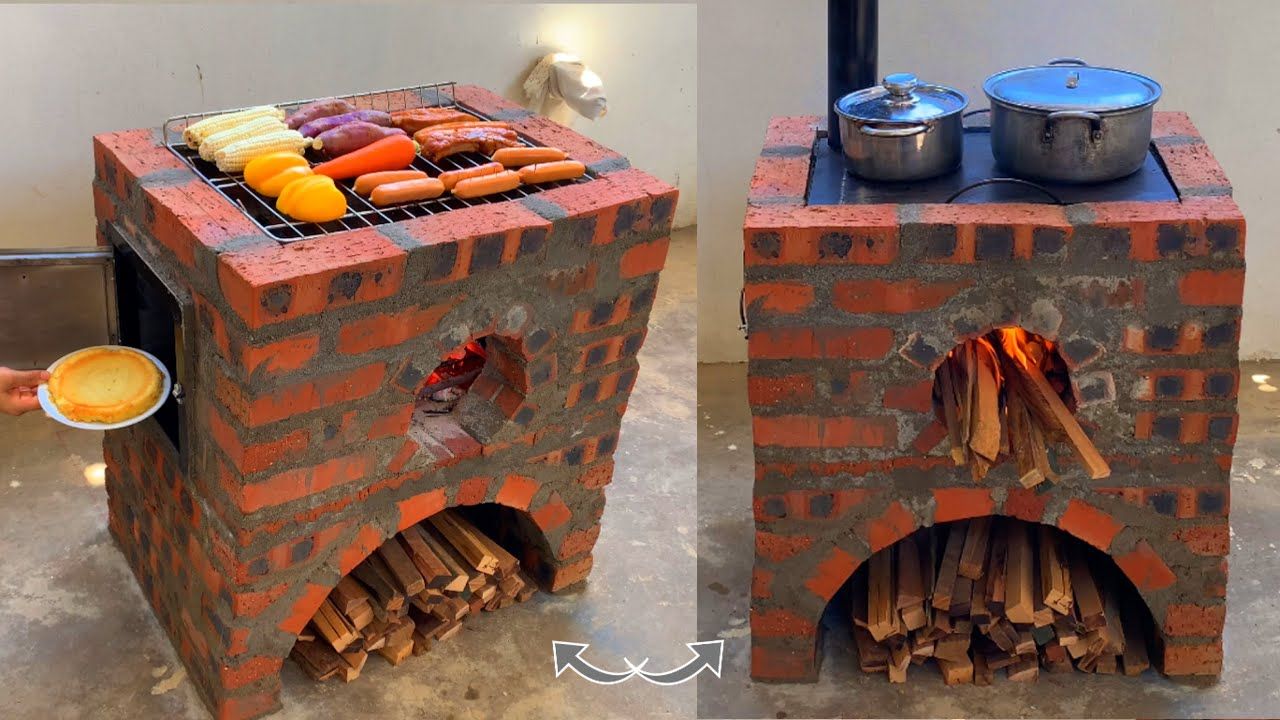
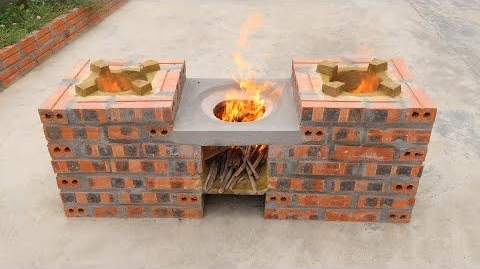
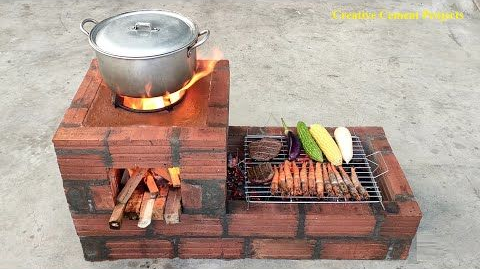
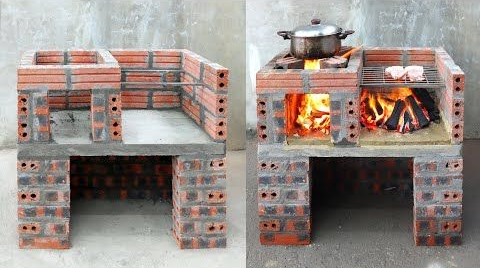
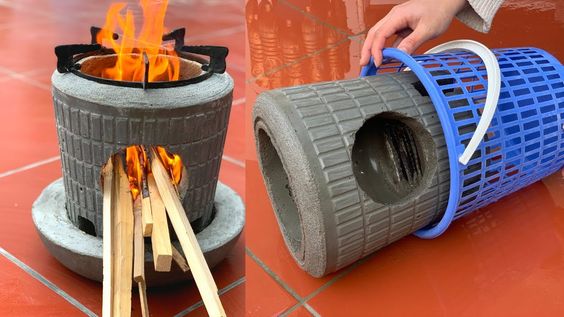
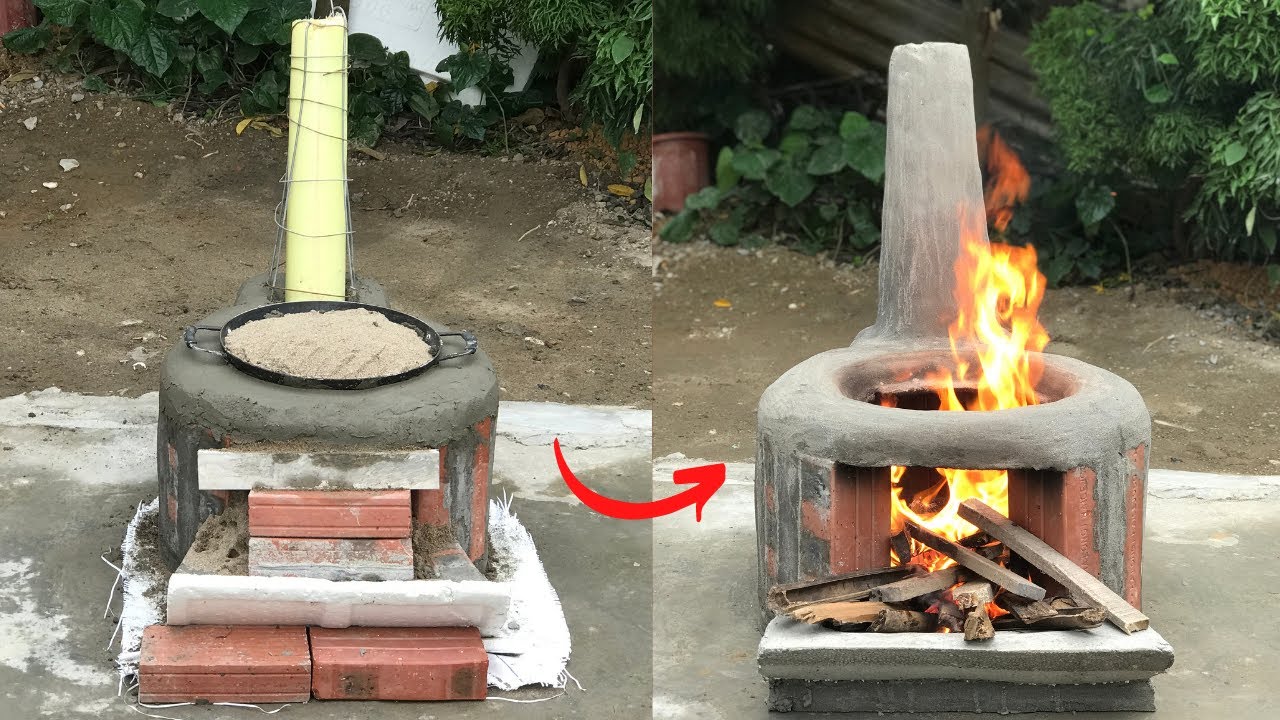
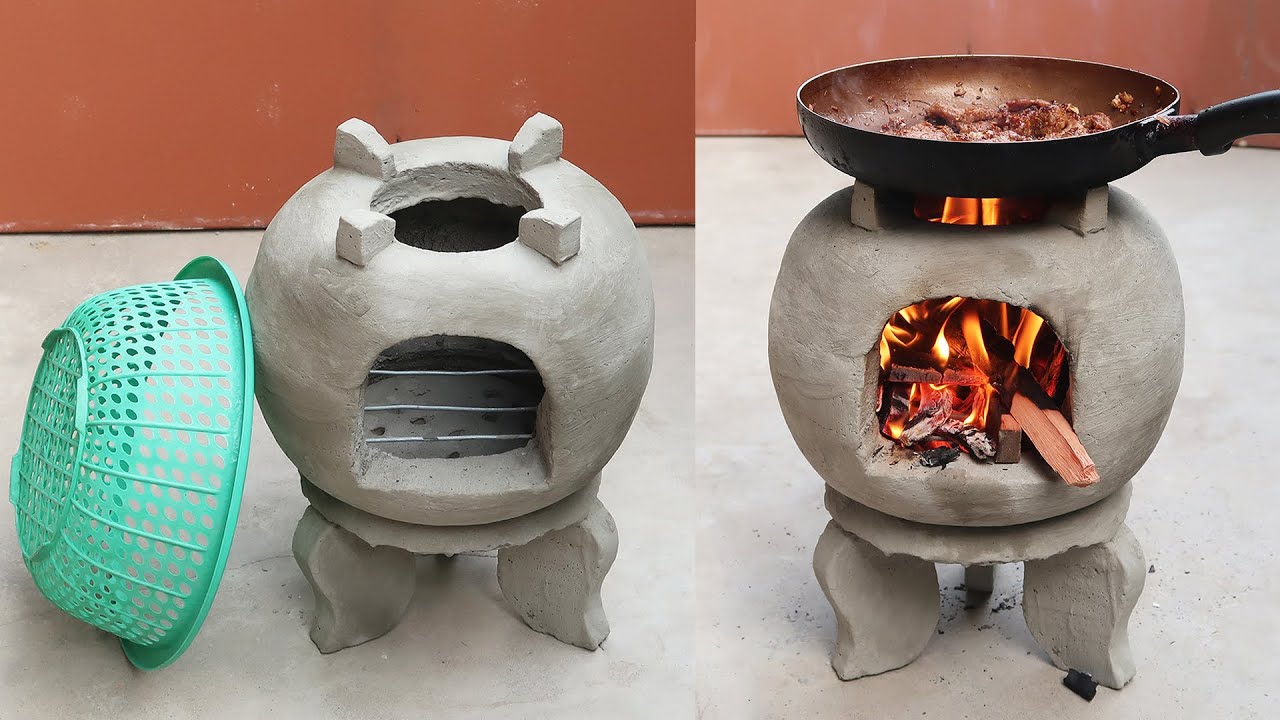
Homemade stove is a cost efficient way to cook food and for a BBQ party without spending huge amount of money for buying costly stoves. You will certainly feel good when you cook your food on your own made stove. We listed DIY stove ideas that look pretty amazing and easy to make. In this article, you will learn how to build a portable wood stove for your home and we hope that you will find one that is suit for your favorite.


.


Post–tensioning is a method of reinforcing concrete in a slab and beam. Post-tensioning is a form of prestressing.
In post tension slab tendons are prestressing steel wires inside plastic ducts or sleeves or metallic sheets and it is positioned in the forms before the concrete is placed.

After this process concrete gets strength but before the service loads are applied the cables are tensioned and anchored against the external edges of the concrete slab.
What Is Post Tension Slab?
Post tension slab is a combination of conventional slab reinforcement and extra projecting high-strength steel tendons which are continually subjected to tension after the concrete has been settled down.
This method helps to achieve the formation of a thinner slab with a longer side span devoid of any column-free spaces.

Post–tensioned concrete means the concrete is filled after the tension is applied, but it is still getting stressed before the loads are applied.
The Post Tension Slab is the type of slab in which the reinforcement goes through ducts and is made of steel cables, not bars. These wires have to be made out by tensioning them after the concrete has hardened and before the scaffolding is taken away from buildings.
This means that the slab bends upward direction so all the concrete works as in compression through the slab.
The Post Tension Slab is usually called post-stressed concrete when there is pre-stressed concrete (the wires need to be tightened before pouring the concrete) and once the mixed concrete has hardened, it can be released from the wires.
The effect is also the same the slab is bending upward side by the tension and there are no sections of the slab where the concrete is pulled. It all works in compression form.
The slab with cables in the pipe is ready to be stressed. It is done after the concrete has to get hardness, so it is post-stressed.
Principal of Post-Tension Slab
Concrete has high compressive strength and steel has high tensile strength when combined it is used to bear loads, and the efficiency increases manifold.
When a heavy live load is applied to the structure its concrete slab undergoes tension form, which leads to the constitution of cracks and ultimately deformation.
To reduce this problem in the post-tension slabs, post-tensioned steel tendons are entered at the time of concreting and tensioned after concreting with conventional rebars.
Types of Post-Tension Method
Bonded Posts

Bonded Post Test
Bonded post-tension slab is used for large structural elements like beams and transfer girders. This method was used for Crete monolithic slabs for house construction where adobe clay Crete problems in the perimeter foundation.
Also used in the construction of bridges. Design advantages include increased span lengths in building and load-carrying capacity and decreased deflection. In this method, Hooke’s law was used to maintain tension and wedge position.
Unbonded Post-Tensioning

It is typically used in new construction for elevated slabs, slabs on grade beams, transfer girders, joists, shear walls, and mat foundations.
In the post-tension slab method, the tendon is coated with lithium–based grease and covered in a plastic sheet formed. Light and flexible these two are the unbounded mono strand that can be easily and rapidly installed for providing an economical solution.
Freyssinet System

It was inaugurated by the French engineer Freycinet. High-strength steel wires of 5 to 7mm diameter of 8 -12-16-24 numbers are grouped into a cable with a helical spring inside steel wires are carried along these grooves at the ends.
it is pulled by Freycinet double-acting jacks which can pull through suitable grooves for all the wires in the cable at one time.
Magnel Blaton System
It is having two wires stretched at one time. This method was introduced by the magnel of Belgium. In this method, the anchor consists sandwich plate having grooves to hold the wires.
All plates carry 8 wires. Approx 5-7mm wires are used in this method. One cable consists of 8 wires. These wires with sandwich plates are used as a tapered wedge.
Gifford Udall System
It was introduced by Great Britain, the type of system used in India. In this system single wire is used and all wires are stressed freely using the double jack.
In this system two types of anchorages are used: 1) tube anchorages and 2) plate anchorages.
Components of Post-Tension Slab

Ducts
It is placed inside the slabs to allow the tendons to pass. The main purpose of ducts is to connect cables with tendons. It is available in metal sheet ducts and plastic ducts.
It is thin sheet metal pipes with claw coupling and welded overlapped seam supplied in length of 4 to 6 meters respectively and used as standard ducts are pinned to each other by an outer screw coupling and locked with PE tape.
Plastic ducts are also available on the market to be used besides metallic ducts in post-tension slabs. Ducts are used as waterproof, frictionless, and fatigue-resistant.
Anchors
One of the most useful aspects of a post-tension slab is an anchor. It is used to bind the tendons into the concrete while deducting or joining two tendons.
The main function of anchorage is to transfer the stressing force to the concrete after the stressing process is completed. Extra reinforcement is provided along the anchors.
In some countries, the anchor is also referred to as a trumpet cone. Also used in houses grouting inlet and outlet pipes to allow grouting of the tendon duct in post tension slab.
This device used the following principal,
1) Wedge action,
2) Direct bearing
3) Looping the wires.
Strands
The steel member that is pre-stressed and embedded in concrete loses the initially given stress exponentially with time. Up to a 10% reduction in steel, requirement is possible. Also reduction in concrete requirements due to the reduced size of structural members.
Jacks
It is the most important part of PT construction. When the placing of strands and casting of concrete is successfully done after 5 to 7 days the jacks are used to give stress to these strands and pulled out to tighten these strands in concrete.
Bearing Plate
It is used to save strands from concrete and avoid casting in a post-tension slab. Provide a proper front for stretching.
The Keeper Plate/ Looping Plate
It is used to support the bearing plate.
Coupler/Barrel
It is used at the time of stretching of HT strands and connects strands or bars. This device was tested to transmit the full capacity of strands.
Vent Coupler
It is used at the corners. Used for grouting purposes at ends.
Grouting Equipment
It is the concrete filling of the duct with a strong bond between the tendons and surrounding grout.
The grouting is prepared by the water-cement ratio of about 0.5 with water-reducing admixture, expansion agents, and pozzolans.
Construction Of Post Tension Slab
The following are the steps for the construction of post tension slab,
1. Set up strands in position then set up duct in position and connect ducts with couplings. Insert strand introduces at that one time one strand. set up bar chairs at the right location given on the drawing. Tape all duct joints.
2. Now tendons are set up in the right position as given in the drawing. Set up stressing anchorage parts and stressing recess on slab edge formwork. Now install the bearing plate at the right position using a chair and also provide a grout vent. Fix out anchorage bursting reinforcement. Tape all connections carefully.

3. Prepare dead-end anchorage parts. Bulb dead-end type will be used. All strands are formed with a bulb dead end by a hydraulic jack.
4. Filling of concrete is done when MS bars and PT components are installed. Tendons need to be observed during concreting any misalignment of tendons results face failure. After concreting concrete should be cured until the specified strength not gets.
5. Now tack off side formwork and prepare for stressing operation. When stressing operation starts carefully clean up all strands. Used colar mark strand for elongation measurement.
6. Set up the anchor head and wedge it into all strands. Start pt stressing after concrete gets compressive strength. Stressing pull load on all strands should be locked off.
7. Stressing can be conducted in both ways transverse and longitudinal. Elongation should be observed.
8. The pressure did by conformation to the calibration document. After the elongation has been approved the strand should be cut using an abrasive disc.
9. Grouting performed asap after stressing operation is completed. Also, a grout vent provides an anchorage for all cables.
10. Anchorage should be capped with concrete grouting equipment have specified sprinkling pressure and material should be taken in a given proportion, not greater than a low slump level.
11. After the grouting process is done some projection surfaces are cut down by an abrasive disc.
Applications
The following are applications of the post-tension slab,
- It reduces or eliminates shrinkage cracking so no joints or fewer joints are needed.
- Cracks the form is held tightly together.
- Permission for slabs and other structural members to be thinner.
- It allows for constructing slabs on expansive or soft soils.
- It designs longer spans in elevated members like floors or beams
- In parking, slots were heavy reinforced thick concrete slabs.
- In bridge decks used slabs allows bridges to span longer lengths without the need to have extra piers or supports.
Advantages
Lower long-term costs
when maintenance requirement is less anyone can save on long-term costs. Then the customer can enjoy some energy savings and the opportunity to earn LEED credits.
Structural Durability
PT slabs show reduced cracking, improved durability, and reduced maintenance costs.
Since they won’t deflect their loading so the immediate hairline cracking is no more observed that otherwise looks odd.
Their bending can be controlled by changing the amount of post-tensioning to balance any portion of the given loads immediately after the given stress.
Fast Construction
when reducing rebar allows for saving considerable time that is otherwise taken up by rebar fixing. The same strands are true with formwork and rebar pouring.
Architectural Benefits
The pt slab has advantages over others as it makes a very efficient base for floor design with thin slabs and columnless spaces in larger spans. It gives architects the independence to work freely with the building’s slab designs.
Reduced Dead Weight
when the pt slabs have a lesser thickness, the quantity of concrete and reinforcement used in the building is reduced by up to 20 to 30% when compared to conventional concrete slabs.
Popularity
because of the benefits, the popularity of pt slabs has skyrocketed for years. The demand for PT slabs throughout all countries continues to increase because of some of the profitable benefits for developers, architects, engineers, contractors, and customers of using buildings.
Improved Performance
The pt slabs are ideal for structures where customers need improved seismic behavior, less vibration, and deflection and crack control. These are perfect for watertight and flexibility in building flooring.
Commercial Real Estate
the post-tensions results in thinner concrete slabs, making the valuable savings in floor-to-floor height available as additional floors. It can provide some extra space within the same overall building height for use as rentable.
Material Saving
while saving the PT slab using a thinner concrete slab. There is substantial material saving. These reduce overall 20% and reinforcement by as much as 75%.
Certification
There are only two groups that offer certification related to PT construction:
PT Institute
PTI has a certification license for manufacturing plants and their parts (level 1 and level 2)
Ironworkers Union
it is introduced by JimRogersand has evaluation and certification licenses also he is the publisher of PT magazine.
FAQs:
What do you mean by Post Tensioning Slab?
Post–tensioning is a method of reinforcing concrete in a slab and beam also. Post-tensioning is a form of prestressing.
What are the advantages of the Post Tension slab Method?
1. Lower long-term costs
2. Structural Durability
3. Fast Construction
4. Architectural Benefits
5. Popularity
6. Improved Performance
What is the Principle of PT Slab?
Concrete has high compressive strength and steel has high tensile strength when combined it is used to bear loads, and the efficiency increases manifold.
]]>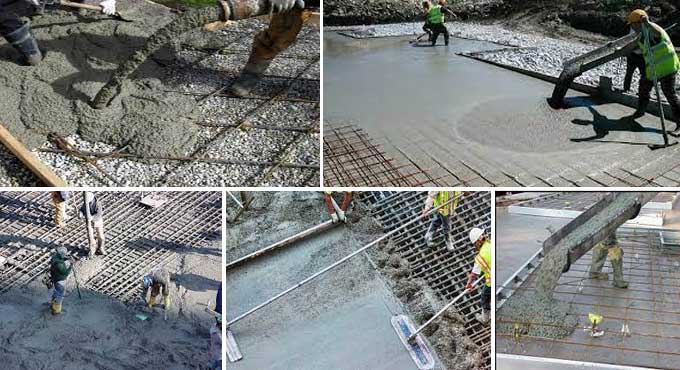
Table of Contents
- A. Concrete Placing
- 1. Avoiding Segregation
- 2. Aiding Compaction
- B. Precautions of Concrete Placing
In this article, we will discuss concrete placing.
Concrete placing may be defined as the process of pouring concrete into the formwork to have a defined shape and size.
Concrete placement is an essential process in construction that defines the success of the structure and its life. Technical and environmental needs are carried into tough care while setting the concrete.
A. Concrete Placing
Here are 2 things you need to take care of while concrete placing listed below:
1. Avoiding Segregation
The considerable practices for ignoring segregation at the time of placing concrete, in any element, are:
a. Concrete must be positioned vertically and closely as much as feasible to its final position.
b. It should not be completed to flow into position. Where concrete must be transported it must be shoveled into the final position.
Other techniques for neglecting segregation at the time of placing rely on the type of element being created and on the type of distribution equipment being employed.
For concrete placing of flat work and slabs incorporating ribs and beams (i.e. shallow forms), the techniques shown below should be considered.
For concrete placing of walls and columns (i.e. deep, narrow forms), problems arise when the concrete is poured from a height and bounces off the reinforcement and forms faces, outcoming in segregation.
The means of evading this vary with the type of distribution equipment being employed as shown in the figure below.
2. Aiding Compaction
To assist in subsequent compaction of the concrete, care should be carried to place concrete in layers that are of a suitable depth for the compaction gear.
Layers that are too deep make it virtually unfeasible to sufficiently compact the concrete, leaving entrapped air that will make voids and blow holes in the surface of the concrete, and prevent it from achieving its potential durability and strength.
The two main types of compaction equipment are immersion (poker) vibrators and vibrating-beam screeds. The effective radius of action of an immersion vibrator relies on its frequency and amplitude.
The standard sizes available in normal concrete construction work include a radius of action between 200 and 350 mm. This means, in practice, concrete should be positioned in uniform layers varying from 250 to 400 mm, relying on the vibrator employed.
To ensure each layer is correctly melded together, the vibrator should penetrate about 150 mm into the lower layer as shown in the figure below.
B. Precautions of Concrete Placing
The precautions that need to be carried out during concrete placing are as follows:
1. During placing, it should be observed that all edges and corners of the concrete surface stay unbroken, sharp, and straight in line.
2. As far as possible, the concrete should be set in a single thickness. In the case of deep sections, the concrete should be placed in successive horizontal layers and proper care should be carried out to develop sufficient bonds between successive layers.
3. It is hoped to prepare concrete as near as practicable to its conclusive position.
4. Large quantities of concrete should not be deposited at a time. Otherwise, the concrete will start to flow along the formwork and consequently, the resulting concrete will not have uniform composition.
5. The concrete must be poured vertically from a proper height. For vertical laying of concrete, care must be carried to employ a stiff mix.
Otherwise, the bleeding of concrete through cracks in forms will occur. The term bleeding is employed to convey the diffusion or running of concrete through formwork.
6. The placing of concrete should be carried out uninterrupted between predetermined construction joints.
7. The concrete should be deposited in horizontal layers of about 150 mm in height. For mass concrete, the layers may be 400 mm to 500 mm in height.
The collection of surplus water in upper layers is known as the laitance and it should be controlled by employing shallow layers with a stiff mix or by placing dry batches of concrete to soak the surplus water.
8. The concrete should be simply worked around the reinforcement and tapped in such a way that no honeycombed surface occurs on the disposal of the formwork. The term honeycomb is employed to indicate a comb or mass of waxy cells initiated by bees in which they hold their honey.
Hence, if this precaution is not considered, the concrete surface so formed would have a honeycomb-like surface.
9. The concrete should be positioned on the formwork as soon as possible. But in no case, it should be positioned after 30 minutes of its preparation.
10. The formwork or the surface which is to obtain fresh concrete should be adequately cleaned, prepared and well watered.
]]>